• I want to thank all the members that have upgraded your accounts. I truly appreciate your support of the site monetarily. Supporting the site keeps this site up and running as a lot of work daily goes on behind the scenes. Click to Support Signs101 ...

How do you create a curve of a known shape and size in Illustrator?

williaty

New Member
How do you create a curve who's dimensions you know in Illustrator? Specifically, I have a curve that needs to be 1242mm wide with 96mm of drop in the center. How do I create a path that does that while remaining smooth and continuously curved?

Just freehanding it with the pen tool risks creating an asymmetric curve. Putting a 3rd anchor point in the center at the drop just risks coming up with a curve of inconstant curvature.
 

iSign

New Member
oh, the words "of drop in the middle" through me off, but now I get it...

so, if you made a box that size for reference, and then lock it...

...with a vertical guideline in the center, you could start a line in the upper corner of the reference box, then add a node in the center of the bottom of the "box", but click-dragging as you create that node, holding the shift key & dragging a perfectly horizontal line, watching for a curve that looks to leave a nice smooth transition to level at the bottom... then click your last node in the upper corner & the right side with have the same curve as the left... and the two bezier handles will allow tweaking that tangent transition as needed.
 

williaty

New Member
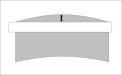
would one forth of an oval, with those dimensions doubled do the trick?
Had to think about this one for a minute. Turns out this is WAY more complicated than I thought and there's probably no universally right way to do this. However, due to the math behind it, no, I don't think so. Had to hit some 8th grade geometry for this one. Assuming the surface I'm applying to is roughly conic (it's rear window glass, for reference), a cross section parallel to the ground is going to be a circle, not an ellipse. The "level line" I want to end up with my text following when installed is effectively a cross section parallel to the ground. Now, if I tried to do anything with a path defined as a portion of an ellipse and then applied it to a cone, the result wouldn't be right because the radius of the curvature would change along the length. On the other hand, if the glass surface is actually a tilted cylinder, then a cross section parallel to the ground actually is an ellipse and that's the right thing to use. So, it really depends on what the exact shape of the surface really is.

To compensate for this, I could paper app tape the area over which I intend to apply the lettering and then use a laser line projector to throw a level line across the surface. Then remove the app tape and apply it to something planar. If I photograph the result from the normal of the plane, that then gives me the planar projection of the curved surface, which I could trace in Illustrator to create a path along which to flow the text. However, that's a bloody lot of work to do for each car that comes in.

I have a feeling assuming that the glass is a portion of the surface of a cone and that therefore the level line is a circle is probably a sufficiently good approximation of the truth for visual work. The question still remains, though of how to pull that off in Illustrator.

However, thinking that through allows me to refine my question: How do you create a segment of a circle that passes through three known points (left edge, right edge, and drop point) in Illustrator?
 

Custom_Grafx

New Member
I'm sure there is a mathematical formula for this, but for your example, your segment needs a circle of 4090mm diameter.
 

Custom_Grafx

New Member
1 - Draw a rectangle - in this case 1242mm x 96mm
2 - Draw a circle - any size, and align it to the top centre of the above rectangle.
3 - Select the circle, and change your anchor to top centre.
4 - Constrain proportions, and enlarge your circle till you see the perimeter intersect with the corner of your rectangle.
 

williaty

New Member
1 - Draw a rectangle - in this case 1242mm x 96mm
2 - Draw a circle - any size, and align it to the top centre of the above rectangle.
3 - Select the circle, and change your anchor to top centre.
4 - Constrain proportions, and enlarge your circle till you see the perimeter intersect with the corner of your rectangle.
OK, I couldn't figure out how to change the anchor (which I'd like to be able to do) but I found a similar method:

1) Use a Guide to establish the left-right center of the work area
2) Use a Guide to establish the "top" of the arc (basically, the left and right corner).
3) Use a Guide spaced your "Drop" amount below the guide established in Step 2
4) Create a circle centered at the intersection of the top horizontal guide and the vertical guide.
5) Expand the circle around its center until the circle intersects the intersection of the bottom horizontal guide and the vertical guide.
6) Now grab the top-center transform handle of the circle and pull out (by using the top center handle, the bottom of the arc will stay where you need it to) until the circle intersects the top horizontal line at the edges of the work.
7) Use the Scissors tool to isolate just the portion of the circle you need.
 

Custom_Grafx

New Member
I would keep the formula handy if I were you... not too hard to do... hard to remember though.

You change the anchor here... see pic.
 

Attachments

  • anchor.jpg
    anchor.jpg
    13 KB · Views: 79

williaty

New Member
Yeah, that's much better. Set up guides, create circle, move circle to touch bottom guide, move anchor point of the circle to the bottom, type in 4000 :lol:


Thanks for the help!
 

Custom_Grafx

New Member
No worries.

By the way, there is a tool in Corel called the 3 point curve tool which let's you do all that in only a couple of clicks...
 

GAC05

Quit buggin' me
Corel would come in handy if you have a copy.
X4 and X5 have a 3 point arc too.
You can do it with X3 and earlier without the 3pt arc - just a few extra steps.
(still less than what you are doing in AI)

wayne k
guam usa
 

signmeup

New Member
Windshields are neither cones nor sections of cylinders. They are free-form curves. You'll go bonkers trying to figure out a formula for that. I just throw a long strip of paper across the windshield and measure the gap at the top. This is the amount to curve the graphic. You can take more measurements along the windshield if it's a really odd curve.
 

Attachments

  • WindshieldPattern.jpg
    WindshieldPattern.jpg
    9.3 KB · Views: 87
Top