Hey guys, first off merry christmas to everyone in this great community!
I just got my first machine, a HP Latex 110, that oddly enough has a 310 label on it but flashes the 110 firmware.
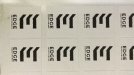
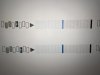
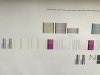
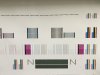
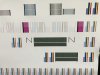
Anyways besides that, I've been having problems with prints, the last rows always come out with an error, a small little detail that makes the ink look like they had been slightly rubbed or to put it another way it is like the printheads "spray" a little ink right at the end.
I am attaching photos that show the last column and the one next to it.
This happens no matter where I am printing on the roll, always at the end of it, the last portion of the print.
So far I've mostly printed tests, labels and stickers, so it'll always show at the last column of the group. It'll happen regardless of where the printheads print the last part of the graphic, I am using 54" rolls, it won't matter if the graphic ends at 50, 40, 30, etc.
The technicians have looked into it and haven't figured it out yet, it has been over a week now, and they decided to call HP just now, so I figured I'd ask here see if anyone else has had this problem or knows a way to solve it, since it'll probably take longer than expected with the technicians.
We've tried aligning the printheads, optimizing print quality, we've tried with different materials, we've double checked that the materials are in the right position before printing (they look fine, we first thought that one side could've gotten up a little bit), the technicians adjusted temperature too and other stuff, the metal holders too.
Any input is very appreciated, thanks!
On another note, we are using Flexi and we've also had problems with prints being centered, i.e right and left margins are never the same, we can tell by the cut marks, and when we try increasing the margins (evenly) with Flexi the machine will print a bigger margin on one side and decrease it on the other, to the point that cut marks get printed right at the edge of the material, makes absolutely no sense.
I just got my first machine, a HP Latex 110, that oddly enough has a 310 label on it but flashes the 110 firmware.
Anyways besides that, I've been having problems with prints, the last rows always come out with an error, a small little detail that makes the ink look like they had been slightly rubbed or to put it another way it is like the printheads "spray" a little ink right at the end.
I am attaching photos that show the last column and the one next to it.
This happens no matter where I am printing on the roll, always at the end of it, the last portion of the print.
So far I've mostly printed tests, labels and stickers, so it'll always show at the last column of the group. It'll happen regardless of where the printheads print the last part of the graphic, I am using 54" rolls, it won't matter if the graphic ends at 50, 40, 30, etc.
The technicians have looked into it and haven't figured it out yet, it has been over a week now, and they decided to call HP just now, so I figured I'd ask here see if anyone else has had this problem or knows a way to solve it, since it'll probably take longer than expected with the technicians.
We've tried aligning the printheads, optimizing print quality, we've tried with different materials, we've double checked that the materials are in the right position before printing (they look fine, we first thought that one side could've gotten up a little bit), the technicians adjusted temperature too and other stuff, the metal holders too.
Any input is very appreciated, thanks!
On another note, we are using Flexi and we've also had problems with prints being centered, i.e right and left margins are never the same, we can tell by the cut marks, and when we try increasing the margins (evenly) with Flexi the machine will print a bigger margin on one side and decrease it on the other, to the point that cut marks get printed right at the edge of the material, makes absolutely no sense.