Mosh
New Member

recently installed Oracal 651 vinyl on some storefront windows
They plan on not being open in 5 years????
recently installed Oracal 651 vinyl on some storefront windows
I love it when people tell me the way I've been doing for 20+ years is wrong and I need to be in another business.
As long as the end result is the same, what's the difference?
They plan on not being open in 5 years????

Have to agree with everyone else here. If you can't apply at least a 4'x8' sheet, dry, by yourself, you're in the wrong business.

Looking for tips to install large (54˝ x 36˝) calendared vinyl graphics, bubble/wrinkle-free, on windows. Sometimes I'm without an assistant (it ain't that easy, even then). I usually peel back the first inch or so of backing, adhere that (dry), and peel the rest of the backing about a foot at a time and soak the material and window, burnishing as we go.
The assistant is holding the material up while I squirt/peel/burnish. Even with help, I've still gotten some wrinkles— especially at the end. Tips for doing this solo, or even a better job with help, much appreciated.
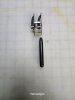
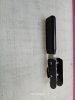
Buy this tool (double blade vinyl backing cutter) - cuts a piece about 5/8"out of the backer. No more worries.Recommendations for hinging on a window where the graphic is edge to edge on the glass, but the glass is inset in the frame (so any material for bleed will get caught up on the frame at the edge and complicate the application). Also, to hinge long vertical panels where the window is inset, is not possible as there is no glass to apply your hinge. Thanks!
Oracal actually recommends a teaspoon of detergent (Dawn) per quart of water. Been using it for twenty plus years: works fine, saves a bunch on Rapid Tac.If your nervous just wet apply, using rapid tac 2
Thanks! Been using something similar, just curious if there were any secrets out there I was missing! Actually yesterday I installed a 7' wide x 10' tall window printed on HP Polymeric Matte Overlam (3mil) unlamented. I used masking for the top 12" of the graphic to stiffen it up, slit the back, removed the top 2" and started with that. With a 10' tall graphic, the bleed needed for any misalignment on the outside edge interfering with the frame still causes issues when applying to the glass.Buy this tool (double blade vinyl backing cutter) - cuts a piece about 5/8"out of the backer. No more worries.
what vinyl you are using?, to do that, without lamination and "premask" I use a thicker vinyl, that's all, the thickness helps a lot, I use a latex printer and Oracal 3258, easy to install, I have done big decals on walls, by the way, to hold it, I tape a metal ruler a few inches down from the top, and then stick it with magnets. the same I do when installing perforated windows. I never use wet apply, only for frosted vinyl.Looking for tips to install large (54˝ x 36˝) calendared vinyl graphics, bubble/wrinkle-free, on windows. Sometimes I'm without an assistant (it ain't that easy, even then). I usually peel back the first inch or so of backing, adhere that (dry), and peel the rest of the backing about a foot at a time and soak the material and window, burnishing as we go.
The assistant is holding the material up while I squirt/peel/burnish. Even with help, I've still gotten some wrinkles— especially at the end. Tips for doing this solo, or even a better job with help, much appreciated.