• I want to thank all the members that have upgraded your accounts. I truly appreciate your support of the site monetarily. Supporting the site keeps this site up and running as a lot of work daily goes on behind the scenes. Click to Support Signs101 ...

JFX200-2513 Colour layer is sticky

Dacsi

New Member
Hi guys,
We're starting a new project and we had a complaint about the prints being sticky/tacky(on acrylic), so I've been researching the problem.
We print wooden signs with colour layer only on white lacquered MDF and after taking them off of the printer they really feel a bit sticky(same as the acrylic).
Obviously, if I leave them for a day they feel less sticky but they are still not as smooth as I'd like. We use a Mimaki JFX200-2513 with LUS-120 inks.

If tried to put a clear layer (matt and glossy as well) on top of the colour layer but I still feel stickiness.

I would appreciate some direction where should I start from regarding this.

I've tried to look for a solution on this forum, went trough a 50-60 treads about the JFX but couldn't find a similar problem so now I'm creating this thread and hopefully someone will be able to help me out.
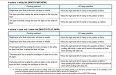
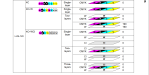
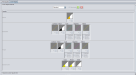
Would you guys recommend changing the density on the attached tab? I'm not sure which one I'd need to change though.

I'm using the production quality (600x600) for most of our products with Uni-directional printing and Normal speed (as I need to keep further away from the media and this is how the quality looks good) with the manual UV Mode being on 12.
Any help appreciated.
 

Attachments

  • density.png
    density.png
    37.4 KB · Views: 128
Last edited:

Solventinkjet

DIY Printer Fixing Guide
Take a look at this chart. It will tell you where to position the lamps depending on how many layers and in which order they are. This chart is specifically for the LUS 120 inks. That should help cure the inks properly. It's one of those things they don't teach you in training so I see a lot of people who don't know about it.
 

Attachments

  • Chart.jpg
    Chart.jpg
    260 KB · Views: 53

Adam Vreeke

Knows just enough to get in a lot of trouble..
First of all I would check the lamp position, and make sure they are in the correct position.

Also check the state your glass lenses are in the are over the UV lamps. If they are foggy they are not curing properly. You can take a screwdriver and loosen the screws around the lamps, they will drop down and you can slide them out. On a HARD FLAT surface you can put alcohol on them and scrape them off with a razer blade. DO NOT do it on a soft surface like foam, you will highly increase your chances of cracking the glass (ask how I know that one!).

Check your lamp luminosity make sure its at 100%

If none of the above work you can also increase you're pass count. It increases printing time, but also increases curing time.
 

Dacsi

New Member
Take a look at this chart. It will tell you where to position the lamps depending on how many layers and in which order they are. This chart is specifically for the LUS 120 inks. That should help cure the inks properly. It's one of those things they don't teach you in training so I see a lot of people who don't know about it.
Yes, I always move the UV heads when I print white and colour(this is the only time I need to change them after reading the manual), otherwise they stay at 0,0.
When I print colour layer only they should be in 0,0 and when I move the lamps the stickiness is even worse, unfortunately.
 

Dacsi

New Member
First of all I would check the lamp position, and make sure they are in the correct position.

Also check the state your glass lenses are in the are over the UV lamps. If they are foggy they are not curing properly. You can take a screwdriver and loosen the screws around the lamps, they will drop down and you can slide them out. On a HARD FLAT surface you can put alcohol on them and scrape them off with a razer blade. DO NOT do it on a soft surface like foam, you will highly increase your chances of cracking the glass (ask how I know that one!).

Check your lamp luminosity make sure its at 100%

If none of the above work you can also increase you're pass count. It increases printing time, but also increases curing time.
The lamp is on correct position at 0,0 unfortunately.

Yes, I do clean the glass in every couple of weeks, so that's also not the problem.

This is probably a very stupid question but how can I check the lamp luminosity?
 

Adam Vreeke

Knows just enough to get in a lot of trouble..
In Properties Tab > Job Attribute (drop down menu), next to it is 'SETUP' button. Click 'SETUP' and it should pop right up (Profile Setting).

I have never messed with it, just know its there. May want into look at that option a little more or see what Solventinkjet says.
 

Dacsi

New Member
In Properties Tab > Job Attribute (drop down menu), next to it is 'SETUP' button. Click 'SETUP' and it should pop right up (Profile Setting).

I have never messed with it, just know its there. May want into look at that option a little more or see what Solventinkjet says.
Thank you. Yes, that is on 100% as well. Never changed it to be honest.
I've only messed around with the UV mode settings at the beginning when we got the machine(we had problems with ink curing) and I've been using 12 since then.
After reading many things on this forum I was thinking I might be over curing and tried to lower the Uv mode but didn't solve the problem, unfortunately.
 

Dacsi

New Member
This is the lamp position chart I've been using from the beginning. I was told on the training to only change the lamps when I print white+colour layers, so that's what I've been doing.
Have I been doing incorrectly?
 

Attachments

  • lamp_position.png
    lamp_position.png
    89.4 KB · Views: 43

Adam Vreeke

Knows just enough to get in a lot of trouble..
According to my chart, that is correct. I run LH-100 so I use different positions.
 
Top