I had the problem, that my L25500 didn't accept the printhead 3! I thought, updating the firmware to the newest release will help! After I did that, a failure 86:01 showed up in the initialization routine for the carriage. The carriage moves shortly to right and the starting process stops.
I checked the system with implemented analysis software, changed the carriage board and checked the contacts on the board to the encoder sensor. Nothing changed!!
Does anyone has experience with this symptoms?
Solve Media Jam Error 86:01 ( This method is suitable for HP L25500, L26500, L260 or may be other model & barnd.) Theory will be same I think.
If you have replaced belt or encoder strip or encoder sensor and getting media jam error 86:01 or any other kind of error please follow steps.
Hardware side.
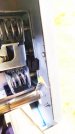
1) Check encoder strip is installed properly and it is not touching in carriage from any sides. It must must must be straight. Check the gap on top & bottom from right and left side of carriage.
2) Check encoder strip gap right side of carriage when carriage at far right next to keyboard.
3) Check encoder strip gap left side of carriage when carriage at far left side next to ink station.
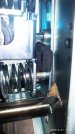
4) Check carriage movement & well lubricate rails. It must be smooth & no obstacle or no grinding noise.
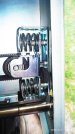
5) Check belt must be moving smoothly on pully on both sides.
6) Belt must not too tight or too lose. This point is very important.
7) Old type encoder strip has metal on top & bottom. Sensor is longer in old type encoder strip.
8) New type printer has different encoder strip. It has metal strip at bottom & short encoder sensor.
9) If you are replacing encoder strip you should replace sensor as per type of encoder strip. Old type or new type.
Software side.
1) Boot printer in diagnostic Service Test Menu. (Refer HP manual)
2) Update latest firmware from Emergency Firmware Update. (Refer HP manual) This will clear all error & we know that firmware side is ok.
3) Check all Electronic Module from Diagnostic mode.
4) Do line sensor test & media jam test.
5) If it pass all test we know that all electronic component is ok.
6) Go to scan axis scan axis test. (Refer HP manual)
You must pass this test to clear media jam error.
1-When you begin this test you will see slight movement in carriage so you know encoder sensor reading encoder strip.
Follow all steps as per HP manual for scan axis test.
My printer was randomly giving me media jam at any stage while doing Scan Axis test. Sometimes it pass Stage 1 some times after stage 3 and so on.
I think it was new belt hard for motor to move fast.
It was doing right bump & left bump ok but when try to scan width it fast movement.
This drama was up to four days & I was keep trying.
Finally found that belt was slightly tight that is what I think.
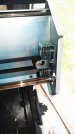
I grab a thick rubber. Just like rubber washer not very soft.
Kids eraser will do job.
Make sure pully plate front part of spring must be slightly back of bottom black stopper. Approximate 5 mm.
I cut small piece of rubber & lift bottom plate of right side pully.
Under the spring as in photo. This way it loose brand new belt slightly.
Hard to notice.
Try different thickness couple of times. I try nearly 10 times then I got success.
Finally I pass Scan Axis test & no more error.
7) From Carriage Menu run Carriage PCA test. If you don’t get any error you win.
This is all hard work & exercise of 2 moths & spending nearly $1000.