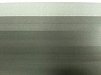
I have been running this CET FK512X for a year now. I still cannot seem to smooth out my banding. So, I have provided photos of each color with the fastest print speed so you can see the density difference between bands.
As you can see from the photos, The first half of the second pass of every color is darker, which shows up as banding after its complete pass. I have been tackling this for months and have got nowhere. It is frustrating to have to slow down my print speed when printing large areas of darker colors, or colors that use all CMYK like grays, tans, and blacks to avoid the uneven coverage.
As you can see from the photos, The first half of the second pass of every color is darker, which shows up as banding after its complete pass. I have been tackling this for months and have got nowhere. It is frustrating to have to slow down my print speed when printing large areas of darker colors, or colors that use all CMYK like grays, tans, and blacks to avoid the uneven coverage.