• I want to thank all the members that have upgraded your accounts. I truly appreciate your support of the site monetarily. Supporting the site keeps this site up and running as a lot of work daily goes on behind the scenes. Click to Support Signs101 ...

Lining up (2) 4x8 Signs with Digital Print

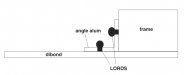
We are producing a 4x16 foot sign. We will be taking 2 4x8 sheets of dibond and lining them up together. My question is, since this will be digitally printed. What is the best way to line them up since they are digital prints.

This will be a custom frame built to hold these signs on a flat room over a store front.

Is it best to make the frame and than the panels mounted to the frame, and afterwards lay the vinyl, using an air release, or can I laminate each half with the print, and cross my fingers and hope they will line up.

Just seeing if anyone can give me a tip to make sure they will line up :) Thanks!
 

The Sign Dude

New Member
I always apply them from the middle out. that way if the graphic stretches at all it doesnt cuase you rpoblems when lining them up. Just my .02
 

Letterbox Mike

New Member
On panels where there is a seam like that, we start by mounting the first 6-12" at the seam end first, and then work to the opposite end of the panel, that way any stretching is away from the seam and not towards it. If you get the print square with the end, you should be able to mount it any old way without worrying about the seam lining up right.
 

AUTO-FX

New Member
Laminate in the shop. Use transfer tape.Good tip on starting from the meeting point. Should line up if frame is as square as the panels, but maybe leave a little wiggle room in the frame dimensions in case you need to shim. this is assuming you are making some kind of overlapping or extruded frame around the perimiter. Again , i dont know what kind of frame you have in mind, just make sure the bottom supporting edge is perfectly level and flat.
 

MikePro

New Member
when I go to tile, I work from the middle>out, but before print I add +3" bleed to the edges of the panels that butt up to each other, so that I can wrap around the edge and down into the seam.
nothing ruins a good mural, than seeing the color of the seam-line cutting up through your print.
 
when I go to tile, I work from the middle>out, but before print I add +3" bleed to the edges of the panels that butt up to each other, so that I can wrap around the edge and down into the seam.
nothing ruins a good mural, than seeing the color of the seam-line cutting up through your print.

Now that's good advice.

I never thought about the middle out thing. I will do this, and post pics when we are done!

The frame will not be visible. I'm trying to see how to blind mound it to the frame without any real visible screws/bolts through the front of it.

Any more suggestions on that?
 

J Hill Designs

New Member
you can add support by using inner angle aluminum clips - drill a hole on each leg, then use the LORDS to attach it to both the dibond and the frame - the LORDS will goop through the hole in the angle, creating a rivet of sorts...

this would be in addition to a full bead attaching the dibond to the frame...
 

Attachments

  • attch.jpg
    attch.jpg
    24.2 KB · Views: 69
Top