• I want to thank all the members that have upgraded your accounts. I truly appreciate your support of the site monetarily. Supporting the site keeps this site up and running as a lot of work daily goes on behind the scenes. Click to Support Signs101 ...

Looking for PVC or ACM Brushed aluminum faced board for routing

SignBoi

New Member
Hello,
Looking for an alternative to what I've been using for a couple of years.
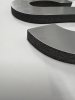
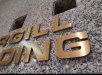
I think it is Ultraboard with a brushed aluminum face laminated together.
My issue with the Ultraboard is that is is a foam core. When I route letters there is noticeable cleanup time that eats at profit.
When I route it (and lightly cut into my spoil board) the foam traps sawdust near the bottom edge of the letter. (air compressor helps remove this but it is not perfect.)
I then use a Brillo pad and fine grit sandpaper to make sure my edges are clean.

I have also used brushed 3M1080 wrap vinyl to cover PVC before routing in the past as well with decent results.
When I look at my current 2080 3M sample book the brushed aluminum has a dull/satin finish.

Anyone know of a better substrate or ideas on how I can improve my production?
Thanks!
PXL_20250224_184436220.jpg
PXL_20250224_184456306.jpg
 

MikePro

Active Member
we just buy ChemMetal laminate and laminate our own materials with contact cement.
huge fan of acrylic as the base material, as the finish is much cleaner by comparison to PVC.

I usually route my lettering face-down, which allows me to add stud holes to the backside, but also keeps my upcut bits from delaminating the material. I also include a rough-pass about .030" offset from the final shape to allow room for the chips to flow-out on the final cut.
....and edited to add: for the love of god, get some 1/8" bits for the final cuts! I roughcut with 3/16"-1/4" bits, but just gotttta do the final cuts with a smaller bit on detailed projects.
you can even add more "detail" smaller letters with a file. concentrating on detailing the face, but angling towards the back to save some sanity.
I also add a little extra "touch" by filet'ing outer corners to ~.015-.030". still sharp, but not SHARP if you ever had to put fingers/scotchbrite on them. my hands reveal a history of handling that freshly-cut .030"aluminum without gloves.
 
Last edited:

JBurton

Signtologist
Your drops look cleaner than your letters, have you tried reversing the direction of travel before cutting?
Also, +1 for Mike's suggestion to cut upside down and add stud marks, up arrows, job numbers, what have you. IDK about contact cement, I'm more opt to use 3m 467mp.
There's also some acm with brushed finish, but it's kind of an insult to brushed vinyl to install on such a cheap panel.
Last thing, you're running the bit too fast on the travel side, or the acceleration is too high. Those non straight areas on the R are made from the bit bending when it changes direction, it's called deflection. You could either cut through the top layer with a shorter bit, then finish up with the longer bit, or just slow it down some.
1740439399815.png
 

Grizzly

It’s all about your print!
We use UltraAluminum regularly to cut letters like you do.
I can get perfect cuts on mine. I agree with JBurton, it looks like you need to reverse the direction.
My only issue is if the bit isn't really sharp sometimes the bottom styrene doesn't cut well.
I also save a bit only for this product so I don't have to worry about any cleanup.
This is straight of the router, no cleanup. I also put a .03 radius on all corners. I think that helps the corners be a little cleaner.
 

Attachments

  • IMG_3773.jpg
    IMG_3773.jpg
    1.3 MB · Views: 50

SignBoi

New Member
Thank you all for the info! I am self taught with the routing and appreciate all of the feedback!
I will be purchasing an 1/8" finish bit today. We have a Laguna smart shop with automatic tool changer so I'll keep the finish bit in one of the extra spindles.
It depends on the job whether I route face up or face down. For the examples above I route a styrene template and just rest the dimensional letters in it and VHB to the wall.
If it is stud mounted I always route face down and copy my stud holes to my styrene template. I haven't been brave enough to try double sided routing using indexing pegs or similar.
Any recommendations for Travel speed? Or a website showing examples?

Thanks again!
 

White Haus

Not a Newbie
we just buy ChemMetal laminate and laminate our own materials with contact cement.
huge fan of acrylic as the base material, as the finish is much cleaner by comparison to PVC.

I usually route my lettering face-down, which allows me to add stud holes to the backside, but also keeps my upcut bits from delaminating the material. I also include a rough-pass about .030" offset from the final shape to allow room for the chips to flow-out on the final cut.
....and edited to add: for the love of god, get some 1/8" bits for the final cuts! I roughcut with 3/16"-1/4" bits, but just gotttta do the final cuts with a smaller bit on detailed projects.
you can even add more "detail" smaller letters with a file. concentrating on detailing the face, but angling towards the back to save some sanity.
I also add a little extra "touch" by filet'ing outer corners to ~.015-.030". still sharp, but not SHARP if you ever had to put fingers/scotchbrite on them. my hands reveal a history of handling that freshly-cut .030"aluminum without gloves.

There's gold in them hills! Super helpful tips in there Mike.

You ever paint the returns after? Don't mean to derail this thread but I'm in the middle of doing some figuring myself on a somewhat related project. We're laser cutting 3/8" acrylic letters that will have a brushed gold polyester applied to the faces. The idea will be to spray the returns (paint type TBD) so that the finished product simulates brushed brass letters, which Gemini couldn't turn around fast enough for a critical deadline.
 

Grizzly

It’s all about your print!
Thank you all for the info! I am self taught with the routing and appreciate all of the feedback!
I will be purchasing an 1/8" finish bit today. We have a Laguna smart shop with automatic tool changer so I'll keep the finish bit in one of the extra spindles.
It depends on the job whether I route face up or face down. For the examples above I route a styrene template and just rest the dimensional letters in it and VHB to the wall.
If it is stud mounted I always route face down and copy my stud holes to my styrene template. I haven't been brave enough to try double sided routing using indexing pegs or similar.
Any recommendations for Travel speed? Or a website showing examples?

Thanks again!
Another tip as well, I like to use a minimum of a 4mm bit, ideally 6mm if the letters are larger. The vacuum cleanup is better with a larger bit and then we don't have to clean with air when we're done.
 

MikePro

Active Member
There's gold in them hills! Super helpful tips in there Mike.

You ever paint the returns after? Don't mean to derail this thread but I'm in the middle of doing some figuring myself on a somewhat related project. We're laser cutting 3/8" acrylic letters that will have a brushed gold polyester applied to the faces. The idea will be to spray the returns (paint type TBD) so that the finished product simulates brushed brass letters, which Gemini couldn't turn around fast enough for a critical deadline.
yes and no.
ideally I'd just let the basematerial be what it is to save time & cost to client, but with PVC you pretty much have to paint it or black will turn grey and white will turn brown with exposure to elements.
interior, doesn't really matter, but ultimately acrylic is still muuuuch nicer.
even if cost of materials may differ, I'd like to think that it is still comparable with less physical labor to "polish the turd" that is closed cell PVC.

if you DO have to paint returns, however, I save a step by pre-applying a sheet of paintmask to the face before adding a couple layers of transfermask & cutting out the letters face-down to keep the routerbit from lifting the mask.
then the paintmask to protect the laminate is already applied and the rest is just prime&paint.
uncertain how this applies to laser cutting, however. my knowledge of cuttable materials in this realm is limited, but I remember hearing that lasercutting vinyl isn't friendly to the machine.
 

JBurton

Signtologist
Any recommendations for Travel speed? Or a website showing examples?
In my experience, you'll find plenty of tables, but your machine is your machine, and you'd ought to test some materials and reckon your own values. You may find that you can cut 3/4" acrylic in one pass at 100ipm, but it's so loud that it's intolerable. There's also a host of different bits that will behave differently, different drives on the tables, different hold down methods. In my early days, I had an old Hartlauer catalogue page that I referenced, but it only had a handful of recommended speeds, everything else was handwritten by the guy before me.
Holler at Laguna and see if there is a way to reduce acceleration, it pays off more than reducing overall speed on something like this. If not, try reducing the speed 10ipm and cutting the same shape repeatedly until you have a perfect one, then increase the speed until you have an acceptable part.

the finished product simulates brushed brass letters
Mount the film to front and back of a piece of clear? I mean, it wouldn't look like brushed brass 100% with the high gloss edges, but it would give an interesting look. That or mount mirror finish to the back, gold over the face, and enjoy the reflections from different angles.
 

White Haus

Not a Newbie
In my experience, you'll find plenty of tables, but your machine is your machine, and you'd ought to test some materials and reckon your own values. You may find that you can cut 3/4" acrylic in one pass at 100ipm, but it's so loud that it's intolerable. There's also a host of different bits that will behave differently, different drives on the tables, different hold down methods. In my early days, I had an old Hartlauer catalogue page that I referenced, but it only had a handful of recommended speeds, everything else was handwritten by the guy before me.
Holler at Laguna and see if there is a way to reduce acceleration, it pays off more than reducing overall speed on something like this. If not, try reducing the speed 10ipm and cutting the same shape repeatedly until you have a perfect one, then increase the speed until you have an acceptable part.


Mount the film to front and back of a piece of clear? I mean, it wouldn't look like brushed brass 100% with the high gloss edges, but it would give an interesting look. That or mount mirror finish to the back, gold over the face, and enjoy the reflections from different angles.
Laguna makes some badass tools. I almost went with them when we bought our 130W laser a month ago but we opted to go with a local company. I was also worried that I'd end up buying a couple of machines that we don't need/can't afford.

I just spent all day playing with the laser, got it to cut brushed gold polyester on 3/8" clear acrylic in one pass. Not perfect, but happy with the progress. (see attached) I love the look of it on the back but worried about VHB / mounting. These will be 6" letters so maybe weight/VHB pulling won't be concern, especially with a polyester, but I've seen it pull vinyl too many times to risk it.

Definitely not an exact replica to brushed brass, which customer originally wanted. One of our previous (Gemini) jobs for reference. We're also going to play with spraying and adding a brushed texture to the face, so then there is no color matching concerns between face and returns, and we can get more of a gold color than the yellow-ish film.
 

Attachments

  • BrushedGold.jpg
    BrushedGold.jpg
    1.1 MB · Views: 38
  • Cargill_Brushed brass.jpeg
    Cargill_Brushed brass.jpeg
    262.4 KB · Views: 37

MikePro

Active Member
one of the coolest things i've ever done to laminated lettering, is use doming epoxy on the finished face.
holy cow does it make the metallics POP!

wish I had a pic to showcase, but it was just me tinkering in the shop on a project for a friend.
 

guillermo

New Member
Hi, can anyone tell me what this material is called? I have some small 4x8 inches small boards to print, but I do not know where I can find this material.
With the name, I can look for it where I live.

Thanks.
 

JBurton

Signtologist
Hi, can anyone tell me what this material is called? I have some small 4x8 inches small boards to print, but I do not know where I can find this material.
With the name, I can look for it where I live.

Thanks.
Plenty of other companies doing the same thing I'm sure, but these folks are based out of Arkansas, got big by doing tons of walmart work.
 

guillermo

New Member
Plenty of other companies doing the same thing I'm sure, but these folks are based out of Arkansas, got big by doing tons of walmart work.
Thank you JBurton.

I will check that company.
 
Top