• I want to thank all the members that have upgraded your accounts. I truly appreciate your support of the site monetarily. Supporting the site keeps this site up and running as a lot of work daily goes on behind the scenes. Click to Support Signs101 ...

Material and install recommendation

Stacey K

I like making signs
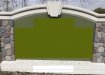
New business would like old letters from previous business removed from this sign and a new signboard cut and placed with their logo. I do not manufacture this type of sign with stones, not sure what it is. The green seemed almost spongey to me when I pressed on it. The letters are currently glued, not screwed into place.

Would ACM work for this and can I screw into this or should it be glued in place? I would like to make a template and cut the signboard so it fits nicely around the top area. Thank you!
 

Attachments

  • Capture.JPG
    Capture.JPG
    105.9 KB · Views: 292

Gino

Premium Subscriber
What's the overall size including the arch to the top.... of the green portion..
 

Jean Shimp

New Member
That looks like a hard coated eps foam sign. Do not try to screw into it. If you pull off the glued letters without breaking the hard coating over the foam you should be able to glue on a new lightweight face if the new face is small enough, maybe 2'x2'. Getting off the old adhesive from the existing letters will be difficult. These types of jobs are easy to lose money on.
 

rjssigns

Active Member
ACM should work fine. Probably Lexel and mechanical fasteners so you don't have to worry about high winds "air freighting" the panels.
 

Gino

Premium Subscriber
Not sure what your sponge background is, but you will hafta figure that out, so you can secure the new substrate to it or some buried backer in there.

For me, the look of the stones and cement, I would not use ACM. In no time at all, it's gonna streak and chalk out. At that size, I'd probably use a good piece of cedar or redwood and either sandblast or carve it and make it elegant. If they don't have the budget, then offer up some cutout letters on just about anything, but not ACM, unless you're gonna wrap it, but then again, you have a permanent sign, that's only gonna last 4 years. The other stuff will last 15 years and maybe need a cleaning every so often.
 

rossmosh

New Member
It's something like a Peachtree City Foamcraft Sign.

Home Depot sells 3/4"x 4ft x 8ft PVC panels with a wood grain imprinted in it for $99. Probably one of the better choices for a job like this.

I'd go with glue and screws to hold it down.
 

Stacey K

I like making signs
Whatever substrate, hand pattern and hand cut, or at least hand pattern and then do an endless number of patterns until it is nearly perfect. It's hard to figure out how much of a curve a designer randomly threw on this sort of panel, and everytime we have done it the curves match poorly. We have done this before with 090 aluminum with studs popped on the back, siliconed in place. Since it's recessed, there is almost no windload, but a healthy serving of silicone is never frowned upon. (Or lexel, everybody here loves that stuff)
Thank you! What do you mean by "studs popped on back". Are you saying that this method would be screwless and held on with just the silicone/lexel?
 

visual800

Active Member
Ive covered quite a few of those up over the years I usually use .032 or .040 aluminum (acm would also be fine) when you finish the panels you can lay it horizontally and silicone all letter to it Easy! I always just silicone my panels onto the structure using Gorilla tape or a couple screws that are placed discreetly
 

Stacey K

I like making signs
Yup. We have a "stud gun" that you attach a ground to the panel and the gun onto the metal and POP, it welds a threaded stud (or a female threaded stud) onto the metal panel. Studs are limited in length, so in this case I would pop a female stud, .75" tall for a 1/4" piece of all thread. Then once on site, I would drill the holes and decide how long to cut the all thread, thread it in, then bend them slightly in opposing directions so it doesn't want to fall right off, coat the back in silicone, and force it in the holes.
It's really a fantastic addition to a welding shop, but if you do not have the capability in the first place, you can achieve a similar effect with glue and pads, just not as flush necessarily. Here's a picture. Please disregard the dust, and the circle that the stud is surrounded by is a mark that the router makes. We stopped making marks this size as it tends to dimple the face with all the heat and is very hard to align under the guard of the stud gun. Now the marks are 1.5" or so in diameter, but more precise.
OK, that makes perfect sense! Thank you for the picture, it helps. I do have access to weld these on so this might be a great option for me!
 

Stacey K

I like making signs
Update. Customer came in and the contractor will install. They only need the sign and they are doing something different with the stones and outside so the sign edges will be covered so I was told to get "close enough" - edges will be covered. After my suggestion, they asked the contractor, he came up with a few ideas to salvage the old sign base but freshen it up with some new stone...not exactly sure but he's got it all figured out.

I really do NOT like the logo but, they just need to sign so the sign I will make!
 

Stacey K

I like making signs
Update. Used .080 aluminum with a laminated print. Pretty easy job. They sent me the artwork so I just needed to get the print and apply it after I cut the metal from my template. Not a fan of the logos fake bricks or the red and black but they have a designer so I keep my mouth shut. I made a paper template then used an old sheet of coroplast and checked it again before I cut the metal. It's a darn good thing I did because when I went back the contractor was there and he removed that top block thing! If I had cut the metal there would have been a cut out on both sides, customer error but still would suck. Anyway, not sure how he installed the sign but he put bricks over the edges. Thanks for everyone's help on this, it worked out well!
 

Attachments

  • 105706642_294955751647809_9010950576089276927_n.jpg
    105706642_294955751647809_9010950576089276927_n.jpg
    96.7 KB · Views: 178

peerlessdani

New Member
Update. Used .080 aluminum with a laminated print. Pretty easy job. They sent me the artwork so I just needed to get the print and apply it after I cut the metal from my template. Not a fan of the logos fake bricks or the red and black but they have a designer so I keep my mouth shut. I made a paper template then used an old sheet of coroplast and checked it again before I cut the metal. It's a darn good thing I did because when I went back the contractor was there and he removed that top block thing! If I had cut the metal there would have been a cut out on both sides, customer error but still would suck. Anyway, not sure how he installed the sign but he put bricks over the edges. Thanks for everyone's help on this, it worked out well!
Is the 3rd picture the finished sign?
 

Stacey K

I like making signs
How did you cut the metal?
Looks great, it's always nice to have a contractor who is willing to work with you!
Thanks! Yes, he was great to work with!

I used my DeWalt Jigsaw. I wasn't sure the best way to do this so I made a paper template for the arch then a coroplast one. I made sure it fit nicely on the sign structure then uploaded a picture and made a nice oval that was smooth and round and cut the outline from vinyl and put it on the metal so I had a nice smooth line to cut on. Was not perfect but the sign is a good distance from the road so you don't see it.
 

Stacey K

I like making signs
Definitely one way to do it! I just recalled you didn't have much in the way of metal working (or was it welding?) and since you'd glossed over that part, I was just curious. Jigsaw is about the only handheld way make a curve like this.
You are correct, not much for cutting metal in general. I pay a guy with a brake press if they are straight cuts. I always have to add a disclaimer for curves LOL!
 
Top