• I want to thank all the members that have upgraded your accounts. I truly appreciate your support of the site monetarily. Supporting the site keeps this site up and running as a lot of work daily goes on behind the scenes. Click to Support Signs101 ...

Muscle Car Digitized

Suz

New Member
This is a TransAm, digitized from a photo a Customer took of his own car. This was sewn onto a black jacket back,
It also had the name of an Upholstery shop in an Arc above the Car, and a second line (straight) under the car.
Customer was pretty happy. It was fun. Thought I would share since I haven't posted any of my work in a while.
Thanks for looking!
 

Attachments

  • TransAm.jpg
    TransAm.jpg
    52.2 KB · Views: 196

WildWestDesigns

Active Member
Nice job. Nice to see someone changing up the stitch angles with fill stitching to give it some dimensionality. It's the little things like that that help breath life into a design.

What was the overall stitch count?
 

Craig Sjoquist

New Member
I don't really understand embroidery, it seems alot more then just take digital picture & sew away since the above post mention fill stitches for a better detailed look & I must admit that does look great indeed, so those extra steps really do pay of ..good going
 

WildWestDesigns

Active Member
I don't really understand embroidery, it seems alot more then just take digital picture & sew away since the above post mention fill stitches for a better detailed look & I must admit that does look great indeed, so those extra steps really do pay of ..good going

It's just changing up the angle of the fill stitches (direction that they are stitched in) that adds extra dimensionality without having to do other things like blending (which also depending heavily on stitch angles) etc, to achieve that same effect.

A lot of your current embroiderers that use auto conversion (computer converts from vector (or even raster) image directly to embroidery) heavily, don't understand the importance of stitch angles and because the computer is making the decision, you either end up with similar angles among fill objects or angles that make no logical sense given the design.

There is a lot more then goes into digitizing for embroidery then a lot of people realize, a lot more then I've mentioned here, that all seem like small things, but it makes the difference between a well running pattern that is great on production time versus the cheapie $5 pattern that costs you more production time because it takes 3 times as long to stitch out. And those that know what good embroidery should look like, that $5 pattern looks awful as well, but even some embroiderers would think that it does look good (or at least say that it does to safe face).
 

Suz

New Member
Overall Stitch Count

attachment.php

For Craig S.
- Here is the photo I was working from - digital photo from Customer. It was fairly low resolution which didn't matter, since I don't auto-digitize.
Sometimes it is good to see what an Artist starts with and what you end up with.

It's just changing up the angle of the fill stitches (direction that they are stitched in) that adds extra dimensionality without having to do other things like blending (which also depending heavily on stitch angles) etc, to achieve that same effect.

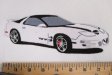
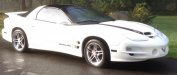
Evan, the overall stitch count on the car alone was about 39,000 stitches. I am not at the shop right now, so that is just going by memory, which isn't always so accurate! :) Oh, I should also mention that the embroidery shown here was done on 3 layers of pellon or backing. I had no thread-breaks, birds nests, no mechanical issues whatsoever with first sew-out. Yay! Usually I have at least one change after my initial sew out. This thing went flawlessly. I picked over it quite a bit before test sew out. One problem I saw in test sew-out was that my gray outline around the entire car got a little too far away fom the gray fill of the windshield. I only use outlines like this if I need to to define an edge like black embroidery thread against a black jacket. So, there is a little gap between the front windshield and the gray outline. But that did not happen on the actual jackets. I had my backing a bit loose in the hoop when I loaded it, and then as the design was building during the sew-out, it began to pull the design in the fill part of the windshield. That will make sense to some of you and no sense to others. Thought I'd explain though, just in case you noticed that! We are our own worst critics. But rest assured, it was not an issue on the Customer's jackets.

Thank you EVERYONE for the nice words! Evan, you are such a great communicator! Yes, there is so much more to embroidery than meets the eye. This is just part of my design, the lettering part of it was full of "OOh and Ahhh" responses from my Customer. But I did not include that, just to respect his privacy. He has me putting his Company name very old school looking (I custom designed his lettering!) big across the back of the jacket. The car in the center is something he's paying for separate when he or his family members or clients want their own car featured in the center of the design.

So really, the custom car part is just the second phase of this design and I must admit, the part I have worked the hardest on. As said, I do enjoy this type of painful work. LOL!

I agree to all Evan said, he is just a much better speaker and writer than I am. Thank you Evan!

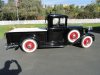
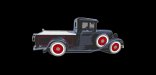
Hopefully you enjoyed seeing the photo I worked from, I hope it helps explain some of the process anyhow! The next car I did for this Customer, which is a Model A Ford. The Model A Ford (picture coming soon) was a 45,000 stitch design, for the car alone. Lettering with Customer's business name above and below was additional stitches, I think about 13,000 more. Add that to the truck, and total was about 58,000 stitches.
 

Attachments

  • TransAm.jpg
    TransAm.jpg
    36.5 KB · Views: 190
Last edited:

WildWestDesigns

Active Member
Evan, the overall stitch count on the car alone was about 39,000 stitches.

That's not really bad at all considering the size. How fast where you able to run it?

Oh, I should also mention that the embroidery shown here was done on 3 layers of pellon or backing.

Medium weight? Not bad at all really, even if it was heavy weight. But I tend to be a stabilizer nazi and go whole hog, but I typically use the tear away so it's easier to just pull the excess a way.

I had no thread-breaks, birds nests, no mechanical issues whatsoever with first sew-out. Yay! Usually I have at least one change after my initial sew out. This thing went flawlessly. I picked over it quite a bit before test sew out. One problem I saw in test sew-out was that my gray outline around the entire car got a little too far away fom the gray fill of the windshield. I only use outlines like this if I need to to define an edge like black embroidery thread against a black jacket. So, there is a little gap between the front windshield and the gray outline. But that did not happen on the actual jackets. I had my backing a bit loose in the hoop when I loaded it, and then as the design was building during the sew-out, it began to pull the design in the fill part of the windshield. That will make sense to some of you and no sense to others. Thought I'd explain though, just in case you noticed that! We are our own worst critics. But rest assured, it was not an issue on the Customer's jackets.

Push/pull are definitely the enemies of full back designs like this one.

Another thing that you have to be worried about (this is just in general, I didn't see anything like this in your design, so don't think that) is worrying about long stitches (end point, and stitch angle are crucial for this) and this is actually the biggest flaw that you will see in auto converted (I can't say auto digitize, I just have a mental block on that).

Evan, you are such a great communicator!

I try, Alicia just says I try to verbally beat people into submission. You remember that one design that I did "You Don't Need to be Stubborn....To be Right (But it Helps)? She has a lot of fun telling people her version of the inspiration that I had for that one.

This is just part of my design, the lettering part of it was full of "OOh and Ahhh" responses from my Customer. But I did not include that, just to respect his privacy. He has me putting his Company name very old school looking (I custom designed his lettering!) big across the back of the jacket. The car in the center is something he's paying for separate when he or his family members or clients want their own car featured in the center of the design.

Lettering is so important in embroidery. It really should be the first thing people learn to digitize (and digitize correctly, by that I mean manually (or semi manually)). I can only imagine how it came out.


So really, the custom car part is just the second phase of this design and I must admit, the part I have worked the hardest on. As said, I do enjoy this type of painful work. LOL!

I find that part of the job enjoyable, but I don't typically enjoy the carpel tunnel that goes along with the digitizing.

The next car I did for this Customer, which is a Model A Ford. The Model A Ford (picture coming soon) was a 45,000 stitch design, for the car alone.

I'm looking forward to that one. I really do like the old Model As.
 

Suz

New Member
That's not really bad at all considering the size. How fast where you able to run it?

Evan, I ran it at a reasonable speed, about 550 stitches a minute. I had time and didn't want to take any chances. The jacket back was a black felt material, with a quilted liner, a letterman type with white stripe on sleeve, neckband, and waist. So I gave the actual jacket 2 layers of stabilizer, used 3 oz. I think for stabilizer. I was doing a million other things that morning when I ran those jackets, but as I mentioned, no thread breaks or problems. I did run out of bobbin thread though. Not bad.

Haha, stabilizer nazi. Me too! I try to go light on shirt fronts, as long as the design can handle a lighter stabilizer. Nobody likes a cardboard feeling backing, right? Especially if you already have some bumps in your shirt. LOL!

You know, I don't have so many problems with large jacket backs as I do those darned high profile flexfit hats with a seam smack in the center. I've learned to hit them with couple of pumps from a spray bottle of water, followed with some steam, which softens them up before embroidering. I run 'um still damp and just let them dry afterwards. That seems to be the cure for hard surfaces.

Another thing that you have to be worried about (this is just in general, I didn't see anything like this in your design, so don't think that) is worrying about long stitches (end point, and stitch angle are crucial for this) and this is actually the biggest flaw that you will see in auto converted (I can't say auto digitize, I just have a mental block on that).

About long stitches, yes those can be a worry. I used Satin stitches in my lettering, I do that a lot. I have been doing that for many years and have learned when it's best to tell my Customer to just let me make the call on fill or satin, or a combination. They like how it looks, like that it saves them money (lower stitch count). They usually ask for Satin stitch when they see my other work, but it is not always wise to use that technique. I too love the look of a satin stitch, but always make sure to do extra work in my tie offs to make sure they don't unravel at beginning and end. It's pretty important to give satin stitching a good under-base too, helps stabilize the work. Also, I try to use the least amount of trims possible during the sewing and try to use travel stitches from one area to another rather than trims, wherever I can. Jump stitches are a good option, and they can be trimmed when you are all done sewing.

I try, Alicia just says I try to verbally beat people into submission. You remember that one design that I did "You Don't Need to be Stubborn....To be Right (But it Helps)? She has a lot of fun telling people her version of the inspiration that I had for that one.

Sounds like your wife loves you! :) One thing I like to say is (used to say this to my former boss) "I'm not always right, but I usually am!" We are good friends now, so that saying still comes up now and then. Anyhow, I liked your Jackass design! Stubborn goes a long way, doesn't it?

Lettering is so important in embroidery. It really should be the first thing people learn to digitize (and digitize correctly, by that I mean manually (or semi manually)). I can only imagine how it came out.

Lettering is something I have always loved. Brings me back to my days hand-painting signs and banners way back before everybody had a computer. Really though, it's fun. I agree, a good thing to learn first. Kind of like learning anatomy before embarking on oil painting or watercolor. That is, if you don't want to do just abstracts. The best part of life drawing was learning how the bones went together, then building the muscle over the bone, then shadows, mid-tones, highlights of the skin. Lettering is sort of like that. The basic lines of the alphabet are the bones of the design. The rest is the muscle shape and the skin tone.

I find that part of the job enjoyable, but I don't typically enjoy the carpel tunnel that goes along with the digitizing.

Carpel tunnel, let's not discuss that! I always wish there was an easier way to do this and perhaps a touch screen? I don't know! But maybe! I don't have a touch screen, but sometimes I dream of one that I can get my digitizing work done with a bit easier than it gets done now!

I'm looking forward to that one. I really do like the old Model As.

Okay then, I'd better get on it!
 

Suz

New Member
Model A Ford

Model A Ford was just over 45,000 stitches for the truck alone. This design when done on the jacket had an additional 13,000 in lettering, which was positioned above and below the car.
The lettering was white, satin stitch

.
attachment.php

I chose not to include the hood ornament. I don't think it was easy to make out, looked like a dog bone to me. Customer didn't complain!
:)
 

Attachments

  • FordTruck.jpg
    FordTruck.jpg
    77.7 KB · Views: 173
  • Model A Ford.jpg
    Model A Ford.jpg
    19.8 KB · Views: 197
Last edited:

phototec

New Member
Nice work!

I'm not into embroidery, however I do have a Singer Futura CE100 which has a limited embroidery function.
 

Attachments

  • CE100-emb(s).jpg
    CE100-emb(s).jpg
    95.8 KB · Views: 204

Suz

New Member
Nice work!

I'm not into embroidery, however I do have a Singer Futura CE100 which has a limited embroidery function.

Thanks Phototec!
That little Singer machine you have looks like it can accomplish a lot of tasks. When I got into embroidery, I started with some similar machines and got (3) of them. I think we had Brother Software at the time. The home digitizing software was not so good then, but I am sure it has come a long way since my start in machine embroidery. This will probably make you laugh, but I used to embroider by hand with a needle and skeins of wool. I would spiff up my brother's jeans (a hippie then) and some of my own stuff. That was back in the 70's. Didn't have lease payments, nothi'n like that! Just a needle and some wool. It was called "crewel" embroidery. Those were the days!
 

WildWestDesigns

Active Member
Model A Ford was just over 45,000 stitches for the truck alone. This design when done on the jacket had an additional 13,000 in lettering, which was positioned above and below the car.
The lettering was white, satin stitch

.
attachment.php

I chose not to include the hood ornament. I don't think it was easy to make out, looked like a dog bone to me. Customer didn't complain!
:)

I just love those old vehicles. Great job!

I think we had Brother Software at the time. The home digitizing software was not so good then, but I am sure it has come a long way since my start in machine embroidery.

I still keep a copy of PE Designs for my PR clients. Mainly just to enter it stop functions (or any other specialty functions) into the pattern as the PR series won't read the ones generated by Wilcom correctly and I have to save them as a PES format.

Brother software isn't bad for it's price point, but it's "clunkly", not sophisticated in it's tool sets or interface (but for those used to MS office programs, it's an easy transition. I prefer Wilcom's GUI. The main thing that I don't like, the main old timers (computer old timers anyway) digitizing tool is the input A tool (name for it in Wilcom anyway), most digitizing programs in the $1k on up range will have it, is one tool in Wilcom, but is two tools in PE Designs. Just that type of thing.

The main problem with home digitizing software (even thought the commercial brands have jumped on this bandwagon as well) is they tend to be heavily involved in auto conversion without the post cleanup toolset. And that's what you'll see a lot of on Etsy selling their digitized patterns.


This will probably make you laugh, but I used to embroider by hand with a needle and skeins of wool.

That's how I learned to. Still have the hoops and I occasionally still do hand embroidery, but either touch up here or there or as an embellishment for a gift. I don't have Hand and Lock's clientele or history, so I can't do that for pay anymore.
 

Suz

New Member
Dennis, Thank you!

Evan, Oh yeah, it was PE Design from Brother. I was glad to sell that program to someone else who needed it more than I did, after I sold the home embroidery machines. It did have a purpose and it was a good affordable way to learn. So glad to have moved on though. You are smart to keep something to open those designs for Customers. I do have a couple of ways to open the odd ones. Mostly I work in the Tajima format, save my sew files in .dst, which I find pretty universal.

I just love those old vehicles. Great job!

Thanks Evan! Feels good to get a compliment from such a well versed "Digitizer" such as yourself. :)

That's how I learned to. Still have the hoops and I occasionally still do hand embroidery, but either touch up here or there or as an embellishment for a gift. I don't have Hand and Lock's clientele or history, so I can't do that for pay anymore.

No Way! You too? Guess I'm not so ancient, yay!
Oh, and about your "Etsy" comment, the only purchase I ever made on Etsty (thought I was smart) was about a $3.00 digitized fancy font alphabet, which had entire set of 1", 2" and 3" tall lettering. Never again! Could not use it, wasted my money. Seller warned bidders/buyers that it was not refundable. Didn't mention not at all use-able either! Not saying all things Etsy are bad. I don't know, that was my only try. Probably just bad luck on my part, but a coinkydink you mentioned what you could get for digitizing on Etsy. Yikes! In this case, gotta agree with you. Nothin fer cheap is somethin fer free. Or do I have it back-asx-werds? :) Better keep on digitizing, right? Etsy won't save me.

Okay, today and the entire week is going to be a good one! Got my Computers all functioning like they should and I can work. Yay!
Happy extended Black Friday everyone! How long will last Friday last?? Go snag a deal or two. :)
 

WildWestDesigns

Active Member
Mostly I work in the Tajima format, save my sew files in .dst, which I find pretty universal.

Whenever I do freelance work, DSTs are usually what I send by default. For your commercial machines, as you've said, they are the most universal. I still do quite a bit of work for single needle users and those that have the low to mid range require their own native format. Sometimes, it's proprietary that you have to have that software to do it, in that case, I'll send a DST and they will convert themselves. Most mid to high end single needles and your commercial machines will accept DSTs though.

Occasionally I will get the customer that thinks that their machine will only take the native format, when in fact, it can read like 20 different formats. Typically that's your PR (Brother) users as that machine is considered high end consumer/entry level commercial. I'll typically send both formats, then they eventually go with the DST.

I actually prefer to work in the Barudan U?? format when I do the embroidery work. I like having the ability to insert slow/fast commands to sped up or slow down the machine in certain spots of the design and not have to babysit the machine. To my knowledge that's the only machine that supports that functionality..

Not saying all things Etsy are bad. I don't know, that was my only try. Probably just bad luck on my part, but a coinkydink you mentioned what you could get for digitizing on Etsy. Yikes! In this case, gotta agree with you. Nothin fer cheap is somethin fer free. Or do I have it back-***-werds? :) Better keep on digitizing, right? Etsy won't save me.

Not at all. There are quite a few that look good. I have toyed with the notion of selling some of my stock designs on there, but that might open up a can of worms that I may not want to deal with.

I have to say though, that quite a few do the auto conversion thing though, you can tell if with their simulated view. The long stitches that I mentioned before, sometimes they are evident when they shouldn't be (some shapes you have them, not way around it). And I also noticed a lot more small(er) designs that still have fill stitches only, giving it a flat look that it doesn't need to have.
 

Suz

New Member
Evan, thanks again for the conversation (phone) a couple weekends ago. I was about to pull my hair out with all the computer fixing going on around here!
Still finishing up some stuff. Updating cad-cutting machines and software. Argh!!!

Thanks for your input about the embroidery stuff too. You are so helpful!
 

WildWestDesigns

Active Member
Evan, thanks again for the conversation (phone) a couple weekends ago. I was about to pull my hair out with all the computer fixing going on around here!
Still finishing up some stuff. Updating cad-cutting machines and software. Argh!!!

Thanks for your input about the embroidery stuff too. You are so helpful!

It was my pleasure. Glad that I could be of some help.
 
Top