• I want to thank all the members that have upgraded your accounts. I truly appreciate your support of the site monetarily. Supporting the site keeps this site up and running as a lot of work daily goes on behind the scenes. Click to Support Signs101 ...

Mutoh Ink Starvation?

300mphGraphics

New Member
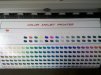
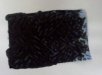
We've had our 1204 for over a year with very little maintenance or cleaning. Running OEM ink and never had a problem, runs like a top. Until recently, we're having some light ink coverage, mainly in the black. See picture. Looks like starvation to me, but would appreciate some direction in what needs fixing. First print is the worst, if I cancel and resend it looks quite a bit better, but still not perfect. Any help would be appreciated as we're over 2 hours from a tech. Actually, we're only about 2 hours from Mutoh in Phoenix.

Thank you!
 

Attachments

  • ink starvation.jpg
    ink starvation.jpg
    34.6 KB · Views: 262

chrisphilipps

Merchant Member
Need a little more information to be able to help. What does the nozzle check look like before the print and after the print? Also have you tried to print on different types of media? Finally what does the internal Palette Test print look like when printed, it is located under Menu > Test Print > Palette.
 

300mphGraphics

New Member
I tried to give all the needed info, new I'd miss a few things!

Palette test looks good, but I don't have an old one to compare it too. I've attached a picture.

The nozzle test was interesting. I checked it before the job pictured above and it was perfect, after the job and palette test and it has a few, small 1/8" holes in two of the black lines in one grid. Second grid and the rest of the colors are perfect.

Having the same issue on banner (Arlon) and vinyl (Oracal).

Thanks!
 

Attachments

  • palette test.jpg
    palette test.jpg
    91 KB · Views: 213

jiarby

New Member
a year with very little maintenance or cleaning

clean it every week!

You are losing your nozzles beause your maint station is no longer pulling a vacuum.
This is a $1000+ repair from Mutoh
or, a $800 DIY repair using OEM parts from a US dealer
or, a $400 DIY repair using Chinese replacement parts shipped from China.

You can probably recover the nozzles with strong cleanings, rag soak, and more strong cleanings. You may have dried ink worms in your pump lines causing a blockage.
 

300mphGraphics

New Member
I don't know about a nozzle issue? I run a nozzle check daily and they're usually perfect. If I'm missing a few, they clear right up with a normal cleaning and print solid all the way across. The dried ink worms in the pump lines sounds like a likely place to try start, is there a standard procedure to doing that?

Thanks again!
 

chrisphilipps

Merchant Member
Because you are only having nozzle loss in one of the two black channels my bet is that you have a failed damper or O-Ring on that line right at the damper. The Maintenance Station failing will not cause you to lose nozzles but you will not be able to recover them if you do lose them. The Maintenance Station is only used to create the vacuum when the printer is first inked up, once this is done providing you don't have any air leaks in the lines, clogged damper, or an empty cartridge creating back pressure you won't lose this vacuum even if the maintenance station isn't working. The only time you would realize that the maintenance station isn't working is when you are missing nozzles and they don't recover from cleanings or you have cartridges that have ink in them but the printer says that they are empty. You can try to swap the black dampers; don’t unscrew the ink lines from them just swap the two of them around. You will have to do a couple of strong cleanings to get the black channels to fire again. If the problem moves from the original channel to the other one than you know for sure that the problem is above the head, if this happens you should try and replace the damper, If the problem stays with the original channel than the problem is with the head or maintenance station. Make sure that you are getting ink to move through the maintenance station before moving the dampers, if it is not you won’t be able to re-charge the black lines. You can test the maintenance station by putting a clean paper towel in the top left hand corner of the waste box and running a cleaning; if you get ink on the paper towel then the maintenance station is moving ink.
 

jiarby

New Member
use a syringe to try to pull ink from the pump drain lines below the maint station.

I suck up some cleaning solution and squirt it up into the capping station from below, then swish it back and forth. You may then also need to pinch the line and squeeze it out like you would toothpaste. You can also fill the cap with cleaning solution and then suck it out with the syringe. It will also just drain out on it's own if everything is in order. If your seal is bad on the cap then you cannot create vacuum when the pump runs.

Set the head height to LOW when doing your strong cleanings to try to get a better seal.

Start saving money for the new maint station!
 

doug5222

New Member
Have you checked to see if the Maintenance Station is pulling ink during a head clean? Not sure how you would do this on a 1204 - haven't seen one in person. The 1304 and 16x4 have easily-accessible waste ink lines which make it easy to confirm ink flow.

If the Maintenance Station is not pulling ink during a head clean, it may be a cleaning issue. The black rubber rim of the Cap in the Maintenance Station must be clean (wet ink is OK) as well as the print head surface where the Cap seats or it will not make an air-tight seal on the print head and will not be able to create the vacuum needed to pull ink.

If cleanliness is not an issue, the Maintenance Station may need to be replaced.
 

doug5222

New Member
On second look at the pic you sent, it appears that the light bands are running in the direction of media travel. If you were having some kind of ink dropout problem, the bands will be light straight bands in the direction of Carriage travel. Do the light bands correspond to the pinch rollers?
 

300mphGraphics

New Member
Doug, you are correct, the lines do run in the direction of media travel. Could it be something as simple as dirty pinch rollers contaminating the media? I'll give those a good clean next.

Attached is a picture of the paper towel trick in the waste ink tray after a single strong cleaning.
 

Attachments

  • cleaning cycle.jpg
    cleaning cycle.jpg
    43.9 KB · Views: 164

doug5222

New Member
Hey 300,

Yeah, when you change the resolution of the print from 720 to 1440, you are putting down more ink and it covers up the problem.

Pay particular attention to whether the bands can be attributed to the pinch rollers or the vacuum holes in the platen.

If the bands line up with the pinch roller spacing, the pinch rollers may have ink on them. If you have ever backed up a fresh print to the point that the un-cured ink gets pulled back under the pinch rollers, the ink sets off onto the pinch rollers. The combination of the contaminated pinch rollers and the hot vinyl disrupts the ink drying rate of the vinyl so you are getting less "dot gain" in the affected areas of the vinyl.

If the bands conform to the vacuum hole spacing, try taping over some of the holes with Scotch tape and see if the banding pattern changes. If so, you may have a heat problem.
 

vinylink0331

New Member
hey 300, did you check the color profile on the black. If you just use 100% black it can come out that way. If that is the problem then try printing black with C-5 Y-5 M-5 K-100. This will get help feel in the lines of black. Hope it helps!!
 

300mphGraphics

New Member
I haven't messed with the color profiles. At least, not intentionally.. I have had the issue with other colors in the past, but mainly black. Right now if I have large areas of black, I am running at a 1440 profile. No large areas of black I can often get by at the 720.

Temps are 43 on the preheater, 45 on the platen, and 50 on the dryer. I'm not sure how to check them while running in the menu, but will try to find that on the next run. I have placed my hand on the outfeed area and can feel the heat there.

I appreciate you guys still trying to help. :) Just had to purchase a new large format black and white laser for bonds as that machine went south on me and my small format color is about to follow it. Service guys have been out nearly every other day for over 2 weeks. I'm cursed!
 

Stealth Ryder

New Member
Make sure the Head is level with the Platen... I have seen this many times, a bad Head Strike can/sometimes will knock the Head loose making it un-level. This prevents it from capping properly. If this is not the case, look for ink flow to the Waste Tray. If not sufficient, replace the Maintenance Assy if you are sure there are no air leaks in the system...
 
Last edited:

300mphGraphics

New Member
We are up above Prescott by about 15 minutes in Chino Valley, a tech free zone evidently. I'm getting by with the 1440 setting, but if need be, I can load the thing and bring it down to Phoenix for service.

I've printed the bearing raceway bulletin and will order the required grease and do a clean/lube job. The raceways look ok, but will look better when serviced.

I've never had a full on head strike, just a slight drag or two in the last year as the material skewed on me at the end of a roll of banner material. I will check in the morning for level. I'd much prefer to have a tech replace, well anything. At least the first time while I watched. Maybe I'd give it a shot the next time, maybe not. ;)

Thank you all again!
 

300mphGraphics

New Member
Temperatures in the printer menu match what I set them at and the material looks flat going through the pinch rollers from the back.

I haven't read anything about pulling the ink cartridges and running a few cycles with the cleaning cartridges in, might that help to clean out anything slowing the ink through the system? Do all colors at the same time? Only the black? Never?
 

randya

New Member
I dont think this is an ink flow issue.
Starvation should start out fine and usually gradually start dropping colors giving more of a gradient effect when the starvations occurs in the horizontal direction.

This looks vertical.

The media may look flat from the back, but the important question is is it flat from the front.

There are two sensors for the cover, one on each side.
I cannot tell you to carefully stuff a piece of rolled up paper (or swab) in each one to push the little microswitch down and disable them.
But that is what will happen if you do and you can then run with the cover up and look at the media under the head while it is printing.
 
Top