• I want to thank all the members that have upgraded your accounts. I truly appreciate your support of the site monetarily. Supporting the site keeps this site up and running as a lot of work daily goes on behind the scenes. Click to Support Signs101 ...

Need Help Mutoh VJ 628 damper replacement

Chris808

New Member
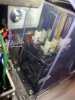
Hello guys! Im having problems with the black ink, I run some print test and the black nozzle is not printing good, I did some cleanings short/ long etc. but not working so I got a set of dampers to replace them and give it a try.
Removed the ink lines but then is a plastic cover sitting on top and to remove that I must remove a metal bar that cross over (is the lever for adjust the printhead height) but at this point I got scared since there’s a lot of springs and little parts. Searched for videos on youtube and there’s nothing about the vj628. Anybody has experience with this model? And how to remove that metal bar?
Any help would be really appreciated.
Thank you.
 

Attachments

  • 24F26BE7-0DD4-4893-85A4-5DB37F306978.jpeg
    24F26BE7-0DD4-4893-85A4-5DB37F306978.jpeg
    819.3 KB · Views: 1,147
  • CD313881-A959-4A30-B018-E6DE2764780C.jpeg
    CD313881-A959-4A30-B018-E6DE2764780C.jpeg
    583.7 KB · Views: 752

GAC05

Quit buggin' me
I have 1624 and it looks like the same head as yours but with a little more room to work around it.
I'm not sure but I think you can change the dampers without removing the head height cross bar.
You want to make a note of what color is at each nipple so you get them back in the right order. I labeled mine 1-8 in a 2x4 grid matching the head position.
You can pull all the ink tubes off along with those plastic adapters on top of the dampers before the hold down plate has to come out. Just turn the little plastic base under the nut a quarter turn so they unsnap. Put the open ink tubes in something the ink won't eat thru - like one of the blue gloves - tape it to the top rail so it won't fall down and dump the ink. Then you can unsnap the damper lockdown by releasing the plastic hooks on both sides of the head. Here I am not sure as mine came straight up but you only need to go up a little then out away from the bar until it clears and then straight up off the head. You'll need some needle nose to pull the dampers straight up off the head manifold. Once you get them all off clean up any ink down in the bottom and make sure none of the old 'O' rings remained behind on the manifold nipples. Put a few drops of cleaning fluid on all the damper 'O" rings to make them easier to mount. New ones snug down onto the nipples - there is a note not to hold or squeeze them by the thin plastic membranes on the sides. Once all are in slide the lock-down plate on and wiggle everything around until the dampers are centered and you can snap down the retainer hooks on both sides of the head. Install the nut flanges onto the dampers - the have to snap into place on all 8. Lube the new 'O' rings, side the new nuts on the tube, then the 'O' ring. Match them up with your seating chart - tighten down the nuts as tight as you can with your fingers and then use a 9/32" (7mm I think) wrench to turn them another 1/4 turn tighter. You should see the 'o' ring start to bulge up just a little on the tube. Run a couple of strong cleans until the tubes fill with ink and you don't see any more air. Once everything looks good with no leaks and no air - put the covers back on and run some nozzle checks and test prints to see if everything is good.
DX7-1.jpg
 

Chris808

New Member
Thank you Gac05, but the vj628 seems they build it super compact and is not posible to remove the top plastic Part without taking out the head height cross bar. at this point I got nervous because its a lot of little parts and springs... not sure if I’ll be able to put it back together. But thank you for the detailed explanation.
 

henryp

New Member
Thank you Gac05, but the vj628 seems they build it super compact and is not posible to remove the top plastic Part without taking out the head height cross bar. at this point I got nervous because its a lot of little parts and springs... not sure if I’ll be able to put it back together. But thank you for the detailed explanation.

Maintenance Manual states you need to remove the printhead before you can replace the valve dampers.
 

Attachments

  • ice_screenshot_20200706-134710.png
    ice_screenshot_20200706-134710.png
    413.1 KB · Views: 745
  • ice_screenshot_20200706-134722.png
    ice_screenshot_20200706-134722.png
    202.9 KB · Views: 641
  • ice_screenshot_20200706-134736.png
    ice_screenshot_20200706-134736.png
    506.4 KB · Views: 542
  • ice_screenshot_20200706-134750.png
    ice_screenshot_20200706-134750.png
    173.4 KB · Views: 678

Solventinkjet

DIY Printer Fixing Guide
Ive checked it several times....it doesnt say remove printhead anywhere
Instruction 7 says:

"It refers to 3.8.15 Replacing Head and
remove Valve Head from Head."

That's their way of saying you have to remove the head. Basically the head cover can't come off without removing the head which is super annoying. I know a lot of people who just never put the head cover back on so they can just pop dampers out without taking the whole head out.
 
Top