VinylLabs.com
New Member
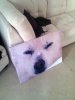
I still need practice, and the color is really off (still not used to my internal rip, or selecting the proper profile for the job) but I relally like my first print, it's of my dog nikki, when my parents saw it, they wanted one done right away too