• I want to thank all the members that have upgraded your accounts. I truly appreciate your support of the site monetarily. Supporting the site keeps this site up and running as a lot of work daily goes on behind the scenes. Click to Support Signs101 ...

NEED HELP: UCJV300 - 404 Error Y Current

HGdesign

New Member
Hello again everyone. I was finally on to printing and cutting various test pieces, and now getting this error after having made a rushed decision to kill a cutting job by opening the door.
Here is what happened:
- I was testing cutting some prints and had reloaded a sheet back into the machine
- I forgot to slide the small metal guides onto the sheet, so when the cutting was about to get started, the lifted right edge of the sheet caught the bottom of the cutting carriage and twisted into a mess as the head traveled quickly left to set the pinch rollers
- I tried to pause the cut at the control panel by hitting the "local" button, but when it kept going to further rollers, I made a rushed deciosn to open the door to kill the job
- The machine at the time was at the second to last pinch roller and I do not think the y-axis was moving
- I removed the knarled up sheet and closed the cover
- I could not figure out how to get the carriage to return the cutter and reset, so I tried to power down
- It went to put the cutter away as normal, but instead of finishing, there was an extra sound from the left side and Erorr 404 Y current appeared on the screen
- It then said "Please wait" on the screen for several minutes without any movements
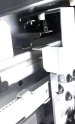
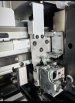
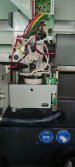
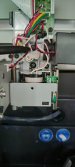
- I eventually opened the maintenance area door on the left and saw the cutter carriage in the lock position, and the piece that travels back and forth was about 1/4" space to the right
- I had to power the machine down and restart to get the machine to reset the main driving piece to return home to the print head
- It powered up fine and seemed to be ok
- I wanted to test if the cutting was working so loaded up some media and proceeded to do a test cut.
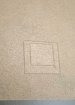
- Everything seemed normal, except the box seemed slightly off-center in the feed direction
- Tried several test cuts, and each were the same
- I unloaded the media, and the machine went to put the cutting carriage away,
and the same issue repeated. Heard a sound, and the y-current error came up.
- Please wait for several minutes with nothing happening and then:
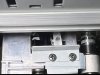
- I may have made matters worse this time, Opeing the maintace area door again to find the same: carriage in the lock position, with the driving piece about 1/4" the the right. I moved it gently by hand back and forth to see that it moved freely.
--BUT - I think I left it a an inch ro two to the right of where it was
- Closed the door and it said press enter.
- Upon pressing enter the magnetic carrier came rushing back home like normal, but slammed into the parked head with a notable crash sound
- "Y current" Press Enter, on the screen again
I powered off the machine at this point and hoping you guys can help guide me again with resolving this so I don't do further damage. Not sure if the crashing into the parked head may have caused physical damage and other problems too at this point.

Thank you so much again.
 

Attachments

  • IMG_5190.jpg
    IMG_5190.jpg
    1.4 MB · Views: 92

Solventinkjet

DIY Printer Fixing Guide
This will be an interesting one. It sounds like maybe the origin flag got bent out of place. That would explain why it's smashing into the head and not docking the cutter properly which causes Y errors due to the impact. It doesn't explain why the cut test is off though. So maybe a few things got knocked out of whack when you hit the media. Take a few pictures of the cutter head and the index head (the part that grabs the cutter and head carriage) and we might be able to point something out of place. On the index head, specifically the origin flag circled in green in the mech drawing below. Also, opening the door shouldn't hurt anything. it was most likely the media crash that's causing this.
 

Attachments

  • Index Head.jpg
    Index Head.jpg
    49.9 KB · Views: 42

Smoke_Jaguar

Man who touches printers inappropriately.
Y current error means something dun jammed up. Basically the motor isn't giving feedback it's moving, so it ramps up current until it tops out. Based on the long "please wait" message, it's not homing, so definitely what Solventinkjet said.

Yay for another thread on the same project/machine. -_-
 

HGdesign

New Member
Y current error means something dun jammed up. Basically the motor isn't giving feedback it's moving, so it ramps up current until it tops out. Based on the long "please wait" message, it's not homing, so definitely what Solventinkjet said.

Yay for another thread on the same project/machine. -_-
I made this thread separate because it is not related to the actual machine refurb, but a new and unrelated incident that is my fault and lead to this error. I felt that the unique nature of this error and cause may happen to others and be relevant if they want to diagnose just this issue. Please do let me know if this is not the right way. I really thought it made sense here to separate.
 

Smoke_Jaguar

Man who touches printers inappropriately.
All good. Any signs of damage? Usually doesn't damage the carriage, but can screw up and sometimes even shear off the encoder sensor in extreme cases.
 

HGdesign

New Member
Here are some photos of the carriages.
- I can see the index carriage flag at the top appears to be in good shape and can park into the sensor near home
( The crash returning home I think was my fault for moving the index carriage a couple of inches by hand and then closing the door so it rushed back and crashed)
 

Attachments

  • IMG_5208.jpg
    IMG_5208.jpg
    418.4 KB · Views: 37
  • IMG_5207.jpg
    IMG_5207.jpg
    1.4 MB · Views: 29

HGdesign

New Member
Looking from the back of the cutter carriage, I believe I have found at least one clear issue.
- This picture is hard to see but a piece of my media is jammed into between the sensor and its mounting plate on the back
- This sensor looks bent out of position ? Angled toward the front of the machine rather than perpendicular to the carriage.
- The media was wedged in really good and I had to unscrew the bottom plate 2 screws to unlodge it.
- I think this explains why the cutter carriage does not know when it has reached its parking position.
- Let me know if I should try to straighten that sensor position, or if its supposed to be angled, and any other tips
 

HGdesign

New Member
Photos of sensor on back of cutter carriage (looking in from the back of the machine)
 

Attachments

  • IMG_5206.jpg
    IMG_5206.jpg
    717.8 KB · Views: 32
  • IMG_5209.jpg
    IMG_5209.jpg
    559.7 KB · Views: 29
  • IMG_5210.jpg
    IMG_5210.jpg
    732.6 KB · Views: 38

HGdesign

New Member
All good. Any signs of damage? Usually doesn't damage the carriage, but can screw up and sometimes even shear off the encoder sensor in extreme cases.
I am not finding any obvious damage yet other than the cutter carriage sensor area where the media was found jammed (photos above). Will continue to inspect. That index carriage did crash into the head pretty hard. Loud crash shook the whole machine. Thankfully, the small encoder stripe sensor on the main carriage above the head release area appears to be intact. Although it was sitting right up against the metal tab at the end of travel.
 

Solventinkjet

DIY Printer Fixing Guide
That sensor detects the pinch rollers but it also detects when the cutter is back at its home position so that would definitely cause it to fail. Try putting it back in place and see if that fixes the Y error. As far as the cutting issue, is there any damage to the blade holder?
 

HGdesign

New Member
Thank you both so much once again for so quickly pointing me in the right direction. It took me some time to get to that sensor. Ended up having to disassemble the cutter carriage from the front as the metal plate behind the sensor had bent and the sensor had actually unplugged. I just finished getting it buttoned up and did a simple test to power up and see if the machine threw any new errors due to the crash. Thank God, it powered up without issue and I was able to do a simple print had test, followed by a cut off of the media. Both went smoothly and the cutter parked back properly upon completing.
I will work on further tests tomorrow after recalibrating the cutting X / Y and see if the problem with the odd square shift went away or not. Will update.
Thank you so much once again !!!
And another lesson learned --- Be extremely diligent on media setup with the media edges being held down with the side clips as well as triple check for any potential edges that might catch.
 

Smoke_Jaguar

Man who touches printers inappropriately.
Be careful about unbolting any frame parts that aren't access panels, doing so can make your machine lose squareness. That said, calibration processes are covered in the service manual and shouldn't be too difficult.
 

HGdesign

New Member
Be careful about unbolting any frame parts that aren't access panels, doing so can make your machine lose squareness. That said, calibration processes are covered in the service manual and shouldn't be too difficult.
That's a good point. I will try to be careful to watch out for that. Thank you
 

HGdesign

New Member
I ran a bit behind yesterday and only had a chance to do a brief amount of testing. I was able to run the print/cut alignment from the pc and that appears to be cutting well as before.
The weird one is the cut test that you do at the control panel on the machine to dial in your pressure settings. The center box looks centered on the scan (left to right), but is still off on the feed. In fact now it appears off even more then before I removed the jammed plastic and fixed the sensor. Not sure if it's related to the crash, or if am just overlooking something silly on my part. Fortunately, if it does not affect the print/cut alignment when I run actual prints, then it does not prevent me from continuing to work with the machine. I will continue to look into it and post back updates. I might be a bit slow responding for a couple of days.
- And I forgot to reply that the blade holder and blade itself appear to be fine without any damage
Thank you both for your guidance on the main issue as that seems to be resolved after fixing the sensor behind the cutting carriage! Thank you!
 

Attachments

  • IMG_5238.jpg
    IMG_5238.jpg
    1 MB · Views: 29

IPreferPC

New Member
I've had to realign and replace this guy a couple of times. Got it down to a 3 minute process. 3 screws total.

Remove the black cover on the cutting carriage.
Remove the two screws in the photo (pointed to with pen)

The whole unit will then come away from the CNC rail block. Be careful of not kinking the ribbon cable as you unhook the cutting unit from the top rail.

From here, you can inspect the unit for any bends, which would be very rare. The little black sensor though, it cops a beating in these print-cut head strikes. I resorted to gluing it back into the bracket, which lasted for another year. Seems the glue was stronger than the plastic of the sensor; as the last strike actually broke the plastic! It's a pretty cheap part, so if you buy one, you might as well get a spare to have in stock. I'd say I've had to pop this sensor back in maybe four or 5 times in the last 7 years.

Have fun out there~
 

Attachments

  • IMG_20240904_121213.jpg
    IMG_20240904_121213.jpg
    1.3 MB · Views: 16
  • IMG_20240904_121325.jpg
    IMG_20240904_121325.jpg
    1.4 MB · Views: 15
  • IMG_20240904_121330.jpg
    IMG_20240904_121330.jpg
    1.4 MB · Views: 15

HGdesign

New Member
I've had to realign and replace this guy a couple of times. Got it down to a 3 minute process. 3 screws total.

Remove the black cover on the cutting carriage.
Remove the two screws in the photo (pointed to with pen)

The whole unit will then come away from the CNC rail block. Be careful of not kinking the ribbon cable as you unhook the cutting unit from the top rail.

From here, you can inspect the unit for any bends, which would be very rare. The little black sensor though, it cops a beating in these print-cut head strikes. I resorted to gluing it back into the bracket, which lasted for another year. Seems the glue was stronger than the plastic of the sensor; as the last strike actually broke the plastic! It's a pretty cheap part, so if you buy one, you might as well get a spare to have in stock. I'd say I've had to pop this sensor back in maybe four or 5 times in the last 7 years.

Have fun out there~
That is interesting that the sesor can get damaged so often. It seems to be in a very tight spot that is hard to get to. I was surprised that my media managed to twist in a way that got to that sensor and twisted it. I'll keep it in mind for future if it happens again. How do you manage to set the height quickly for the assembly when reassembling? Took me some time to try to use gauge shims and try to keep it from shifting while tightening screws. Also, I assumed that the print/cut alignment must have shifted and then re-did that step as well. Lost some time all together, but imagine going faster next time.
 

HGdesign

New Member
I've been making progress on running the machine reliably again. Here is a photo of my latest cutting tests and they have gone back to normal centered again. I never figured out what the reason for the shift of the squares was. It was off for a while, but my print/cut seemed to still work. Checking again recently however, it seems to have corrected itself, but I do not know what could have changed.
The only odd detail I notice now: the first time I run a cut test, the cut takes place along the right origin with the outer box cutt-off on the right and overlapping the center box right edge.
However on subsequent cut tests, the cuts shift over about an inch to the left of the scan origin, and then the boxes are centered again like they should be.
Not sure if the first cut being off is normal, as I think I had seen that happen before the crash as well but had not done enough cutting to be familiar with the normal behavior of the machine.
Thank you all so much for all your help: your knowledge and willingness to guide us new users is so helpful and I would like to express my sincere gratitude.
Hopefully these posts of us newbies making mistakes are useful to others that follow to learn from and avoid & fix their own similar issues.
IMG_5803.jpg
 
Top