• I want to thank all the members that have upgraded your accounts. I truly appreciate your support of the site monetarily. Supporting the site keeps this site up and running as a lot of work daily goes on behind the scenes. Click to Support Signs101 ...

Need some help....

Marlboro Man

New Member
Hey everyone, sorry I haven't been around in a while but I lost my sign in info and have been beating my brains in with this damn printer which is STILL not printing.

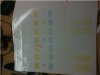
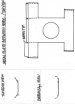
Ok, here's the deal. I have a Mutoh Falcon Outdoor 62 I bought over a year ago which is still not working. I replaced the mother board, the printer goes through the motions but won't put ink down. I replaced the heads same story, I replaced all the dampers, and physically siphoned ink from the cartridges into the dampers which shows me that the ink cartridges are all good and the lines to the dampers are clear and not clogged and I even replaced the heads, guess what?! Same problem!!. I took off the top cover, and the door, took the heater panel out and rigged up the control panel and tried to run a test print. The reason for this was to find out which way the motor turns the pump so I could try to prime the pump manually and low and behold, the damn motor isn't spinning to drive the pump. I opened the main panel with all the electronics, pulled the pump ribbon cable and did a continuity test on the motor. Lets call the blue colored wire of the cable 1 and going from left to right, 2, 3, and 4. I get continuity when I connect the electrodes to #1(Blue Wire) and #3, and I also get continuity when I connect the electrodes to wires #2, and #4.

Since I don't have an electrical schematic, I don't really know what those wires go to in the motor or what their function is supposed to be. What I'm thinking is that if I'm getting continuity from the motor, that would indicate that the motor is good and the problem is the mother board. Can someone tell me if I'm right on this or help me get a schematic?
 

Marlboro Man

New Member
I bought it used and it's taken me over a year and still not working right. Finally, last night I was working on it until 2:00am and finally got it to print 2 test pages. They both were scratchy looking (Banding Issue?) and the first which has some very light geometrical shapes at the top then some yellow A's then some light blue A's then back to yellow. The next one had what looks like beans? and "COLOR INKJET PRINTER" at the top but this time it only printed in yellow. I did a head cleaning before doing this print and it was better but still banding and only the one color. I don't know if it's supposed to have more than one color or not because the User Guide manual doesn't say. Any ideas?
 

iSign

New Member
can't help ya... I paid $30,000.00 for mine, had it set up for me, worked perfectly from day one, paid for itself several times over, helped put me on the map as digital print professional, and let me spend my time doing signs and not servicing strange machines...

nothing against the DIY folks... there is a lot I still approach with the DIY mentality, in my free time, for my personal life... but in business... I stick to spending my time on what i can make money on...
 

Marlboro Man

New Member
What does your nozzle check look like?

Do you get a seal on the cap if you pull with a syringe?

I siphoned the ink from the cartridges with a syringe and filled the dampers half full as per instructions. I then siphoned ink through the new pump by way of the two lines that go to the waste ink bottle on the right rear, had the capping station pushed all the way to the right to seal and got ink from both lines. Ran 4 head cleans and still no better on the print and it looks like only the yellow is printing now. I've never done a nozzle test? I'll go look and see how to do that and get back.
 

randya

New Member
Nozzle check should always be your first troubleshooting try.

If you are getting all the ink through the lines to the waste, (good vacuum seal at the pump) and no firing, could be a cable connections issue or bad heads.

I dont remember if this has a fuse for each color or just one for each head (typically), that means that at lest one head fuse is good, but the other could be blown.
Maybe someone more knowledgeable will chime in on this subject.

You've indicated that these head were 'cleaned', do you know how?
 

Marlboro Man

New Member
I can't find any procedure on how to do a nozzle check. Here are the tests I did.
 

Attachments

  • Test Print 1.jpg
    Test Print 1.jpg
    4.4 KB · Views: 88
  • Test Print 2.jpg
    Test Print 2.jpg
    3.3 KB · Views: 122
  • Test Print 3.jpg
    Test Print 3.jpg
    2.8 KB · Views: 88
  • Girl pic test.jpg
    Girl pic test.jpg
    19.2 KB · Views: 81

Mikeifg

New Member
Hate to say it but if it's taken this long to get it working and not properly, Then you are better off getting a new printer.You are going to have more headaches than it's worth. Plus if you get any kind of work to print is it going to be reliable, will it break down and cost you customers. If this is your only printer I would cut my losses and sub out for now.
 

randya

New Member
http://service.mutoh.com/#/Printer ...on Outdoor/Manuals/Falcon Outdoor User Guide/

8. Perform Nozzle Check. Press Quality/Speed button until light next to the Rabbit
is lighted. Press Resolution button until only the light next to 360 is lighted. Hold
the Shift key and press Nozzle Check. A test pattern will print. If all nozzles are
firing you are ready to print. If some of the lines are missing, go to step 7.


Pictures are small, but it looks like more than just yellow is firing.
 

Marlboro Man

New Member
pressed and held shift key and hit head alignment key and it printed some marks in yellow and said "Pattern A 4. Can't really see what printed to get an idea if out of alignment.
 

Marlboro Man

New Member
Ok, I made a rough drawing of the small metal plate that screws in between the heads. It kinda looks like a fat "T" with serifs. As I said, I pulled the heads again, took a syringe and filled it about 1/4 of the way with isopropyl alcohol and put a little pressure to it and it flowed through the nozzles. I put everything back together minus the little metal plate because one of the arms broke off and now the printer doesn't print anything.

Is there anywhere I can find out how to test the ribbon cables to see if I'm having any problems there? Here is the drawing. I'd like to know if it is for positioning only or if it has some kind of grounding responsibility too.
 

Attachments

  • Metal Spacer between heads Mutoh RJ1600.pdf
    319.5 KB · Views: 143
  • Mutoh RJ1600 Head Spacer.jpg
    Mutoh RJ1600 Head Spacer.jpg
    33.9 KB · Views: 95
Last edited:

randya

New Member
Grounding is done through the cable.
That part is put tension on the heads for alignment.
Will run without it, it will just make adjustments a bit more difficult.

You can run continuity on the cable.
But you may have blown out fuses, the heads or mainboard.
 

randya

New Member
You can check the continuity of each 'wire' in the ribbon.
Remove the cable, touch your probe ends to the same wire at each end.
Check for 'resistance'
 
Top