iSign
New Member
well, as the title says I was able to design this & have it ready for install in record time. The client is on the resort property where Maui's largest & most high profile golf tournament is held. They were late getting approval & finally ordered the sign Wednesday, in hopes of getting it installed on the Friday before the Tournament last weekend.
I charged $1000 if they would pick up and install themselves, which they did. They also sent me a nice pic!
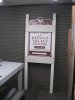
I designed this to fit with the resort colors of burgundy & white, instead of the lime green they usually print their logo in. They said when it wasn't green it was black & white, so I said how about white on a burgundy reverse panel. They had drawn an awkward landscape layout, but once they got my layout, they loved it.
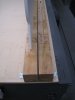
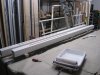
To speed up the production time, I used 1/2" PVC instead of MDO like I usually would have used. I screwed the 4x4's to the spoil board & routed a quick groove to recess my sign into. First time trying that, but it won't be the last! I printed the graphics since I didn't have enough burgundy in stock & the sign is a short term sign, or so they say...
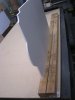
Anyway, I primed & painted the posts with water base paint to get them done quickly. The panel was tapped in with a rubber mallet. It was a tight enough fit that it didn't need any adhesive or fasteners... but I did reinforce the complete assembly, so the client wouldn't risk snapping off my tabs if they weren't careful installing it.
Well, I have a few pics, so I'll try to upload in some sort of logical order.

I charged $1000 if they would pick up and install themselves, which they did. They also sent me a nice pic!
I designed this to fit with the resort colors of burgundy & white, instead of the lime green they usually print their logo in. They said when it wasn't green it was black & white, so I said how about white on a burgundy reverse panel. They had drawn an awkward landscape layout, but once they got my layout, they loved it.
To speed up the production time, I used 1/2" PVC instead of MDO like I usually would have used. I screwed the 4x4's to the spoil board & routed a quick groove to recess my sign into. First time trying that, but it won't be the last! I printed the graphics since I didn't have enough burgundy in stock & the sign is a short term sign, or so they say...
Anyway, I primed & painted the posts with water base paint to get them done quickly. The panel was tapped in with a rubber mallet. It was a tight enough fit that it didn't need any adhesive or fasteners... but I did reinforce the complete assembly, so the client wouldn't risk snapping off my tabs if they weren't careful installing it.
Well, I have a few pics, so I'll try to upload in some sort of logical order.