• I want to thank all the members that have upgraded your accounts. I truly appreciate your support of the site monetarily. Supporting the site keeps this site up and running as a lot of work daily goes on behind the scenes. Click to Support Signs101 ...

Need Help Onyx Profiling help

White Haus

Not a Newbie
It's been a couple of years since I made a profile, and even back then I was no expert. (I know how to go through the "for dummies" onyx steps, but beyond that I'm clueless. )

We just had an Epson S60600 installed last week and I got right to creating custom profiles.

I created this 720x720 profile for one of our most common materials, General Formulations 201HTAP but I'm not convinced it's correct/ready to go. (Although we ran a few jobs with it and it printed well, but haven't tested color accuracy too much yet)

I just did the basic onyx workflow, and the accuboost workflow at the end. (First time doing this, but figured what the hell)

Does it make sense that I would have gone with 400% ink limits for all 3 options, and does this affect color accuracy at all or just tries to minimize unnecessary ink laydown? The amount of ink this printer can lay down and dry at high speeds is like nothing I've seen before on our Rolands - so there wasn't any pooling/artifacts/drying issues even at 400%.

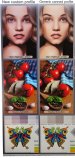
I'm a bit surprised by how Magenta heavy the colors come out in the Onyx quality evaluation file - I've attached a couple of examples comparing it to one of the generic canned profiles. I expected the canned profiles to be a bit blah but not THAT drastically different - the greyscale image and grey pantones look better on the canned one.

I did create another profile for 3M 40C-20 that I think came out a bit better, but only change was skipping the accuboost part.

Just trying to get a better understanding of this before I spend more hours possibly creating new profiles incorrectly. At the end of the day I'm not looking for G7 certification but do want good, accurate profiles for all our common media.

Any tips/feedback would be greatly appreciated, and I do understand that these are loaded questions!
 

Attachments

  • GFHTAP_InkLimits.jpg
    GFHTAP_InkLimits.jpg
    1.2 MB · Views: 335
  • GFHTAP_OnyxEvaluation2.jpg
    GFHTAP_OnyxEvaluation2.jpg
    1.4 MB · Views: 146
  • GFHTAP_OnyxEvaluation1.jpg
    GFHTAP_OnyxEvaluation1.jpg
    1.1 MB · Views: 145

ColorCrest

All around shop helper.
We just had an Epson S60600 installed last week and I got right to creating custom profiles
Ideally, you would have printed the Onyx evaluation file and compared it to previous prints from any or all previous machines. You likely may have been satisfied with the results from the canned profile, as many are, upon installation. It's the basic test to sign-off the installation before the guy scoots out the door. Did the installer not load 20 ft of his vinyl or paper and print the file?

(Although we ran a few jobs with it and it printed well, but haven't tested color accuracy too much yet)
You should recognize from your evaluation print compared to the canned profile print that the custom profile is grossly invalid and should not be used.

Does it make sense that I would have gone with 400% ink limits for all 3 options, and does this affect color accuracy at all or just tries to minimize unnecessary ink laydown?
I've mentioned in much earlier forum posts that this step is rather forgiving. Your example bears proof here. Readers should understand this Onyx step of "ink limits" may not use the same term as other competing RIPs for the same control. However, no, 400% is uncommon and you're presenting a risk of not being able to use a copy of the profile for other materials, which ideally, you would want to leverage.

I expected the canned profiles to be a bit blah
Just a misinformed expectation, is all.

the greyscale image and grey pantones look better on the canned one.
Agreed. Aesthetically, especially large format grayscale images on the warm side will be more pleasing to the decorator as opposed to dead-neutral grays which might appear as depressing, concrete bunker walls.

I recommend the canned profile for now but keep experimenting, carefully. Take advantage and understand the Onyx gamut viewer at the ink restriction step and also print the evaluation file during the setup stages to see the difference between the base calibration print vs the ICC color calibrated print.

Good luck.
 

White Haus

Not a Newbie
Ideally, you would have printed the Onyx evaluation file and compared it to previous prints from any or all previous machines. You likely may have been satisfied with the results from the canned profile, as many are, upon installation. It's the basic test to sign-off the installation before the guy scoots out the door. Did the installer not load 20 ft of his vinyl or paper and print the file?
The installer did no such thing. If it wasn't for the fact that we loaded up a roll and sent a print down, they would have left without even checking that the heads were firing and not DOA from the factory. But I digress........
You should recognize from your evaluation print compared to the canned profile print that the custom profile is grossly invalid and should not be used.

I've mentioned in much earlier forum posts that this step is rather forgiving. Your example bears proof here. Readers should understand this Onyx step of "ink limits" may not use the same term as other competing RIPs for the same control. However, no, 400% is uncommon and you're presenting a risk of not being able to use a copy of the profile for other materials, which ideally, you would want to leverage.
I suppose I should have. I'm just not sure where I went wrong with the profile creation.

Regarding the ink limit I don't really understand the description for the step. From Onyx:
While viewing the Ink Limit Swatch left to right (light to dark), try to determine which patch best represents the solid dark shade for the color you are looking at. Significant consideration should be paid to identifying patches that have artifacts. Artifacts may affect your ICC Swatch and cause potential reading errors which in turn may lead to image quality problems.
Common artifacts include ink bleed, an embossed or raised look, a picture frame appearance, or a glossy or dull appearance. All of these artifacts indicate too much ink, requiring a reduction to the Ink Limit.


"For the color you are looking at" doesn't make sense to me. For section "A", technically 100 is the only one without any grain to it, and it basically turns black by 220 or so. So would I select 220 in that example?

I'll try starting over and using the "Advanced" option for ink limits as it seems like it has more options.

I recommend the canned profile for now but keep experimenting, carefully. Take advantage and understand the Onyx gamut viewer at the ink restriction step and also print the evaluation file during the setup stages to see the difference between the base calibration print vs the ICC color calibrated print.

Good luck.

Will do. I'll keep playing around and hopefully (eventually) will be able to wrap my head around this.

Thanks again.
 

ColorCrest

All around shop helper.
it basically turns black by 220 or so. So would I select 220 in that example?
"220 or so" is rather common. However, and again as I have posted earlier in the forums, one should realize the tremendous difference between 220 and 400 yet your print maxed at 400 is still not flooded with pools of ink. This step in Onyx can be very forgiving and it's measured only visually and not by a hardware instrument.

Be sure to print the evaluation file from earlier steps to compare with the print from the final ICC profile step that will apply to actual production work. Maybe post a picture of the two.
 

White Haus

Not a Newbie
"220 or so" is rather common. However, and again as I have posted earlier in the forums, one should realize the tremendous difference between 220 and 400 yet your print maxed at 400 is still not flooded with pools of ink. This step in Onyx can be very forgiving and it's measured only visually and not by a hardware instrument.

Be sure to print the evaluation file from earlier steps to compare with the print from the final ICC profile step that will apply to actual production work. Maybe post a picture of the two.
Thank you - will go back to the drawing board and start over with a new profile and will share my results.
 

White Haus

Not a Newbie
Switch to Epson Workflow

The problem will be solved
Thank you - I've re-created a new profile using Epson workflow and it's much faster and seems much better.

Also just came across the Gamut Report portion which did confirm my first created profile was awful - new one is significantly better.

Will share my findings tomorrow.

Does it make sense that I should be using "Contone" as the print mode dot pattern? It's the only option at first glance but if you click on the gear icon there is the option for "OEM(Epson Precision Dot)".

I didn't even realize Epsons were Contone printers, thought it was just HP Latex.
 

Pauly

Printrade.com.au
if you have a canned profile, recalibrate it. You can do that in the RIP-Queue with the Recalibrate button. then compare that print to the old one.
Canned profiles aren't "bad". They're just not profiled for your machine so they will always appear bad.
This is as long as the canned profile is for the same stock you're using. otherwise it's useless.
 

White Haus

Not a Newbie
if you have a canned profile, recalibrate it. You can do that in the RIP-Queue with the Recalibrate button. then compare that print to the old one.
Canned profiles aren't "bad". They're just not profiled for your machine so they will always appear bad.
This is as long as the canned profile is for the same stock you're using. otherwise it's useless.
Thanks Pauly, will try this as well.
 

ColorK

New Member
I'm working with Epson Surecolor 10070 printers. We have 8 of them and I am looking at doing a full profile overhaul on all of them. I'm use to Onyx being used with the G7 workflow and using Caldera to create. I'm a big fan of how the ink limit graph is put together and it was easy for me to get the ink saturation where I needed it to be. So I'm a little lost at the Epson relationship with Onyx. My main concern is the ink. I have to be very precise on my ink limits and density. They are in a humid environment so I need the ink to be high enough to get the best color possible (dye sublimation company) but not oversaturate it. On Caldera, most of those printers (they are DGIs) sit at 40-50% ink limit but I am not sure how that would translate to Epson. The entire workflow seems different than using the G7, which is what I am use too.

Basically, I need lowest amount of ink used with highest color quality, with high humidity, so my saturation is my biggest fight.

I've only been doing this for a couple years and Epson is a new one for me. Any and all advice/insights would be amazing.
 

davidtavcar

New Member
I'm working with Epson Surecolor 10070 printers. We have 8 of them and I am looking at doing a full profile overhaul on all of them. I'm use to Onyx being used with the G7 workflow and using Caldera to create. I'm a big fan of how the ink limit graph is put together and it was easy for me to get the ink saturation where I needed it to be. So I'm a little lost at the Epson relationship with Onyx. My main concern is the ink. I have to be very precise on my ink limits and density. They are in a humid environment so I need the ink to be high enough to get the best color possible (dye sublimation company) but not oversaturate it. On Caldera, most of those printers (they are DGIs) sit at 40-50% ink limit but I am not sure how that would translate to Epson. The entire workflow seems different than using the G7, which is what I am use too.

Basically, I need lowest amount of ink used with highest color quality, with high humidity, so my saturation is my biggest fight.

I've only been doing this for a couple years and Epson is a new one for me. Any and all advice/insights would be amazing.
I think that guy did a good job describing steps for a great profile. https://www.signs101.com/threads/ad...yx-how-to-evaluate-charts.150401/post-1407549

In the first step you should find the sweet spot where you limit ink for individual channel. You should not limit TIL too much. Around 300% is a limit. With hi pigment inks you can easily lower individual channel to 50%. Well it depends what materaul, inks, ... anyway the first step is the most inportant :)
 

sublitechpro

New Member
Sublimation printing has taken the world of customization by storm, offering the ability to transfer high-quality, vibrant designs onto various surfaces. The key to achieving stunning sublimation prints lies in selecting the perfect sublimation ink for your printer.

In this comprehensive guide, we’ll delve deeper into each of the best sublimation inks for 2023, based on extensive research and web search results.
 
Top