• I want to thank all the members that have upgraded your accounts. I truly appreciate your support of the site monetarily. Supporting the site keeps this site up and running as a lot of work daily goes on behind the scenes. Click to Support Signs101 ...

Phototex for Templates

jfiscus

Rap Master
I was thinking the other day about how to build complex templates for vehicles like ATVs, golf carts, etc where a lot of very odd-shaped panels are in play and figuring our 2-d models are tricky, when an installer walked by and commented on how nice phototex was to install that day as it does not stretch at all.

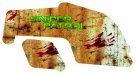
That started my brain buzzing about trying it out for template making. I had an old roll that had gotten some moisture on it and tunneled from the backer so I gave it a try. It stuck well to the plastic and conformed great. I cut where I had to and got the panels wrapped. Once they were wrapped I took a grease pencil and traced the edges, ridges, etc that I would want in the template. then I cut it down some and squeegeed it back flat on the backer.

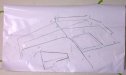
I took that template and taped it on the wall and got a good straight-on shot and traced that in Illustrator. Then I measure the piece on the wall and scaled appropriately.
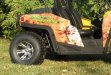
Everything turned out perfect!
 

jfiscus

Rap Master
(some pics of the process)
 

Attachments

  • DSCF0003.jpg
    DSCF0003.jpg
    34.5 KB · Views: 266
  • Mini-Buggy-Template.jpg
    Mini-Buggy-Template.jpg
    73.2 KB · Views: 247
  • Zombie Curb Wrap.jpg
    Zombie Curb Wrap.jpg
    703.3 KB · Views: 240
  • IMG_4481.jpg
    IMG_4481.jpg
    99.4 KB · Views: 299

zmachine

New Member
Great post, as I have been trying to figure out the same thing.

Looks like a great solution, I will need to get some phototex and try it out myself for sure.

Was just curious what vinyl you used for the final product?
I've used convex, arlon, and tried 3M's new stuff but have always fought the bubbles trying to get the best alignment of panels together and applying them dry.
 

54warrior

New Member
When you have the "pieces" traced out, how then do you get them into the computer at the correct scale? i have been taking my templates to Staples and having them scan them in.
 

qmr55

New Member
When you have the "pieces" traced out, how then do you get them into the computer at the correct scale? i have been taking my templates to Staples and having them scan them in.

One thing you can do is draw a 1"x1" square on the template before you scan it or take a photo of it. Then scale that box to 1" and everything else should be correct.
 

jfiscus

Rap Master
When you have the "pieces" traced out, how then do you get them into the computer at the correct scale? i have been taking my templates to Staples and having them scan them in.
I taped them up on the wall so they were flat, then shot them from a distance with the camera. then traced in Illustrator and scaled correctly once traced using a tape measure.
 

J Hill Designs

New Member
One thing you can do is draw a 1"x1" square on the template before you scan it or take a photo of it. Then scale that box to 1" and everything else should be correct.


for better accuracy, the larger your 'scale sample' is, the better -- 1"x1" could equate to a huge difference on, say, a 48" template
 

eahicks

Magna Cum Laude - School of Hard Knocks
You could print a 1"x1" grid on the phototex first, then use as suggested.
 
Top