Hello Stuart how are you?
Before answering your question please read through the following and see if you followed the same steps.
1. Remove all water based ink cartridges.
2. First colour load an empty cartridge with hot water and from the damper suck hot water then leave it filled with hot water. repeat this for all colours.
3. Leave this over night then in the morning suck out the remaining water via a syringe via the damper from all ink lines.
4. Colour 1 load a cleaning solution cartridge from your supplier for your new solvent inks into the cartridge slot and suck out the solution using a syringe via the damper. Repeat this for all colours.
Now your ink lines are clean.
5. Add new dampers and change capping station, print heads and pump.
6. Very carefully without damaging the new dampers attach a syringe to the damper just by holding and suck out the ink until it fills the syringe a little . Repeat for all colours.
7. Now remove 1 hose that's coming from your pump that's connected to the capping station which should be under 1 of the heads and connect a small hose to it which is connected to a syringe. Make sure the syringe is closed so your able to draw out the syringe in the next step.
8. Make sure the heads are in there normal position and sitting over the capping station correctly. Now slowly draw out the syringe until ink starts to come out through the ink lines, via the damper through the print head. Do the step to the other heads. On my FJ50 I have 2 print heads that has 2 hoses.
Your system now has been washed with new ink running through it correctly.
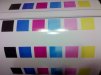
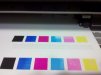
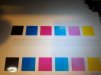
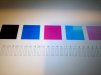
You may experience fish eyes which are white dots due to contamination from 1 ink to the new one. Just print a couple of metres of media in full colour and it will clear itself out. If it remains in cyan just print half a metre of a cyan until it clears and so on.
If your converting a solvent printer for the first time you may not be aware but you will require at least 5 metres of vinyl to test with and at least 250-400ml of ink that will be wasted. Its part of the conversion. You have saved $$$$ and to save those $$$$ you need to waste $$.
Once you have finished reading this compare this info with how you did your conversion and see if any steps were missed or you took a short cut with how I explained this conversion.
I have a feeling that your issue may be solved in steps 7 & 8.
If you have followed all steps above and you still have this issue make sure there are inks in the ink lines and if they are not full then you have an air leak somewhere & it is possible your ink carts may be leaking. If they are leaking the stainless steel ink feeder (its where the ink cartridge connects to) may be pushed in hence you will need to remove the cover on top and remove the ink cart systems and fix and clean this out properly.
If everything is 100% to the above keep printing full colour at full width until the system settles itself out and it will because you may have contamination in some ink lines.
Also its an idea to print using a tiff file format between 150 to 300 DPI saved as RGB and for the profile I have used the Adobe RGB1998 using the bi directional setting, error diffusion and make sure pvc vinyl is chosen if your using vinyl.
Hope this info helps.
Joe