• I want to thank all the members that have upgraded your accounts. I truly appreciate your support of the site monetarily. Supporting the site keeps this site up and running as a lot of work daily goes on behind the scenes. Click to Support Signs101 ...

Removal of DX4 manifold screw? Help! -- 1/2 way through manifold replacement!)

Jumpshoutmedia

New Member
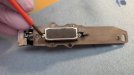
Is there a trick to removing the 2 screws that hold the print head and plastic manifold together? (see photo)

I broke one of the nipples so I bought a replacement manifold and I'm trying to swap it out, but neither of the two tiny phillips screws will BUDGE!

I tried every size phillips driver that I own, I've even tried using a flat blade that was wide enough to fit in the entire screw head, but when I went to unscrew it, the screwdriver blade actually bend/twisted!

I'm afraid to try any harder for fear of breaking something or stripping out the tiny head on this screw causing the entire head to be junk!! PLEASE.. any advise would be GREATLY appreciated!

PS, do I need to remove the white rubber looking stuff that's covering the hex shaped nut on the other side of the manifold? I didn't want to pluck that stuff out to see if there was a nut that could be removed because it looks important.

Thanks!
 

Attachments

  • manifold.jpg
    manifold.jpg
    1.6 MB · Views: 76
I have never had an issue, did one today.
I usually remove the brown base first.
You can remove the white rubber stuff, there is a nut under that, put a drop of cleaning solution from the nut side.
You may get lucky.
 

Jim Hancock

Old School Technician
You absolutely must remove the printhead from the brown head adapter plate. It is physically impossible to remove the manifold screws without doing so. You might need to remove the nut with the white RTV from the old manifold if the replacement manifold doesn't have any. The best way to remove them from the old manifold after you have removed the manifold from the head is to put one of the screws into the nut from the bottom and push the nut out by putting pressure on the screw. No need to put cleaning solution on it, as the RTV will help keep the nut in place while installing it in the new manifold.
 

Jumpshoutmedia

New Member
You absolutely must remove the printhead from the brown head adapter plate. It is physically impossible to remove the manifold screws without doing so. You might need to remove the nut with the white RTV from the old manifold if the replacement manifold doesn't have any. The best way to remove them from the old manifold after you have removed the manifold from the head is to put one of the screws into the nut from the bottom and push the nut out by putting pressure on the screw. No need to put cleaning solution on it, as the RTV will help keep the nut in place while installing it in the new manifold.
Thanks! I ended up destroying the head trying to get the two manifold screws out. They were VERY well seized in place by old ink. The heads of the screws are SO fine that the bitting quickly stripped out, so the ONLY chance I had of breaking them loose was to "slot" the heads with a dremel and a very fine diamond cutting disc, then using a flat blade screw driver. And even then, I had to apply SO much torque to the screws that the entire head NEARLY broke off one of them, and I was nearly spinning the nut around in it's hex-shaped pocket! When they finally gave way, it happened with a hard "POP" sound, and I found clear evidence of LOCTITE on the threads of BOTH screws! I'm 99% sure they were't supposed to be installed with loctite!

It occured to me that it was one of the heads that I previously replaced, and I bought that had from digiprint supply, so who knows how it got like that. It wasn't in a container sealed from Epson.

Either way, once I got it back together, It only partially printed the test pattern, and after several easy cleaning cycles, it quickly degraded until it was no longer firing any ink at all. Each test print would get worse and worse, until that entire color was gone from the test print pattern completely. So I either manhandled and damaged the head somehow when I was trying to break those screws loose, or some ink had dried/congealed in the time when the printer was down and I was waiting for the new manifold to ship (it sat approx 4 days without doing a cleaning cycle), and then after I installed it back in the printer, that glob of congealed ink moved into the manifold and completely clogged the head, or... who knows!

Ultimately I decided I had enough, so I took advantage of the great pricing that Roland is offering right now, and I ordered a brand new VG3! LOL.

Now I just have to figure out what to do with the old printer! Do I replace the heads and try to sell it used? Sell it as-is without attempting to repair the heads? I figure it'll prob be worth a heck of a lot more if I can show it printing a nearly perfect test print, right? But how much could a very clean, 13 year old XC-540 really be worth?
 

Jim Hancock

Old School Technician
You need to see what they are going for by doing an online search and on Ebay. Factor against that how much heads, etc. will cost to get it operational, plus your time. You didn't say how it was printing before you decided to replace the manifold. Based on all that and the PITA factor, if you decide it's not worth messing with, try selling it for parts or take the boards out and sell them on Ebay. If you part it out, don't forget to take out the power supplies, which are hidden under a plate under the rest of the boards in the electronics chassis. One of them is pretty expensive for a power supply.
 
Top