-
I want to thank all the members that have upgraded your accounts. I truly appreciate your support of the site monetarily. Supporting the site keeps this site up and running as a lot of work daily goes on behind the scenes. Click to Support Signs101 ...
You are using an out of date browser. It may not display this or other websites correctly.
You should upgrade or use an alternative browser.
You should upgrade or use an alternative browser.
Replacing Roland Dx4 Printhead On Sp-540v?
- Thread starter phototec
- Start date
The process is fairly straight forward. Make sure you have the right tools, and everything will go much smoother. When you replace the heads, take the opportunity to replace captops, dampers, and wipers too. Be careful with the dampers when putting them on the nipple on the head plate. Also, the SM talks about turning of the power at the service sw and then at the main sw. In addition, be sure to UNPLUG the machine when you're working on it. The manual doesn't specify that in that section IIRC, but do it.
Just an update. The head I found rolling around in the tool bag is the Magenta and I was able to fully recover it. The new heads work great. Just changed the manifolds. Those are the yellow & light Magenta as yoi can see in the attached pic. Should have all working in a few days. ")
Attachments

Tizz
New Member
If the M&Y head are working by using the K&C head cables your M&Y fuse will more likely be blown.
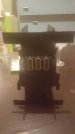
Trace this fuse back to the main board and get a tester to check the fuse. The fuse is a small rectangular type (surface mounted fuse).
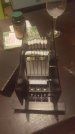
I've soldered an external fuse holder on this blown fuse and mounted it elsewhere for a quick fix. This way the fuse can be replaced at anytime when I blow it again! Lol. Just ensure to use the same voltage rating.
It is always best to remove the blown fuse and replace but I needed it up and running at the time.
I've have pics of this somewhere, let me know if you want to seem em.
Trace this fuse back to the main board and get a tester to check the fuse. The fuse is a small rectangular type (surface mounted fuse).
I've soldered an external fuse holder on this blown fuse and mounted it elsewhere for a quick fix. This way the fuse can be replaced at anytime when I blow it again! Lol. Just ensure to use the same voltage rating.
It is always best to remove the blown fuse and replace but I needed it up and running at the time.
I've have pics of this somewhere, let me know if you want to seem em.
Pics would be great! Would love to see your fuse set up to imitate it. The printer printed test prints from the printer not a rip for 2 days before the fuse blew out. I'm thinking it's a bad head. I hadn't moved the wires. Thanks
Also, thanks for all who have helped. This forum has been super valuable resource.
Also, thanks for all who have helped. This forum has been super valuable resource.
Tizz
New Member
I could'nt confirm if the capacitors or transistors may go too.
From experience the fuse went on mine. But that was my error! I knocked the data cable out (only by a little), by accident after changing dampers, caps and running test prints and this was enough to blow a fuse. And yes I did have the sub power and main power turned off when replacing.
Please make sure to turn off the sub power and main power when checking the fuse.
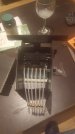
The entire board was removed for easier access since the original fuse is very small.
If your's has blown for some other reason, check that your cables are sitting correctly.
Hopefully another experienced member here can diagnose a potential issue.


From experience the fuse went on mine. But that was my error! I knocked the data cable out (only by a little), by accident after changing dampers, caps and running test prints and this was enough to blow a fuse. And yes I did have the sub power and main power turned off when replacing.
Please make sure to turn off the sub power and main power when checking the fuse.
The entire board was removed for easier access since the original fuse is very small.
If your's has blown for some other reason, check that your cables are sitting correctly.
Hopefully another experienced member here can diagnose a potential issue.
phototec
New Member
I could'nt confirm if the capacitors or transistors may go too.
From experience the fuse went on mine. But that was my error! I knocked the data cable out (only by a little), by accident after changing dampers, caps and running test prints and this was enough to blow a fuse. And yes I did have the sub power and main power turned off when replacing.
Please make sure to turn off the sub power and main power when checking the fuse.
The entire board was removed for easier access since the original fuse is very small.
If your's has blown for some other reason, check that your cables are sitting correctly.
Hopefully another experienced member here can diagnose a potential issue.
View attachment 128099 View attachment 128100 View attachment 128101
So which printer did you do the fuse alteration on?
Tizz
New Member
Tizz where did you get the fuse. Can't find 3.15 amp 67 volt at radio shack
Purchased mine from Jaycar audio (local store here in AUS maybe similar to radio shack there).
I believe you can use a higher voltage rated fuse but make sure its the same amperage as your existing. (Using a higher amp fuse will allow a higher current to pass through and can cause a fire). The ampere rating is very important just make sure its the same as the original.