• I want to thank all the members that have upgraded your accounts. I truly appreciate your support of the site monetarily. Supporting the site keeps this site up and running as a lot of work daily goes on behind the scenes. Click to Support Signs101 ...

Roland SP540v print-cut adj. is Way Off

VinylLab

New Member
Hello everyone,

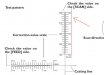
My Roland cut line is WAY OFF. Hopefully someone can help me out. I am currently printing labels on a disposable one-time use product so they don't need to be laminated. Every time I try to print then cut these, the cut line, specifically the SCAN line, is more than 5mm off. The print-cut adjustment doesn't go past +5mm or -5mm.

I have attached a photo of where the cut line is when I'm test printing. Has anyone had this issue? I just environmental matched, cleaned the encoder strip, and ran the limit initialization. One thing I haven't done is clean the encoder sensor, but it's printing perfectly so I don't believe that is the issue.
attachment.php
 

Attachments

  • cut off.jpg
    cut off.jpg
    33.3 KB · Views: 8,017

rjssigns

Active Member
I had similar issues with my SP540V. Encoder has nothing to do with cutting. But...it has everything to do with making the printer print exactly where its supposed to. My printer got to the point where there was a fairly repeatable error. Time to start looking.

I started taking exact anal retentive measurements regarding the location of the CutContour crop marks. Even though the print looked great the crop marks could be as little as 2 to as much as 6 or 7 millimeters off.

There were two calibrations I did but can't remember their exact names. One was for the encoder and the other was a linear calibration. You'll have to look at the manual.

The rear paper interrupt sensor went out and I couldn't perform the calibrations. Rolands logic(?) on this escapes me. So I replaced the sensor and finally got it to calibrate.

Doing so put the crop mark error under a millimeter. Cuts improved, but I am still working on getting the machine back to new form. Right now it is very accurate up to 5 feet. When new we could routinely run twice that distance.
Right now the machine is as good as it will get without additional pinch roller tension. Which is what I'm working on right now. Boils down to shimming the pinch roller bodies. Years of sliding back and forth on that metal rail has made them a tad sloppy.
 

Solventinkjet

DIY Printer Fixing Guide
Run the "encoder setup" and "encoder calibration" in service mode and then run "environmental match" in user mode. If all of those run without any errors, try doing the print cut adjust again. This usually does the trick as long as there are no other issues going on like the printer measuring the material as 0.0" or if you are getting right pinch roller errors.
 

rjssigns

Active Member
Run the "encoder setup" and "encoder calibration" in service mode and then run "environmental match" in user mode. If all of those run without any errors, try doing the print cut adjust again. This usually does the trick as long as there are no other issues going on like the printer measuring the material as 0.0" or if you are getting right pinch roller errors.


Ding ding. Those are the things I was trying to remember. Thanks Vander.


So much fun getting old...
 

VinylLab

New Member
Service mode

Run the "encoder setup" and "encoder calibration" in service mode and then run "environmental match" in user mode. If all of those run without any errors, try doing the print cut adjust again. This usually does the trick as long as there are no other issues going on like the printer measuring the material as 0.0" or if you are getting right pinch roller errors.


I'm trying to get into service mode by pressing down, right, left, up, right, down, left, then holding the left/right/down and pressing power, but it keeps saying "Service Mode Protected". Have you ever gotten this message?
 

Solventinkjet

DIY Printer Fixing Guide
You have to make sure you push all the buttons in order within 5 seconds. If you take too long it will not let you in.
 

cajun312

New Member
When I had alignment issues with my roland, the tech sent me this and it worked.


How to manually adjust print and cut issues
Environmental Match
1 – press menu
2 – press down arrow several times until you see environmental match
3 – press menu – THE MACHINE MUST NOT HAVE ANY MEDIA LOADED
Auto print cut Adjust
1 – press menu
2 – press down arrow key until you see print-cut adj – press right arrow key
3 – press down arrow key until you see AUTO – press enter
4 – when the screen says completed press enter and then menu
Then design a row of 1”x1” square in illustrator and put a cut line as the stroke with no offset.
Open this in versaworks and double click on the image. You can blow it up to check and make
sure the cut like looks correct on screen. If so then go ahead and print and cut the job.
If the image is still off then:
To fix TOP TO BOTTOM issues
1 – press menu
2 – press down arrow key until you see print-cut adj – press right arrow key
3 – press down arrow key until you see FEED press right arrow key. Use the up and down arrow
to make changes to the number to move the cut line UP AND DOWN. If you want to move the
cut line UP change the value to a lower (or negative) number. If you want to move the cut DOWN
change the value to a higher (or positive) number.
Press enter to accept those changes and reprint and cut the job. If the setting were to much or
not enough adjust the value (don’t forget to press enter to save the changes.
If the cut line is fine TOP TO BOTTOM then ignore this step ---- note, if the cut line is going the
wrong way change the values the other direction for example if it was at 0 and you enter 0.1 and
the cut even farther the wrong way change that 0.1 to a -0.1.
To fix LEFT TO RIGHT issues
1 – press menu
2 – press down arrow key until you see print-cut adj – press right arrow key
3 – press down arrow key until you see SCAN press right arrow key. Use the up and down
arrow to make changes to the number to move the cut line LEFT AND RIGHT. If you want to
move the cut line LEFT change the value to a lower (or negative) number. If you want to move
the cut RIGHT change the value to a higher (or positive) number.
Press enter to accept those changes and reprint and cut the job. If the setting were to much or
not enough adjust the value (don’t forget to press enter to save the changes.
If the cut line is fine LEFT TO RIGHT then ignore this step ---- note if the cut line is going the
wrong way change the values the other direction for example if it was at 0 and you enter 0.1 and
the cut even farther the wrong way change that 0.1 to a -0.1.
This last step will correct any issues with that squares print and cut. If there are issues with the
size of the cut not matching the size of the print let us know.
 

Tony Rome

New Member
VinylLab and Vader, can't thank you guys enough for this. Thought I was screwed and got it all to work. THANKS!
 

cnysigns

New Member
When I had alignment issues with my roland, the tech sent me this and it worked.


How to manually adjust print and cut issues
Environmental Match
1 – press menu
2 – press down arrow several times until you see environmental match
3 – press menu – THE MACHINE MUST NOT HAVE ANY MEDIA LOADED
Auto print cut Adjust
1 – press menu
2 – press down arrow key until you see print-cut adj – press right arrow key
3 – press down arrow key until you see AUTO – press enter
4 – when the screen says completed press enter and then menu
Then design a row of 1”x1” square in illustrator and put a cut line as the stroke with no offset.
Open this in versaworks and double click on the image. You can blow it up to check and make
sure the cut like looks correct on screen. If so then go ahead and print and cut the job.
If the image is still off then:
To fix TOP TO BOTTOM issues
1 – press menu
2 – press down arrow key until you see print-cut adj – press right arrow key
3 – press down arrow key until you see FEED press right arrow key. Use the up and down arrow
to make changes to the number to move the cut line UP AND DOWN. If you want to move the
cut line UP change the value to a lower (or negative) number. If you want to move the cut DOWN
change the value to a higher (or positive) number.
Press enter to accept those changes and reprint and cut the job. If the setting were to much or
not enough adjust the value (don’t forget to press enter to save the changes.
If the cut line is fine TOP TO BOTTOM then ignore this step ---- note, if the cut line is going the
wrong way change the values the other direction for example if it was at 0 and you enter 0.1 and
the cut even farther the wrong way change that 0.1 to a -0.1.
To fix LEFT TO RIGHT issues
1 – press menu
2 – press down arrow key until you see print-cut adj – press right arrow key
3 – press down arrow key until you see SCAN press right arrow key. Use the up and down
arrow to make changes to the number to move the cut line LEFT AND RIGHT. If you want to
move the cut line LEFT change the value to a lower (or negative) number. If you want to move
the cut RIGHT change the value to a higher (or positive) number.
Press enter to accept those changes and reprint and cut the job. If the setting were to much or
not enough adjust the value (don’t forget to press enter to save the changes.
If the cut line is fine LEFT TO RIGHT then ignore this step ---- note if the cut line is going the
wrong way change the values the other direction for example if it was at 0 and you enter 0.1 and
the cut even farther the wrong way change that 0.1 to a -0.1.
This last step will correct any issues with that squares print and cut. If there are issues with the
size of the cut not matching the size of the print let us know.


Het there, I know this is old.. but our cuttings seem to be a tad larger then the print. I did the square test above.. it printed and cut perfect. I then ran a job and the cut was off to the left by about 1/8" inch. But the cutting seems to get exagerated the longer the design is. It's gets up to almost an 1" on a 96" design. Can you help please.
 
Top