• I want to thank all the members that have upgraded your accounts. I truly appreciate your support of the site monetarily. Supporting the site keeps this site up and running as a lot of work daily goes on behind the scenes. Click to Support Signs101 ...

Roland VP540 - Black ink spray ?

AylmerSigns

New Member
I've had my Roland VP540 for approximately 5 years. Never had to put any maintenance in the machine. As strange as it sounds, I broke the wiper blade plastic piece, approximately 3 years ago - and the machine is now working on a (Bic Pen) plastic barrel that I glued to the original piece (didn't have this problem after DIY fix). I've always made regular maintenance on it.

Lately, I've been having this "spraying" issue, around the black. No matter if I use the Roland Colorsystem Black, 0/0/0/100, 100/100/100/100 or Black 6 - I always get this problem. Even if I try making a medium wash, or change the vinyl - always the same. I printed the bar test, and every notch is there, except for maybe 5-6 out of the whole black grid.

I thought it was a static issue, but the machine is grounded, on the rolls and the machine itself.

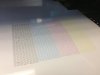
Any idea what this may be? Picture included is from the VW color system... Red comes out perfectly (although the actual picture seems pixelated and rough) but ... black has a **spray** beside it...

Thanks guys!
 

Attachments

  • Roland.jpg
    Roland.jpg
    28.4 KB · Views: 243

AylmerSigns

New Member
Thanks for the reply, it's very much appreciated! I didn't know exactly how to upload the picture, and the CoPeck file, so I uploaded them here
 

CS-SignSupply

New Member
Your test print looks decent but the black head obviously has deflected nozzles.

Your report shows the following...

You need to update your firmware first... 3.3 is old. New version here

Head shot counts are all below 2 billion shots, rated for up to 6 billion

Total print time, 754 hours.

13 Wiper Motor Errors - when did you last replace the wipers and scraper with OEM parts?
 

Attachments

  • nozzletest.JPG.0x675.puia7zahji9hpvi5idfh6288lac3di.jpg
    nozzletest.JPG.0x675.puia7zahji9hpvi5idfh6288lac3di.jpg
    39.2 KB · Views: 219

AylmerSigns

New Member
Wipers and scrapers (the black thin plastic behind the screwed metal plate?) were changed about 2 months ago. As for the error motors, they date from quite a while back, when I had to repair the plastic that holds the two wipers in place.

I'll update my firmware. I didn't even know about firmware update. To be honest with you, we bought the machine from a company that didn't really teach us anything about it... And who want to charge us way too much, to come down in our are. (10 hours road - yes, 10 hours - once to do diagnostics and another 10 hours to replace + part costs...)

Any idea what could fix the deflected nozzles?

Thanks!
 

CS-SignSupply

New Member
I would do the following first...

Clamp off the Black captop line before the pump with a binder clip. Flood the captop with cleaning solution and park the heads. Let the head soak in this solution for a day. Remove the clamp from the captop line and power the unit on.

Run a powerful clean and then run another test print.
 

AylmerSigns

New Member
Hi Bobby,

Thanks for the info. on the support. I was wondering, if it wasn't asking too much, if you could confirm the steps I need to take. If you don't have time, please do not hesitate to tell me so; I'm just not very sure about how to proceed on a 20k machine...

Remove the front panel (where the controls are), and remove the below metal piece (I now have access to the lines running out of the cap tops).

CMYK - C and M run their own tubes, where they meet at a "Y" adapter, becoming one tube, then into some pump. I put a binder clip on the K hose, before meeting the "Y". Flood the captop (where it's a hairy-like black inked looking) with the Roland solution.

Question is how do I park the heads, for it to sit in the flooded captop? Must I turn the power off before playing in this, and manually move it?

Thanks - and sorry for being such a pain - I just don't want to screw anything up!
 

CS-SignSupply

New Member
Not a pain at all and I am glad to help.

Yes to everything. Power off and unplug first. Remove appropriate covers to gain access to the tubing. Clamp off the K captop line before the Y connector. This isolates the one captop.

Push the printhead slightly to the right and then to the left and position over the media. Drip cleaning solution onto the black captop. It should pool up seeing as you have the tubing clamped.

Move the heads to the right until they lock in place.

Let it sit in the fluid for a day.

The idea behind this is for the solution to soften up any dried ink on the head.

It is very possible that this will not resolve the deflected nozzles, but it is what I would do before replacing the printhead.
 

AylmerSigns

New Member
You're great, Bobby.

We're doing the process right now. Lets hope it all works out! I'll keep you posted. We thank you so much for all the help and information!
 

rjssigns

Active Member
Static or dirty encoder strip. Deflection will not cause what you are seeing.
It will only cause banding etc...in the printed area.
Exhaust all the simple stuff first then move forward.

May want to check humidity levels in the shop. Anything below 50% you're asking for headaches.
Put in a different roll/type of material and see if the issue repeats.
If it doesn't then you have a static build-up on that particular material.

If you have to use that material for a job today. Get some dryer sheets and suspend them with tape(back of printer) 1/16" over the material. Print away.
 

CS-SignSupply

New Member
After the soaking, if you do not get any better results, call me and and I will run the Ink Fill pattern with you to see if the head is failing.
 

AylmerSigns

New Member
Printing!

So, I soaked the head for 2.5 hours - all while I decided to clean the encode strip. Since I had half the machine open, I decided to really clean the encore strip, removing it and washing it all off. About half way on the strip, there was a huge accumulation of grease/ink (not sure exactly what, but sticky) - and removed it. Something moved in the shop, as I was expecting to be alone, and scared me - which got the little encoder bar spring flying... in the machine. I had to disassemble half the machine, and finally got my spring out.

Powerful clean out. Noped - still having the same bars on my nozzle test.

BUT. I decided to still try printing something ... which came out quite nice. I would call it a 8//10, compared to a 2/10 this morning... I mean, I can't expect the machine to be perfect, when it's 5 years old, and haven't put any money in it (so far...).

Thanks again guys for the great help, I very much appreciate.

Note: I also got some of those dryer sheets. I don't really care if they work or not - the shop smells awesome. Kudos! :thankyou:
 

AylmerSigns

New Member
Finally, my problem has been solved.

I feel quite stupid for what was causing the issue... But there is nothing I could do, for I did not know of the existence of this leveler on the printing head unit.

As mentioned before, I had really bad training, when I purchased the machine. In fact, I think the tech was actually trying to learn about the machine - and trust me, he wasn't too good of a learner either - all while showing us how to use the machine. In fact, to this very day, I still learn new features (such as PerfCut, thanks to this forum...) every day.

Turns out my problem was quite simple. I didn't know the print heads could manually be set to low. I knew about the function in the Versaworks menu, but didn't know it could mechanically be done. Basically, the printing heads were set to high, and I was trying to make the calibration/bidirectional, all while having the heads set to high, which were pretty misaligned to to inkspray.

Turns out on one of those tests, my correct value was to -4, and I was sitting a +6... Wow!

Again, thanks for all the help you guys - you can't imagine how grateful I am, for all these awesome tips and tricks.
 
Top