• I want to thank all the members that have upgraded your accounts. I truly appreciate your support of the site monetarily. Supporting the site keeps this site up and running as a lot of work daily goes on behind the scenes. Click to Support Signs101 ...

Roland VP540 New Heads installed can't seem to get them aligned What is going on?

mcbirdman

New Member
I was so happy that hybriddesign sent me a motherboard and other parts including an extra pinch roller. Appreciate him so much.
I went through the process and installed the board, used the Peck tool and eventually replaced a transistor that aparently was blowing fuse 1.

I have just replaced the Black and Yellow heads and they arent stuck "ON" all the time.
The Cyan is not great and the Magenta which was worse is almost non existant even though I kept the heads wet during all this wait time.

I was delayed with a backorder a couple weeks and I hope in the next few days the next two new heads will be here so We can replace the Magenta...... and Cyan if I have to - at this point I am just trying to make headway to get it back to where it WAS printing a while ago.

So using the Service notes I did things like linear calibration, put the 2 head ranks in.
The notes talk about Service mode printing the vertical lines and using small allen wrench to align. And I used a steel ruler to physically line up the heads horizontally.

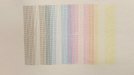
So I know cyan and magenta head needs attention. The manual says vertical print and shows the vertical lines and how to move top lines left or right. The actual test it print looks like it actually is giving both tests at the same time but the lines are 3.5 whole lines offset, the illustration shows solid color bands and mine is printing a grid and it is off SO far that a normal test print has a huge overlap of colors.

Spent HOURS last night doing my best and not seeing any real difference in adjusting the screws except the cyan which was tilted at an angle a little, fixed by the allen wrench.

I guess I gotta rethink if it is possible the carriage board is acting up on me, if the linear tape is acting up -(It calibrates no error) I thought I was doing things in the proper order but nothing looks right and I know how the test prints looked before with color boxes of dashes and now So messed up.

Can anyone tell me if, they think I have the linear problem of an old clear tape (I had cleaned it before all of this happened. I didn't like how it looked so ordered the part, now can't find it) If I have a carrige board problem or somehow I am not doing things in order. I feel pretty beat up over this whole problem and although I am getting there, last night was a total waste and I am not even sure what I would do different.

I will try to post the photos of what panel said, followed by what it printed. I appreciate any suggestions.


20190524_231752.jpg
20190524_232252.jpg

20190524_231409.jpg
20190525_022955.jpg

And this is what I get:
20190525_011945.jpg
 
Last edited:

Ere

New Member
I will tell you out front I am an HP and Canon factory trained tech and I don’t work on Roland but I will give you my two cents and maybe it will give you an idea of something else to try. I have never mechanically adjusted printheads. That being said maybe it is a Roland thing. Anyway. I would put those adjustments back to where it was originally. In the building process there are many variances and those tweaks accommodates for them. In Canons when this happens we replace the main control board and the board above the print head and when that doesn’t take care of it we replace the the ribbon cables. Something electrical always in a Canon. When the ink doesn’t quite come out but it is still aligned than it would be in the ink delivery somewhere. Usually the heads.
 

hand851

Roland Mutoh & Mimaki inks digiprint-parts.com
You don't have ink in the magenta side of the head and are missing nozzles in the cyan and the yellow. Hire a tech.,. This is a 2 hour job for a good tech.
 

mcbirdman

New Member
Hi Ere, thanks for input. Always welcome and appreciated. I am having so much fun....I know 2 of the heads are going to be replaced but I am just trying to gain alignment and control after having replaced a motherboard simply because of the known problem with mainboard network failure.

On a Roland the heads are individually installed and then have micro adjustments. When I run the tests and the printout comes out not like the manual, I am not sure what is correct. I think this is showing me two tests at once.

For instance, left shorter test..... are the black bands looking like a grid instead of sollid black because of alignment? Maybe it would be solid but because the area that I think should be solid colors have those 3 vertical black stripes through them shows that the bi directional is wayyyyy off. I am thinking that the taller test to right shows the top lines being about 3.5 lines to the right. I think I have to figure out how to input the correction through software but any other test I use it is so blurry I cant see the numbers.....


1) Before the m board and head changes it was working...so untouched when changed board and heads. Linear Encoder strip old but no error code...I didn't know if I would see some little improvement so I ordered a new one. It can't hurt, I just don't know if it will have a huge impact.

2) I am leaning towards the idea that the Blurry printout is going to have to be corrected with software control than mechanical adjustment. It is 3.5 lines to the right as in ticks on a measuring stick but I think the mechanical/allen wrench adjustments when talking about being a line width to left or right is actually how many actual lines If printed side by side In terms of resolution or lines

This is a big distinction. To me, this would explain why adjusting the screws are not appearing to do much because of this difference. I think the key is adjusting the software adjustments in service menu.

I guess I am going to have to go through screen setups and see how I can input the bias numbers to some effect. This is so bad I will either see it get better or worse. If it gets better then when I print tests out I can maybe read them.... Thanks,
 
Last edited:

equippaint

Active Member
Its tricky to align them. I think you just adjust one of the heads against the other and not back and forth between the 2. It seems to be a waste of time to even do this when your heads arent even firing right. Id sort that out first and then move forward.
Follow the service manual and dont jump from one adjustment to another or you will keep chasing it.
 

ProPDF

New Member
You have serious issues going on here and an alignment problem would be your best problem and you are far from it. The head nozzle test show the machine is not firing correctly even on the new heads. This is usually a board, encoder and or sensor problem usually. You can not align any print heads at all until you have the black print head working/firing correctly cause all heads align to it. You are wasting time going in and out of the machine if all the heads are not working properly. I would seriously get the correct heads and head board and have a tech come out to you. Right now your nickle and diming will add up to dollars and nonsense.
 

mcbirdman

New Member
Thanks perfect pfd. I didn't end up going in today.....thinking I'd wait til I get the other two heads installed. I already ordered the encoder strip a few days ago just in case. I think that once they are installed it will be more worth my time, and they will be here in a few days...

I know the other colors are off the same amount and it doesn't hurt to focus time on black only realizing they are all askew with bi directionally. I realize the black is locked down and can't really physically be changed. (a set screw under carriage) All colors must align to black but who knows what software setting is still in place needing correction. I think calibration is severely off on both Vert and Horiz, and possible that my new carriage board is hosed as well as my old one.

So I think it's possible that the software settings from putting in a new board are way out from what this machine needs. All colors are printing offset to right and I think vertically off. which makes me think it is software or possible that there is a problem with headboard although after switching that with the new one bought this month.....they both do it.

I think regardless of how many colors work - if black is printing Far Right I have a software problem or a messed up head board and the only way to get any farther is to see if focusing on the black calibration or the headboard can get me past this.

If all colors are printing askew to right I think all I can do is check calibration while I wait for the parts. I thank you for your help and I think the main point is that I should focus on the black and at least see if I can get the major deviation in bi direction figured out then I can worry about the other 3 colors. I mean really, all four print to to right? If I go ahead and send a print job it also has border of image skew to right so sides are not square. Something is telling it to do that......and it does it consistently which makes it seem like some sort of calibration bias over applied.

Will keep you posted and I appreciate your input. This has already been so much work and I am still not there.......yet.....
 

hybriddesign

owner Hybrid Design
I'm looking at your test print and it isn't as bad as you think.

-in service mode our machines have at times also printed the combined test pattern, no idea why but maybe it's based on what firmware version you're on. I wouldn't worry about your test print not matching what's in the manual at all.
-your vertical bias isn't perfect but it's not horrible and it looks like you're on the right road to fixing it. Do you have any vinyl you can print on? It's really hard to do these tests with old heads when printing on banner material as it's hard to read a test print
-you're right in that you need to align the other heads to the black head but I'm pretty sure that only applies to the vertical alignment. your black head is too high right now, bring it down a bit (turn the set screw clockwise) and it'll be easier to align the other heads to it. On our Rolands we've never been able to get the tops of the test prints to align as we always get line drop outs there. We align the bottom of the patterns and ignore the tops
-the cyan looks like it's offset to left but that might just be your bias and bi-directional

Your cyan head is bad but if you're only printing banners it might be okay. Hard to tell on your magenta as the test print is hard to read.

Personally I'd make sure your bias is adjusted right, move your black head up a little and finish up your vertical alignment and then move to the other alignment tests in the manual and see what you end up with. I don't think your boards are bad. On our really old machines we would create a test print which was a grid of alternating small squares. One square would be cyan, the next magenta, and so forth. We'd print this test pattern (on vinyl or something easier to read than banner) and if needed use this to make final adjustments. If you're machine is printing yellow a little too far to the left we'd correct for it in the bi-directional adjustment settings (if it's printing too far to the left, instead of entering in the correct # in the bi-directional alignment you'd enter a number farther to the left and this would trick the machine into shifting the print a little to the right).

Swapping in a new encoder can't hurt though and it's a cheap part. It might clear up a bit of the blur. We had a weird blurry area in just one section of our printing on the VP540 that we just overhauled and it was a drop of black ink on the encoder that I didn't even notice. The print would have weird banding right where that drop of ink was.
 

ProPDF

New Member
Ok so first thing first. One part at a time if you don't know how to check the electrical parts of the boards. Put in a new encoder strip and see what happens. Then put in a new encoder sensor and see what happens. Do not put anymore heads in this machine except 1 new one in the black head position and see if you can get a clear nozzle fire out of it. If not you got electrical issues and I would guess the main board. I am having a hard time from the pics but I would test with one print head in the black position and then add a second head and see what you get. You can do test print from the service menu side (need to enter service code) that will print 4 1 inch thick bars like the photo attached. Do that and post it up here. I would also see if you can talk your local dealer into re-loading VP540i parameters remotely via peck tool. These models had main board problems but were very solid printers. You may need to send out the mainboard to someone like macmedia for $250. It's best to hold off on installing all the new heads right away in case the printer sits for a week or more not functioning and runs a risk of drying out the new heads.
 

ProPDF

New Member
Hybrid look at how bad the normal and service mode photos are contradicting themselves in just the gap or space between alone. That service mode alignment isn't too bad you are right but look how spaced out his normal mode test bar print is. Something is going on board or internal parameters wise I think to have such a huge difference from service to normal mode.
 

mcbirdman

New Member
Okay, here it is....While waiting for encoder strip I tried adjusting detailed and basic bias.
Same overlapping with thin line offset to Right ON Both Colors - Hard to see but they are the Same......

..... Removed Cyan and Majenta....I switched ribbon cables on remaining Black and Yellow. When the yellow printed as black it was easy to realize that they are printing the same type of patterns with those vertical stripes offset to right . Seemed no matter what bias adjustment -20 or 10 or whatever -couldn't see a difference.

I don't know if what I am seeing could be from a carriage board problem telling these new heads to fire and write these vertical lines or if the servo board plays some role in this.....

New heads coming in tomorow though.....I am guessing that when they are printing new, they will be printing the same pattern as the black and yellow /will be easy to see the lines on them too.
20190528_193937pic.jpg
 
Last edited:

mcbirdman

New Member
ok so I put the heads in and it is as I expected. Same pattern same size and alignment on all colors.
I am waiting for linear tape to arrive.

Want to mention we had blown a fuse on F1 we had. found a transistor on mainboard that wasnt reading 40k so I replaced it and no blown fuses and all heads print. Considered possibility the transistor went maybe it damaged the head board somehow. Not sure if that could produce symptom like this with all 4 heads having exact same overprint and Horiz skew ing on printouts. When I replaced Mainboard I also put in brand new printhead board before firing it up. With problem continuing I have switched boards back to the original one, the one T sent me and none of them make a difference.... but what if they got fried from the bad heads? IF I knew the ONLY thing head board does is amplify the firing voltage to heads...Other than fact all 3 print head boards =same results... worry if they all good or possibly bad.

So I wonder if I should try to get another power head board since they are cheap.
I don't just don'tknow if that board can cause these problems.

I am thinking that if it isn't the linear sensor or tape maybe I am going to have to start swapping boards. I only have the tape and not the encoder coming but it does pass linear encoder tests...

....just can't figure out what is controlling the position of all 4 colors.....the Servo board? Hybriddesign was so kind to help me out with that board too. I would hate to have that fail if for some reason I have a failed head board....

I am thinking linear tape install.... maybe that or the sensor bad......
I used the peck6 and installed the old setup and the new and even factory default and can't see why it is doing this still....

Is it reasonable to Next replace the head board in case somehow that is flakey now from bad heads or previously blown fuse. Then, if it seems like something the servo board swap might fix at least I know we have all new parts inline.....

I am trying my best, and appreciate all the comments. BTW I did some adjustments and I see it move a little through software but overlapping seems beyond software adjustment range. I really think if I didn't have these major problems with print overlap it wouldn't take me long at all to make the minute adjustments.

All 4 colors being ghosted/overlapped with in exact same way and with exact same vertical lines?offset. And when it makes a print it acts like offset like this with overlapping colors is similiarly happening both Vertically and Horizontally.

So i only have an encoder strip coming so far. I have 4 new heads installed. Is there a reasonable need to swap servo board with one H sent me and if so, is it safe to do so without worry about buying a headboard first to avoid theoretical interboard damage?
I can swap the linear tape no risk. If no worky....Should I order the linear sensor and while I am at it order sigh, another head board and when it comes swap encoder, headboard and servo board. Or swap servo board sitting here already. Rrrrrrrrr. This is still cheaper than sending a tech but undoubtedly not fun.
Next move ?
Thanks !
20190529_235816web.jpg
20190529_235851web.jpg
 
Last edited:

mcbirdman

New Member
I'm looking at your test print and it isn't as bad as you think.

-in service mode our machines have at times also printed the combined test pattern, no idea why but maybe it's based on what firmware version you're on. I wouldn't worry about your test print not matching what's in the manual at all.
-your vertical bias isn't perfect but it's not horrible and it looks like you're on the right road to fixing it. Do you have any vinyl you can print on? It's really hard to do these tests with old heads when printing on banner material as it's hard to read a test print
-you're right in that you need to align the other heads to the black head but I'm pretty sure that only applies to the vertical alignment. your black head is too high right now, bring it down a bit (turn the set screw clockwise) and it'll be easier to align the other heads to it. On our Rolands we've never been able to get the tops of the test prints to align as we always get line drop outs there. We align the bottom of the patterns and ignore the tops
-the cyan looks like it's offset to left but that might just be your bias and bi-directional

Your cyan head is bad but if you're only printing banners it might be okay. Hard to tell on your magenta as the test print is hard to read.

Personally I'd make sure your bias is adjusted right, move your black head up a little and finish up your vertical alignment and then move to the other alignment tests in the manual and see what you end up with. I don't think your boards are bad. On our really old machines we would create a test print which was a grid of alternating small squares. One square would be cyan, the next magenta, and so forth. We'd print this test pattern (on vinyl or something easier to read than banner) and if needed use this to make final adjustments. If you're machine is printing yellow a little too far to the left we'd correct for it in the bi-directional adjustment settings (if it's printing too far to the left, instead of entering in the correct # in the bi-directional alignment you'd enter a number farther to the left and this would trick the machine into shifting the print a little to the right).

Swapping in a new encoder can't hurt though and it's a cheap part. It might clear up a bit of the blur. We had a weird blurry area in just one section of our printing on the VP540 that we just overhauled and it was a drop of black ink on the encoder that I didn't even notice. The print would have weird banding right where that drop of ink was.

I got all 4 heads put in.... Same Pattern on all of them....
waiting for the encoder strip..... not sure if there is anything else I should / could do..... thanks :)
 

mcbirdman

New Member
Okay so after 60 DAYS of waiting for Parts From Florida Digi ! I have installed the encoder card and head board. All 4 colors print with same open non sollid grid pattern with same offset strips and pattern. I have tried to keep the 4 new heads clean and flowing while I waited.....RRRRR

Trying to figure out if this could be caused by horizontal motor problem I sometimes here the motor "click" as the head moves but it does pass the tests. It has been so long I have been forgetting where I left off. I am not sure what can cause the alignment to be so far off but the motor is consistent enough to make the same incorrect pattern on all 4 colors. I do have a horiz motor I could put in......

I just wonder if a scan motor goes bad can it print exact same pattern but offset the colors same exact amount or is this a software or board problem......
 

Attachments

  • 20190529_235816web.jpg
    20190529_235816web.jpg
    456.9 KB · Views: 185

Solventinkjet

DIY Printer Fixing Guide
Your print heads are simply not firing properly so you aren't going to be able to align them in this state. Something is electrically bad in the system and I would suspect the main board. Your test print should look like the picture below even when they are out of alignment.
upload_2019-8-7_9-12-48.jpeg

As you can see, you're not even close to that. The head signal is getting messed up somewhere.
 

C5 Service&Repair

New Member
You definitely have a mainboard or ribbon cable issue. There is no way you'll ever align the heads like that. Start with unplugging the machine and hitting the power button 10-15 times. Then pull all the long ribbon cables and check the ends and ensure none are bent and they are all seated correctly. Then do your test print. If it doesn't improve, then pull the head cables and check and reseat them.
All the while, inspect each cable for ink drops. The ink will eat through the cables and cause issues.
 

mcbirdman

New Member
Thanks for taking the time looking at this most frustrating problem. What is unique is that the offset colors and stray offset lines are exactly the same on all colors. To me, it would seemed more than a bad cable. So yesterday I swapped out the current board with the original board which was mainly having network connectivity issues rendering it nearly useless for print jobs because it stalls in the middle of print jobs when data gets interrupted.

Well, test pattern came out like the SolventInkjet photo shared above with minor alignment issues. This indicates motherboard problem and now I have to figure out if this kind of duplicate offset printing is the type of thing that could be sent in and fixed since it seems like most people were sending in boards for a blown transister on a single color dropping out etc....

This affects all colors and I am not sure if anyone out there might be able to tell me if this is something repairable or has had similiar experience. I have written to both places listed on ebay that sell board repair service but they never reply......

I guess I am looking for a main board again or going to try to send this one in but I am not sure if the problem is a known fixable or unrecoverable. Does this sound familiar to any of you? (Other than the frustrating part about trying to get an old printer running lol)

Thanks !
James
 
Top