• I want to thank all the members that have upgraded your accounts. I truly appreciate your support of the site monetarily. Supporting the site keeps this site up and running as a lot of work daily goes on behind the scenes. Click to Support Signs101 ...

SP-540V Ink Line Replacement

zodizo

New Member
Hi all,

In the process of reviving a SP-540V that's been sitting in my parents garage for 6 years :eek: replaced dampers, captops, wipers, encoder strip, got 2 cleaning cartridges and all new inks. Lets just say, this printer and I have spent a loooot of time getting to know each other in the past 4 weeks lol. I was able to draw cleaning solution from the cartridges into all 4 new dampers. However, neither ink or cleaning solution will pull through the caps using a syringe. The heads are seated exactly center with the captops so don't think its an alignment issue.

I noticed there was a lot of clogged ink in the lines when I removed the back cover to replace the encoder strip. I undid the black hose directly from the damper and at the opposite end where it connects to the ink cartridge. I blew an air hose through the cartridge end and dislodged a lot of ink and crud that was keeping ink from flowing freely. Haven't tried reconnecting the hose to the damper and filling with new ink because I regrettably lost one of the o-rings during disassembly :banghead: i've got several backup o-rings set to come in next week

So, I have a few options for reassembly, and some questions for those who have done this job before on a Roland or another printer:

1) Run the air hose through each line, follow with cleaning solution, then fill with ink and try pulling through the captops?
2) Replace all the lines and o rings then fill with ink?

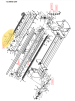
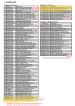
Also, if I should replace the lines, I'm looking at getting at least 1720 mm of 2 mm ink line and 1000 mm of 3 mm ink line, according to the service manual, correct (highlighted in the pictures below)? Is it also advised to get new ink line connections for connecting the 2mm and 3mm line? Of course all the o rings will be replaced since I'm having to order them anyway.

THANK YOU IN ADVANCE this forum has been a huge help for working on this dinosaur!
 

Attachments

  • Screenshot 2023-11-24 214141.png
    Screenshot 2023-11-24 214141.png
    203.3 KB · Views: 195
  • Screenshot 2023-11-24 214157.png
    Screenshot 2023-11-24 214157.png
    218.5 KB · Views: 76

damonCA21

New Member
Budget for two new heads as well as after that amount of time they are going to be shot. That is probably why ink isn't drawing through them as they will be completely clogged with dried ink and sludge. The nozzles in the print head are extremely small, and even if you get them unclogged they won't print. You will probably also need to replace the ink pump as these can clog up too.

After that amount of time I would just replace the hoses as it will be quicker than trying to clean them. You will also need to clean out the needles in the ink dock as these can clog too. You should be able to draw ink from the bottom of the damper with not too much pressure applied, this will let you know the ink path is clear.
 

Jim Hancock

Old School Technician
An alternative to replacing the lines is to disconnect the ink lines at both cartridge side and the damper side. Connect a syringe to the ink line at the cartridge end with some flexible tubing. Place the other end in a container of acetone and pull ink through the lines until the line runs clear. Acetone will dissolve ink faster than anything else. Once all the lines are cleared, run some cleaning solution through the lines to remove any residual acetone. You mentioned using a syringe. If it is a plastic type, the rubber piece will eventually swell from contact with the solvent ink. You may find these 2 items to be very helpful.

https://www.amazon.com/gp/product/B081Q2S7T6/ref=ppx_yo_dt_b_search_asin_title?ie=UTF8&psc=1


Tip - when the syringe is getting full, you can disconnect the needle from the syringe, empty it and reconnect to pull more fluid.
 

Novadon

LEF2-200
I'm no expert by any means, but if easily accessible, I'd replace the tubing (it is very inexpensive to purchase).

Also, after that, I'd attempt to clear / clean the heads rather than spending significant time and $'s on arbitrary Head replacements and potential head alignment issues. ;)

What do you think Jim H?
 
Last edited:

Jim Hancock

Old School Technician
I have replaced ink lines before, and it is a major pain. The new lines have to be fed through the chain system and there are tubing size changes with couplers in the middle of the chain. It requires some disassembly of the chain system in order to feed the lines through. The ink lines are impervious to acetone. The few times I did change ink lines was because of damage to the lines themselves.

As far as the heads go, he can try to soak and clear them, but as Damon said, it's pretty much a foregone conclusion they are toast after this amount of time.
 
Last edited:

damonCA21

New Member
Thanks!

Makes sense on the line cleaning, given the complexity to replace.

But my liking a challenge (and yeah, frugal) I'd at least try a Head cleaning. But that's the Virgo / Machinist / Putterer in me. ;)
It is always worth trying to clean the heads as there is nothing to lose but time, but when they have been sitting this long I would be very careful doing it. When they are very clogged trying to force cleaning solution through can cause the inner ink diaphragms to split, and they they a write off as they are very delicate
 

FrankW

New Member
Be aware of that this machine is out of service. It is no problem to get ink damper, heads and so on because they are not specific, but I (as a technician) was at a customers site to repair one, and 3 of the 5 parts needed are not available anymore.

Before thinking of replacing the ink tubes (is is a real pain), you should try to pull the ink through the cap tops (disconnecting every single tube from the pump and pull). If you has lost one o-ring, you could try to pull with two ink lines (on one head and one cap) before getting new o-rings. The best way to clean the tubes is to put cleaning cartridges in the bays and pull then. I would not "blow" from the cartridge side if ink damper and heads are connected.

If you use third party inks, be shure that they fit to the printer.
 

damonCA21

New Member
Most parts are available used as well. I've never not been able to find a part for a repair ( plus I have quite a stash of parts I have built up over the years )
 

zodizo

New Member
Hi again, THANK YOU EVERYONE for the helpful replies!

Today I stopped by Ace Hardware and picked up a o-ring assortment kit and was lucky enough to find one that fit the 2mm hose! So we're back in business today.

Since there's no damage to the lines themselves (no kinks, holes) I just decided to flush the entire line from cartridge end to damper end with air. I then followed Jim Hancock 's advice and flushed first with acetone to break up the remaining crud stuck to the walls of the hose. I don't think I ever got it completely clean but I was able to pull the cleaning solution through with a LOT less resistance than before, so it must have done some good. I think any problems related to the dried ink in the lines has been eliminated now.
However, I still have not been able to pull cleaning solution or ink through the captops.
That is probably why ink isn't drawing through them as they will be completely clogged with dried ink and sludge. The nozzles in the print head are extremely small, and even if you get them unclogged they won't print.
I'm beginning to think this is the issue. The heads have had four 8-hour long head soaks inside the captops so far. I'm only getting a tiny amount of cyan on my test prints so far, no other colors.
Also, after that, I'd attempt to clear / clean the heads rather than spending significant time and $'s on arbitrary Head replacements and potential head alignment issues. ;)
Any tips on reviving the old heads? I'd like to attempt every possible method to clear the heads before opting for a replacement. I've heard others mention on this forum the use of ultrasonic cleaners, removing heads from the machine and doing a deep soak in solvent cleaner, but the topic of reviving old printheads on this forum is somewhat of an urban legend on this forum... would love to hear tips from those who have done even partially successful head cleanings!
 

Jim Hancock

Old School Technician
Personally, I think you are beating your head against the wall on the heads... Four 8 hour soaks should give you more than a tiny amount of cyan. The ink is dried up inside the head where cleaning solution can't get to it. Yes, it can be removed with ultrasonic and cleaning solution, but the ultrasonic frequency on most ordinary ultrasonic cleaners resonates with the crystal structure in Epson heads. The end result is some or a great deal of nozzle recovery, but the side effect is massive deflection, due to ultrasonic damage to the firing crystals. Been there, done that while testing when I worked for an ink manufacturer. The Epson heads are especially delicate internally. I have also used a top end Print Head Doctor Model 15 head recovery system, which was just a bit over 6 grand, primarily on Ricoh heads, which are much more robust. Even the Print Head Doctor people will tell you Epson heads are an iffy proposition using their system, which is very sophisticated. The system I used didn't do well with Epson heads, but quite well with the Ricoh heads. So, there is some feedback for you from my hands on experience.
 

Jim Hancock

Old School Technician
Added thought... If you want to be sure you have all the dried ink out of the lines, fill them with acetone again and block of both ends and let it sit for 30 minutes, then flush it out again.
 

zodizo

New Member
Personally, I think you are beating your head against the wall on the heads... Four 8 hour soaks should give you more than a tiny amount of cyan. The ink is dried up inside the head where cleaning solution can't get to it. Yes, it can be removed with ultrasonic and cleaning solution, but the ultrasonic frequency on most ordinary ultrasonic cleaners resonates with the crystal structure in Epson heads. The end result is some or a great deal of nozzle recovery, but the side effect is massive deflection, due to ultrasonic damage to the firing crystals. Been there, done that while testing when I worked for an ink manufacturer. The Epson heads are especially delicate internally. I have also used a top end Print Head Doctor Model 15 head recovery system, which was just a bit over 6 grand, primarily on Ricoh heads, which are much more robust. Even the Print Head Doctor people will tell you Epson heads are an iffy proposition using their system, which is very sophisticated. The system I used didn't do well with Epson heads, but quite well with the Ricoh heads. So, there is some feedback for you from my hands on experience.
What are your thoughts on using "NMP" N-Methyl 2 Pyrrolidone for cleaning printheads? Or using tools like DX4 printhead cleaning tool to flush the heads manually?
 

damonCA21

New Member
To be honest, and just my opinion... most of the head cleanings systems for DX4 heads are snake oil and don't work. The videos I have seen where they show the cleaning fluid flowing well through the head never actually show a test print done with them afterwards. As Jim says, they may clear out the nozzles, but that doesn't mean there is going to be no deflection and the head is going to work properly.

They may give some improvement on a very lightly blocked head, meaning it was recently printing fine, so the ink hasn't had a long time to congeal inside the head, but I can't see them doing much for heads that have sat long enough for the ink lines to clog.

The problem with solvent inks is when left for a long time, the solvent evaporates and leaves a really thick sludge ( like artists oil paint only thicker !). Even ultrasonic cleaning and constant flushing won't shift it all as it takes a lot of pressure to force that through the nozzles, and to do that is more likely it will damage the nozzles or head rather than clear it.

When they get that bad soaking does very little as it won't penetrate into the gloop of old ink, it will just sit on it and may dissolve a little of the surface.
At the moment you have nothing to lose though as neither head works, and there is a 99.9% chance they will never work again properly, so try different things, but if you want the printer working again it's going to be time for a couple of new heads
 

Jim Hancock

Old School Technician
What are your thoughts on using "NMP" N-Methyl 2 Pyrrolidone for cleaning printheads?
See Damon's post... I don't get into the exotic solutions (nothing wrong with them), as I'm more focused on getting the printer up and running as quickly as possible so my customer can start making money. Remember, in this business, down time is lost money.
Or using tools like DX4 printhead cleaning tool to flush the heads manually?
Not a fan of the approach as manufacturers suggest. Here's why. The path the ink follows through the head is like an upside-down tree, i.e., it starts as a single large opening and keeps splitting into branches, with each branch splitting in two until at the nozzle plate it's 180 openings. As this happens, each branch is smaller. If you have any debris in one of these branches, pushing solution through the head from the top only pushes the debris into a smaller opening until it is stuck, usually permanently. If I'm trying to clear a head, I make a small fixture from the bottom of a water bottle, place the head on top of this fixture and put just enough solution to submerge the bottom of the head by 1/8 inch. I will then gently pull ink upward through the head, hopefully dislodging any debris and pulling it out. With that in mind, the system itself is a very useful tool, just use it the logically right way, pull, don't push!
 

zodizo

New Member
Well, after another 8 hr soak last night, today's test print was blank once again. Thinking I will drain the ink from the lines and flush them with acetone once more today. I have a healthy supply of acetone on hand from doing my fingernails, LOL.

If I'm trying to clear a head, I make a small fixture from the bottom of a water bottle, place the head on top of this fixture and put just enough solution to submerge the bottom of the head by 1/8 inch. I will then gently pull ink upward through the head, hopefully dislodging any debris and pulling it out. With that in mind, the system itself is a very useful tool, just use it the logically right way, pull, don't push!

What kind of syringe do you use for this method? I've got a glass syringe and a little extra flexible tubing. Do you have to remove the printheads or can the solution be pulled up through the manifolds?
 

Jim Hancock

Old School Technician
Your glass syringe is perfect, provided it is big enough. I use these items, as the syringe is a Luer Lock type, as are the needles. This makes it easy to detach the syringe from the needle to empty the syringe. The variety of needle sizes let you find the right one that fits snuggly in the flexible tubing. I use the #12 for most things. I also use these to attach to the bottom of the dampers when attached to the ink lines to fill new dampers and charge the ink lines. This approach uses a lot less ink than doing an ink fill. As you already know, it's also good for pulling ink through the heads to check for airtight integrity with the caps, pulling gently, of course! When installing new heads and dampers, I suggest charging the dampers this way, but to do a power clean to charge up the new heads. Less chance of damage that way. When charging dampers, I suggest cleaning the syringe between colors, as sometimes residue from the previous color will backflush into the next damper, which you don't want.

A tip on using the needles on dampers. When using the #12 on older dampers, for whatever reason, it needs to fit snuggly. If it is loose, time for a new damper, as you will definitely have an air leak when you put it on the print head. Also, with a foam swab, lubricate the O-ring on the bottom of the damper and the manifold post with a tiny bit of cleaning solution. It makes it easier to install and forms a better seal.

Of course, the overwhelming general consensus here is, you need new heads.

https://www.amazon.com/gp/product/B081Q2S7T6/ref=ppx_yo_dt_b_search_asin_title?ie=UTF8&psc=1

https://www.amazon.com/gp/product/B01LM8LTTO/ref=ppx_yo_dt_b_search_asin_title?ie=UTF8&psc=1

Do you have to remove the printheads or can the solution be pulled up through the manifolds?
Yes, the heads need to be removed.
 
Top