Adelgander
New Member
This is a separate thread as requested for our printer issues. Again, I am using Flexi 8.
First off this all began when we ran out of black ink, and ordered new ink cartridges. Same everything, from the same place, same brand etc. Once we changed them, we started experiencing issues with our reg marks not printing, and realized the black was not printing at all, and the other colors were just compensating as best they could to print its closest version of black. We tried setting or marks to "all" and "cyan", but it just doesn't really show up or detect on the plotter.
The image titled "print test" is the draw I did after pulling ink through with the syringe. As you can see there was a strange smear, and ink only really printed for one portion instead of two.
The other test draws are what I got just now, first before I did anything, then after a maintenance cleaning, and then after ink fill up function.
I have done a few things to try and resolve the issue: (and I'm not sure what a lot of these things are actually called, so I will just describe them)
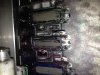
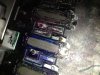
1. First we tried the syringe to draw ink into the plastic cartridges that intersect the ink lines before they reach the actual heads. I noticed that one of those plastic (I will call them "cards") was less full of ink than the others, so I figured there might be a clog someplace.
2. After the temporary success on one of the black test draw portions, I decided to replace that plastic "card" on the line that did not print. I had a few new clean, empty ones in a box I found here. After this, still no black at all. I ended up replacing both of them on the black head, and still no black on the test draw.
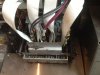
3. I went around to the back of the printer and removed a panel that gave me access to a different part of the ink lines. Here there seem to be some metallic "housings" of some sort that I was able to disconnect the tubes and try drawing ink through there with the syringe. This area is located on the back of the machine above the waste ink receptacle.
4. I then tried every combination of maintenance tests from normal to heavy cleaning, and ink fill-ups to ensure no air was in there. There is an error on the screen all the time saying "replace wiper" but I don't have one laying around. Not sure if that could be the cause of all this.
Things that have happened that might be suspect:
An employee that used to work here but left recently was stationed at the machine to watch the corner of the vinyl we had in it for printing, as it was curling up and try to get caught by the carriage. Of course he wasn't paying attention and it snatched it right up and crumpled up under the carriage. Luckily I was near by and ran over and flipped the switch to stop it from continuing its job. Maybe that damaged the head for black? But why would it print even a temprary portion of the test draw?
I learned all of this from a former employee here, as she had about three years dealing with the crap this machine gives us. She exhausted her knowledge of what to do last week, and none of the parts/ service companies we have on file are available/willing to help over the phone... or they are lazy and do not get back to me.
I hope the information I posted here may be of help for finding a possible solution. Thanks to everyone.
First off this all began when we ran out of black ink, and ordered new ink cartridges. Same everything, from the same place, same brand etc. Once we changed them, we started experiencing issues with our reg marks not printing, and realized the black was not printing at all, and the other colors were just compensating as best they could to print its closest version of black. We tried setting or marks to "all" and "cyan", but it just doesn't really show up or detect on the plotter.
The image titled "print test" is the draw I did after pulling ink through with the syringe. As you can see there was a strange smear, and ink only really printed for one portion instead of two.
The other test draws are what I got just now, first before I did anything, then after a maintenance cleaning, and then after ink fill up function.
I have done a few things to try and resolve the issue: (and I'm not sure what a lot of these things are actually called, so I will just describe them)
1. First we tried the syringe to draw ink into the plastic cartridges that intersect the ink lines before they reach the actual heads. I noticed that one of those plastic (I will call them "cards") was less full of ink than the others, so I figured there might be a clog someplace.
2. After the temporary success on one of the black test draw portions, I decided to replace that plastic "card" on the line that did not print. I had a few new clean, empty ones in a box I found here. After this, still no black at all. I ended up replacing both of them on the black head, and still no black on the test draw.
3. I went around to the back of the printer and removed a panel that gave me access to a different part of the ink lines. Here there seem to be some metallic "housings" of some sort that I was able to disconnect the tubes and try drawing ink through there with the syringe. This area is located on the back of the machine above the waste ink receptacle.
4. I then tried every combination of maintenance tests from normal to heavy cleaning, and ink fill-ups to ensure no air was in there. There is an error on the screen all the time saying "replace wiper" but I don't have one laying around. Not sure if that could be the cause of all this.
Things that have happened that might be suspect:
An employee that used to work here but left recently was stationed at the machine to watch the corner of the vinyl we had in it for printing, as it was curling up and try to get caught by the carriage. Of course he wasn't paying attention and it snatched it right up and crumpled up under the carriage. Luckily I was near by and ran over and flipped the switch to stop it from continuing its job. Maybe that damaged the head for black? But why would it print even a temprary portion of the test draw?
I learned all of this from a former employee here, as she had about three years dealing with the crap this machine gives us. She exhausted her knowledge of what to do last week, and none of the parts/ service companies we have on file are available/willing to help over the phone... or they are lazy and do not get back to me.
I hope the information I posted here may be of help for finding a possible solution. Thanks to everyone.