• I want to thank all the members that have upgraded your accounts. I truly appreciate your support of the site monetarily. Supporting the site keeps this site up and running as a lot of work daily goes on behind the scenes. Click to Support Signs101 ...

Template building for off road vehicles

zmachine

New Member
I have created a few templates from scratch for snowmobiles and side by sides much to my own displeasure of available templates.
It takes forever and isn't really worth the time unless you can sell tons of the kits but for my own/friends vehicles I want them to look nice & clean and not a hack job.

So my question is for those who have done the same, I am still trying to find the best/most efficient way to transfer the physical piece (have tried everything from masking tape to wrap vinyl) to the digital space properly.

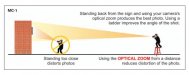
I starting out using a camera and trying to take a straight on picture, then tracing digitally, but that is very rarely accurate and requires multiple revisions and wasted material.
Then I went to a reprographics company and had them scan in the physical pieces but the output is only available as a bitmap and still needs some work before a proper vector object is achieved.

Any tips or advice would be greatly appreciated, thanks.
 

ChaseO

Premium Subscriber
Scanning it is about the only way I have ever found that will work. When I make my own templates, I make them out of paper, then dust the edges with spray paint, and draw lines on them with measurements to make sure I am properly scaling them. Then I make the vector outline using the Bezier tool and do my final node editing.
 

phototec

New Member
I use low tack vinyl and print a 1"x1" grid over the whole piece, then apply the vinyl to the panels I want to make a template of, and using a black marker follow the outer edge of the panel drawing a line, I also make notes if the panels have returns or need to match up with another panel.

I then remove the vinyl pieces and stick them on the wall and take a high resolution photo of the grid printed pieces (not with phone camera), trying to shoot as straight-on and centered as possible so O don't get lens distortion, then I open the images in PS and scale them up to full size, the printed 1"x1" grid helps me get rid of any lens distortion and makes sure the image is to exact size, using the measuring tool in PS.

Then, I import the photo into Illy and use it as a full sized (or scaled) template to create my graphics.
 

SightLine

║▌║█║▌│║▌║▌█
I use low tack vinyl and print a 1"x1" grid over the whole piece, then apply the vinyl to the panels I want to make a template of, and using a black marker follow the outer edge of the panel drawing a line, I also make notes if the panels have returns or need to match up with another panel.

I then remove the vinyl pieces and stick them on the wall and take a high resolution photo of the grid printed pieces (not with phone camera), trying to shoot as straight-on and centered as possible so O don't get lens distortion, then I open the images in PS and scale them up to full size, the printed 1"x1" grid helps me get rid of any lens distortion and makes sure the image is to exact size, using the measuring tool in PS.

Then, I import the photo into Illy and use it as a full sized (or scaled) template to create my graphics.

This.... I do pretty much the same but a bit simpler. Instead of printing a grid on the app tape I just use a straight edge and draw a few horizontal and vertical straight lines on the app tape then draw a few measurements onto it while it is on the vehicle (or whatever) as well as tracing the edges out. Also - an excellent and dirt cheap plugin for Photoshop, PTLens from ePaperPress. The guy that created and keeps it update is very good about adding support for new cameras (even iphone 5). The plugin works great for correcting camera lens distortion, much better than Photoshops own tool for it in my opinion. http://epaperpress.com/ptlens/index.html

Anyways once I get my photo right and cropped I just open it in illustrator and draw the template over it. Sure it can take a bit but to get things right its worth it. I do not bother trying to get it to any exact size in photoshop (unless I plan on just designing right in PS on top of the image). To get it to the right size in Illustrator here is another tip for making sure you have a photo or artwork in Illustrator to a known exact size (you can also work in scale like 1:4 or whatever). Say you have some art or a photo and you know a specific dimension like the height of a certain part or width of a window. Make a rectangle over that part exactly the width of it (the measurement does not matter yet, it just needs to be exact over the photo or artwork). Select the new rectangle and the photo (or all of the artwork) and make it a big clipping mask. Now you have a rectangle the width of the window or whatever, make it proportionally the known width or height (or a quarter the known size if you want to work in scale). Then release the clipping mask.... Voila'. :)
 

zmachine

New Member
Thank you for all the responses and for the links!

Haven't tried the grid approach but that would be a good idea. I know that there is some transfer/masking tape you can buy with 1" grids but not sure how conformable it would be.

For those taking pictures, are you using a tripod or another type of fixed system and just adjusting for distance based on the size of the piece?
Have tried several ways and can never seem to get a good straight on shot either from the ground (above) or placed on a wall (in-line).
I have a decent enough stand alone camera but always seems to be a little off.
 

phototec

New Member
Thank you for all the responses and for the links!

Haven't tried the grid approach but that would be a good idea. I know that there is some transfer/masking tape you can buy with 1" grids but not sure how conformable it would be.

For those taking pictures, are you using a tripod or another type of fixed system and just adjusting for distance based on the size of the piece?
Have tried several ways and can never seem to get a good straight on shot either from the ground (above) or placed on a wall (in-line).
I have a decent enough stand alone camera but always seems to be a little off.

That's why I print the grid with vert and horz lines, it allows me to get a TRUE flat image in PS without any distortion, If you start out right (see below) you will not have to do very much to straighten the image, and I use the lens correction filter in PS to make sure it corrects for my lens distortion.

Ok, here is a tip for taking a photo of the template outline you made (with or without a grid), use a medium telephoto lens and move way back from the subject, (this eliminates most lens distortion), center the camera left to right and up and down so you are in the exact center of the image and shoot straight on. I measure the center of the image from the floor, then make the camera on a tripod the same distance from the floor to the center of the lens. Using the tile grid on my floor, I fine the center of the image on the wall and make sure the camera is centered left to right. Then when shooting with an 85mm lens, there is almost NO distortion.

This method also works very well when you need to take a photo of an existing sign that you need to duplicate, you can use the u-distorted photo as a template for the new sign. I attach a yard stick to the old sign (with double sided tape) so I have size a reference indicator in the photo.
 

Attachments

  • Move back.jpg
    Move back.jpg
    82 KB · Views: 105
Top