• I want to thank all the members that have upgraded your accounts. I truly appreciate your support of the site monetarily. Supporting the site keeps this site up and running as a lot of work daily goes on behind the scenes. Click to Support Signs101 ...

Need Help test print alignment

signgirl71

New Member
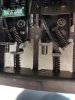
Any easy fix to this or is this close enough? Installed new printhead but I notice the test print is a tad bit off. I saw where you can use those two screws under where it sits to adjust it but on mine, the screws don't reach in the middle hole and you can only tighten to the right on the left hole. Tried it anyways to see if it moved but it doesn't seem to do a thing. Heres a pic to show - good enough or an easy fix? Of course now it won't read the registration marks which seems weird to me since it was working fine before I changed the printhead, but you know how it is, you fix one thing and another thing will just break just to tick you off! money money money money
 

Attachments

  • 20231226_121044.jpg
    20231226_121044.jpg
    1.7 MB · Views: 202

Solventinkjet

DIY Printer Fixing Guide
That looks out of whack to me for sure. You need to run the head alignments after installing a head. Also, make sure you clean the area under the head bracket. A lot of the time ink gets in there and makes it stick like glue and so the physical alignments don't actually move like they should.
 

signgirl71

New Member
That much skew I would definitely fix it and after that do all the adjustments.
how do I do that? I tried with those screws but as you can see the first print and the second print there is no difference yet all the feed and scan adjustments I did seem fine
 

signgirl71

New Member
That looks out of whack to me for sure. You need to run the head alignments after installing a head. Also, make sure you clean the area under the head bracket. A lot of the time ink gets in there and makes it stick like glue and so the physical alignments don't actually move like they should.
from what I read there is suppose to be a possible hex that could adjust this other than the screw but if you notice the screw doesn't touch anything all way screwed in and the screws on the left are the ones that I think are suppose to be hex because all you can do is take that other screw and screw them tight against that metal rail but you can't back them out. I'm at a loss because I can't move the printhead anywhere even when the three screws holding the head in place are loosened or those screws won't align back up to hold down the head. Yes in the picture it's a filthy close-up but it's to show what I'm talking about.
 

Attachments

  • 20231226_141550.jpg
    20231226_141550.jpg
    1.4 MB · Views: 103

damonCA21

New Member
The hex screws ( the ones on the left ) adjust the head from to left to right ( the skew ) . They do this by pushing against the brown plastic plate the head fixes to.

The white plastic capped ones move the head backwards and forwards.

To clean the head slider to make sure the white one is working you need to take out the head and the brown plastic plate it fits onto, then remove them metal bar under it. This is what adjusts the head, and ink buildup under it stops it moving. It should move freely backwards and forwards when you adjust the white adjuster.

Remember as well the left hand head is always fixed, and you adjust the right hand head to this.
 

signgirl71

New Member
The hex screws ( the ones on the left ) adjust the head from to left to right ( the skew ) . They do this by pushing against the brown plastic plate the head fixes to.

The white plastic capped ones move the head backwards and forwards.

To clean the head slider to make sure the white one is working you need to take out the head and the brown plastic plate it fits onto, then remove them metal bar under it. This is what adjusts the head, and ink buildup under it stops it moving. It should move freely backwards and forwards when you adjust the white adjuster.

Remember as well the left hand head is always fixed, and you adjust the right hand head to this.
so that last line - the left hand head is fixed, and that's the one I changed, so I should do this to the head on the right then, the one I didn't change? And if I adjust that left screw that is suppose to be a hex then the top and bottom of the print test should align straight? Other then re-doing the alignment tests in service mode again??
 

damonCA21

New Member
Yes, leave the left head where it is, then adjust the right head with the white screw so they are approx level with each other. The hex screw with adjust the straightness of the head in the holder. If you get hold of the service manual for the printer it takes you through all of this in more detail, but the important thing is to make sure the metal sliders under the head are clean and free to move, otherwise the adjustments won't do anything
 

Jim Hancock

Old School Technician
This should help. And be sure to use a long PH1 (not a #1) Phillips screwdriver so you don't hit the dampers and break the manifold post. Also, you don't need to tighten screw #1, the middle screw, until you finish the bias and vertical alignments. Don't forget to enter the head rank and clear the shot count for the new head. And hopefully, you installed new quality dampers, as reusing the existing dampers can sometimes result in air leaks that can drive you crazy trying to find.
 

Attachments

  • SP-300(V) head alignment.pdf
    412.6 KB · Views: 50

signgirl71

New Member
This should help. And be sure to use a long PH1 (not a #1) Phillips screwdriver so you don't hit the dampers and break the manifold post. Also, you don't need to tighten screw #1, the middle screw, until you finish the bias and vertical alignments. Don't forget to enter the head rank and clear the shot count for the new head. And hopefully, you installed new quality dampers, as reusing the existing dampers can sometimes result in air leaks that can drive you crazy trying to find.
Thank you, I actually found that originally and thats how I alligned (well tried to) everything after I installed the new print head. My hex (which I swear isn't a hex but just a screw - a hex doesn't work but that middle screw works in it - will not back off, it will only go straight) so I took off the original head I replaced and backed that screw off so it wasn't pressing on the plate and tried to aligned it straight with the other even though the previous post said that one is fixed and to move the other. But now, my yellow and magenta has fallen out leading me to believe from what I have read that the f3 fuse on the main board has fried - this is just my guess. I am assuming the main board is on the backside of the machine and I have never replaced one before and I'm sure it's nothing I can just go to the store and get and will have to find it and order it online, which puts me down for a few more days. I'm now beyond frustrated as there is no way I can afford a tech to come out, and I usually figure this stuff out on my own. Anyways, I appreciate all the help! I am glad there are so many people on here willing to help! Let's hope the new year is better than this year and these problems fix themselves! Thanks again!
 

damonCA21

New Member
Before doing any head work, unplug the machine from the wall and leave at least 15 minutes before working on it to let the charge drain from the capacitors, otherwise you can blow the fuse easily. If you are handy with solder it is easy to replace the small mini fuse with a glass fuse in a holder. This is a common upgrade on the boards as if you do blow a fuse it allows you to swap a new one without any soldering.

The screws on yours will be a hex head, but it is a very tiny one and hidden inside the metal tube bit the screw sits in. If they havent been moved for a long time they can be quite stiff though, but should turn easily when free. If it really stuck when you get the correct size hex driver, use some needle nose pliers to grip the screw body and gently move back and forth to free it. A squirt of WD40 can also help
 

signgirl71

New Member
Before doing any head work, unplug the machine from the wall and leave at least 15 minutes before working on it to let the charge drain from the capacitors, otherwise you can blow the fuse easily. If you are handy with solder it is easy to replace the small mini fuse with a glass fuse in a holder. This is a common upgrade on the boards as if you do blow a fuse it allows you to swap a new one without any soldering.

The screws on yours will be a hex head, but it is a very tiny one and hidden inside the metal tube bit the screw sits in. If they havent been moved for a long time they can be quite stiff though, but should turn easily when free. If it really stuck when you get the correct size hex driver, use some needle nose pliers to grip the screw body and gently move back and forth to free it. A squirt of WD40 can also help
yeah, that was my problem, I had it on in service mode and started screwing with it without unplugging it - that's why I'm pretty sure I blew the fuse. I ordered one but hearing something about soldering it is starting to worry me. guess I'll figure it out when it comes in tomorrow. I did use the plyers to back off that hex screw too - hopefully all goes well and i can get back to printing and fix the original scewing issue
 

signgirl71

New Member
with the yellow/magenta dropping out after me stupidly trying to realign the heads in service mode without shutting it off, and reading that it has probably blown a F3 fuse, is there a way to tell if it is blown by looking at it? If this is it then it doesn't look bad to me but I never seen a fried one other then in a picture where it actually looked fried. Seeing how I have never soldered anything and wouldn't even know how to go about doing it, would there be any other reason why those colors just dropped out before trying to figure out how to get this off and replaced? I have a new one coming tomorrow. Thanks again for any help!
 

Attachments

  • 20231227_100658.jpg
    20231227_100658.jpg
    891.3 KB · Views: 64

balstestrat

Problem Solver
You need a multimeter to check it. However me even telling you this means you have no idea what you are doing and that always means you can mess up more things on your way.
 

signgirl71

New Member
You need a multimeter to check it. However me even telling you this means you have no idea what you are doing and that always means you can mess up more things on your way.
lol - yeah, I read something about some kind of tester, was just wondering if you could tell by looking at it. Also looking for other reasons why the color dropped out to check if its not the fuse. either way i have a fuse coming.
 

damonCA21

New Member
with the yellow/magenta dropping out after me stupidly trying to realign the heads in service mode without shutting it off, and reading that it has probably blown a F3 fuse, is there a way to tell if it is blown by looking at it? If this is it then it doesn't look bad to me but I never seen a fried one other then in a picture where it actually looked fried. Seeing how I have never soldered anything and wouldn't even know how to go about doing it, would there be any other reason why those colors just dropped out before trying to figure out how to get this off and replaced? I have a new one coming tomorrow. Thanks again for any help!
No you can't normally tell if the have blown by looking at them. They have a very thin wire inside the ceramic block that connects to the two metal ends. If it blows it is inside the block, so you won't be able to tell.
If you have never done any soldering before I would get someone else to do it! They are very small and tricky to change over, and you can easily damage the board beyond repair. Any mobile phone or electronics repair shop should be able to to do it for you
 

Jim Hancock

Old School Technician
I can guide you through how to check the fuses and output transistors. Call me at the number in my signature. It will be easier to talk you through it than explaining it here.
 

signgirl71

New Member
Since I am waiting on a delivery today of the fuse (I also ordered the cables that go to the head) I decided to try to swap the head cables to see if it would print the dropped out magenta/yellow and it did. Would that test make it safe to say the fuse has not blown and it just needs new head cables or am I getting my hopes up?
 

Jim Hancock

Old School Technician
When you did this, did the black/cyan head stop printing? I presume you swapped the cables in pairs without crisscrossing the cables in each pair.
 
Top