• I want to thank all the members that have upgraded your accounts. I truly appreciate your support of the site monetarily. Supporting the site keeps this site up and running as a lot of work daily goes on behind the scenes. Click to Support Signs101 ...

The Great Seal of the United States (with the Eye in the Pyramid): aluminum and steel

Simon Arthur

New Member
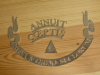
I created this one just to show our customers what this type of sign looks like. Also to give an idea of what goes into turning this type of seal or crest design into real metal parts you can touch.

The materials are brass, stainless steel, and aluminum, all 1/8" thick. Plus one tiny laser cut piece of black acrylic.

The metals are all waterjet cut.

attachment.php


The design was taken from the original Wikipedia version
attachment.php


Then cleaned up into shapes suitable for cutting in Inkscape.
attachment.php


After waterjet cutting, some of the pieces needed to be redone: they had sections that were too small, bridges too thin, etc.
attachment.php


You can read more about it on our website.
 

Attachments

  • sign-complete.jpg
    sign-complete.jpg
    81.1 KB · Views: 272
  • Selection_436.png
    Selection_436.png
    348.5 KB · Views: 198
  • Selection_438.png
    Selection_438.png
    232.1 KB · Views: 188
  • recuts-prefinish.JPG
    recuts-prefinish.JPG
    184.6 KB · Views: 190

2B

Active Member
looks very good.

if you do it again (or a like project) would suggest making the background frosted acrylic so you can see through it and also if you ever add LED lighting the shine through is AWESOME
 
I know it's not perfect. What would you suggest to improve it?

The size of certain elements and the placement is way off. Namely, the lettering across the top doesn't follow the arc. The ribbon on the bottom appears too low, as does the pyramid. I would use a slightly oversized adhesive vinyl template to place the elements, similar to what we use to place laser cut letters on an interior wall.

attachment.php
attachment.php
attachment.php
 

Attachments

  • SMALL 20141211_093008 small.jpg
    SMALL 20141211_093008 small.jpg
    249.8 KB · Views: 186
  • SMALL 20141211_095013.jpg
    SMALL 20141211_095013.jpg
    329.3 KB · Views: 201
  • SMALL 20141211_102644.jpg
    SMALL 20141211_102644.jpg
    320.4 KB · Views: 192

artbot

New Member
I'd either cold cast it or either acid etch aluminum for this. attached is a similar project i did way back by etching aluminum.
 

Attachments

  • 005_FT BELVOIR ETCHED MILITARY SEALS.jpg.jpg
    005_FT BELVOIR ETCHED MILITARY SEALS.jpg.jpg
    50.5 KB · Views: 150

Simon Arthur

New Member
Good idea on using the stencils.

I resized the lettering and banner after the originals didn't turn out right on the waterjet, which meant that I kind of had to wing it as far as the positioning. If it was for a real customer, I'd have been more careful.

The size of certain elements and the placement is way off. Namely, the lettering across the top doesn't follow the arc. The ribbon on the bottom appears too low, as does the pyramid. I would use a slightly oversized adhesive vinyl template to place the elements, similar to what we use to place laser cut letters on an interior wall.
 

artbot

New Member
with etching aluminum it's not so much about depth. there's the mill side (unetched) then the etched negative space, they reflect in completely different ways. plus when buffing them out the edges capture
the black residue, you can leave that in lightly with nicely accents detail. as for actual depth, it up to how much acid and how thick the aluminum is. i preferred to use .060 and etch down around a 1/16th of an inch.
 
Top