Goatshaver
Shaving goats and eating bushes
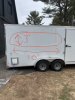
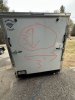
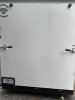
I mainly do die cut stickers and labels. Some larger stickers but I've never done anything this large for a trailer before.
It's a bit out of my comfort zone, but I'd really like to get experience doing more car graphic work.
What things should I watch out for when doing trailers like this? I have no tools to install and not sure if the customer was going to do it themselves or have me do it.
What would be some best practices for basic applications and getting graphics ready for installs on this?
I don't carry any cast material and would most likely use Substance 2755 with 3150 overlaminate.
Thanks!