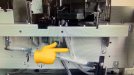
I'd guess that there are several different methods for head soaking. My method is different from most, but it works for me. I use a piece of thin, smooth plastic, like I receive in junk mail offers for credit cards. I cut it a little larger than the cap top, about 2.125" X 1.5". I put the head height to "high" and move the carriage to the left and place this plastic piece on the cap top. I cut a piece of Scott towel to about 1.5" X 4", fold over about 1" of it, and place it on top of the piece of plastic. The folded down part goes between the cap top and the spit box. I use a syringe with about 2cc's of cleaning fluid to saturate the towel that's above the cap top, move the carriage back to its home position, and put the head height back to "low." See attachments. I let it soak for about 5 minutes. Then, put head height back to "high", move the carriage to the left, discard the piece of Scott towel, move the piece of plastic, use a swab to moisten around the cap top, move the carriage back to its home position, and put the head height back to "low." Next, I use a scrap piece of vinyl or banner material and print 1 to 2 square feet of CMYK color bars. I use a banner profile (540X720) and no weaving. Lastly, I do a nozzle check test. If several jets are missing, I repeat the process or I print a square foot of the color that has missing jets. And, yes, I cut away some of the MS so that I can have a better view of the head when it's parked. Some here will probably disagree with this method, but, like I said, it works for me.