• I want to thank all the members that have upgraded your accounts. I truly appreciate your support of the site monetarily. Supporting the site keeps this site up and running as a lot of work daily goes on behind the scenes. Click to Support Signs101 ...

What went wrong !

wellsinoz

New Member
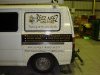
Good Morning All , i have been stalking this site for some time but the time has come for me to come out of the cupboard and see if you can offer some advise. This was our first paid wrapp We went home last night very happy with our efforts but today we have returned to find the wrapp pulling away from were we have trimmed around the rubber. We use 3M IJ 180C. Appricate any advise and soloution perhaps or do we just do it again ? Thanks from Aus
Hopefully i have posted this correctly appologies in advance if not
 

Attachments

  • Beez Neez 004.jpg
    Beez Neez 004.jpg
    65.6 KB · Views: 108
  • Beez Neez 005.jpg
    Beez Neez 005.jpg
    24 KB · Views: 100

GAC05

Quit buggin' me
How did you clean the vehicle?
It looks like there is mold on the paint near the rubber gasket.
It also looks like you cleaned just the panel that was covered.
We clean the whole vehicle even if we are doing just panel work, it is too easy for the dirt to end up under the vinyl otherwise.
If the gasket was treated with something like ArmorAll and not cleaned well it would transfer to the vinyl while you were positioning it.

Contaminates on the surface combined with over stretching to get it to set down into the recess around the window is my guess from the photo.

wayne k
guam usa
 

jbogart

New Member
Couple of questions:

1) Is the vinyl laminated? If so, with what?

2) How much did the vinyl get stretched when you applied it?

3) What did you clean the van with before application?

Sorry to hear that you're having trouble with your wrap - hopefully we can all help you out.:Cool 2:
 

Letterbox Mike

New Member
Looks like a combination of not cleaning well enough or with the right cleaner down right along the edge of the rubber and maybe not post heating it? I would also suspect over-stretching it right there, and maybe not getting enough squeegee pressure right along that edge too. Really there are a lot of things that may have caused it.

Did you post heat it?
what was it cleaned with?
Why is it wet in the second picture and is it possible that that water seeped up under the vinyl because of lack of pressure, proper cleaning or post heating?

It's really tough to get those crevices and corners cleaned well, but that's where it's most important because that's the most likely failure point. It's also really important to post-heat after application to make sure the vinyl's memory is "reset" and the adhesive is activated enough to get a strong grip to the paint.
 

wellsinoz

New Member
Thanks for your quick responces
Yes did only clean the part we were working on ( will take advise and do whole car ) and just took anouther look there is somthing in close to the rubber not sure if its mould but some dirt near the rubber in close.
The vinly is laminated with 3m 8519 we brought them togeather
Yes we did stretch the vinly a lot around the window to try and get into the curves this may have contributed.
We cleaned the van with soap water then avery surface cleaner
So I am thinking Prep better AND PREP AGAIN !
Is there a better product we can use to clean with and what do you do about the rubber if there is AmorAll should we mask with something to stop the vinyl touching the rubber or is this again a cleaning issue ?
Is there a fix or should i just re wrapp ?
Thanks again
 

Mike Paul

Super Active Member
Prepping the vehicle is extremely important.

-Wash the vehicle
-Wipe the area with a solvent base wax and grease remover like Prepsol.
- Finish cleaning with alcohol.
 

Turfa

New Member
As well as the good advice given about (especially about cleaning) ....The film looks like it has shrunk back from the edge. If possible try to avoid stretching right to the edge. Somtimes you can put in a relief cut (say aslong the rubber)to relieve the tension in the film & then work it to the edge without stetching. Also, if you washed the van (or it was raining) & water was trapped under the rubber seal, it will get pushed out when you apply the film up to the seal & bring out all sorts of dirt & plasticisers from the rubber that will contaminate the adhesive. Make sure all the water has a chance to dry out under the seals & in panel joins before installing
 

MikePro

New Member
trim away the bad edge to be clean outline around the perimeter. and possibly go the extra mile by adding a 3/8" stripe of black high performance vinyl, overlapping a good .090" onto your wrap material
 

cdiesel

New Member
I think the guys above are correct--failure to clean. I think that the issue was made worse by overstretching. Even if the areas are dirty, you usually won't see bad shrinkage like that after a day if the vinyl is applied in a relaxed manner.
 

Custom_Grafx

New Member
In addition, I see yellow on that edge. If your print wasn't cured properly before laminating/installing - just another issue to consider on top of the cleaning/surface prep one.
 

TyrantDesigner

Art! Hot and fresh.
on edges that but upto rubber like that, I normally go the extra step and get the 3m edge primer for all the channel grooves and along edges where it has a chance to fail. Also finish layered panels and some door panels that you wrap the edge with 3m edge sealer.
 

SignBurst PCs

New Member
Primer can be a life saver in "iffy" areas. I agree, proper cleaning, prep, and post-heating are MUSTs, but there are just come times that primer is a great idea. This is especially true if you have slightly "abused" the vinyl with overstretching.
 

SightLine

║▌║█║▌│║▌║▌█
Ha - yes I sincerley hope he did not wet apply that! :omg:

Also agree with the other - proper cleaning and prep. Especially around areas like that - and if water has gotten near those rubber seals you better get a towel on a plastic blade and get any wetness from behind the edge of the rubber seal or let it dry for a day. If you dont - as your squeegee hits the vinyl still on the rubber - you squeeze the water from behind the rubber out. Now it's behind your wrap. We clean carefully around window seals and where possible try to get it clean behind them just a bit as well as scrubbing the outside of the rubber itself then applying primer around the entire perimeter.

Picture 2 is clear as day.

Don't use water to do the application!
 
Top