• I want to thank all the members that have upgraded your accounts. I truly appreciate your support of the site monetarily. Supporting the site keeps this site up and running as a lot of work daily goes on behind the scenes. Click to Support Signs101 ...

Aaaaaaaaargh!!! Carved a sign wrong!! (I hate Flexi)

signmeup

New Member
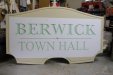
I forgot to convert my file to curves before I opened it in flexi and cut the mask for this sign. Flexi makes fonts weird when I open files with fonts in them. Being a sign maker, this happens fairly often. It made "Town Hall" thin and off centre. I hate when this happens!!! I can't believe I didn't notice this. As soon as I had the sign carved and stood it up I saw the mistake. Ughhhh! (you know the feeling...)

Why does this happen to my fonts? I have the fonts obviously.....it's all on the same frikken computer. It's only a matter of time before I do this again......
 

Attachments

  • BTHallSign.jpg
    BTHallSign.jpg
    73.6 KB · Views: 113

Pat Whatley

New Member
Because Flexi does not recognize kerning brought in from other programs, it sets it all back to the default settings.
 

signmeup

New Member
It also did something odd to the W in Town and changed the weight of the font in the bottom line. "Berwick" and "Town Hall" are the exact same font...... it's not just kerning.
 

gabagoo

New Member
I guess you can call it a wake up call to keep a close eye on what it does from now on.

A shame for sure.....

I use Flexi but have not seen this problem before. When you say you forgot to convert to curves...did the original come from Corel? I wasn't even aware that you could open a file in Flexi like that and have always sent everything as eps files from Signlab or Corel when using Flexi for printing or cutting, with the assumption it could never open the files in their native format. Interesting....but now that you say it screws them up I will continue doing it the way I do.
 

bob

It's better to have two hands than one glove.
Add a device on the right. The right device of the right weight will look as if you planned it.
 

Sign_Boy

New Member
Sorry to hear that.
Why not save one version with fonts converted for Flexi?
This way you'll be safe.
 

Marlene

New Member
I don't know the answer to the font/flexi question but can you do on 1" thick material the inside shape with new letters? you can mount it to the face of this sign and it will just be more dimensional looking without having to totally start over.
 

signmeup

New Member
Thanks for the suggestions. I can't alter the sign...it's been approved by council as is.

I "copy" what I want to cut from Corel and "paste" it into flexi. Saves time messing with files. (well...not this time)

It just can't deal with fonts... you have to convert to curves first. I'm going to carve the other panel before I patch this one and redo "Town Hall". It'll give me a chance to calm down. Actually I'm very calm... just pi$$ed at myself. (and a little at flexi)
 

signmeup

New Member
No can do Marlene the sign has to be made as approved and also match the other signs I've made for the town.

I'll cut a "Dutchman" patch and re-carve the lettering. Maybe a step by step of the repair process will make some good out of this. It's very difficult to patch HDU because it's so soft. The tricky part is the painted area won't sand the same as the unpainted patch.
 

Pat Whatley

New Member
Add a device on the right. The right device of the right weight will look as if you planned it.

Like and exclamation point!

It's TOWN HALL! Woo hoo!


Sorry, I feel your pain. I'd love to see a step by step of how you're going to fix it.
 

Marlene

New Member
what's a Duthcman patch? just curious. glad you can fix it. yes, a step by step of how you fix it would be great! not only to fix a sign but would be helpful when a customer needs a line of copy changed.
 

signmeup

New Member
"Dutchman": It's a bit derogatory I guess. The term comes from the famed frugality of the Dutch. In wood working, a defect in a tabletop (for example) would be cut out by routing the area and a piece of the same type of wood would be set into the routed area and sanded flush. Usually the patch would be made first and then placed over the defect. The craftsman would then cut around the patch with a knife to mark the area to be removed. Then a hand router would be employed to remove the unwanted area and the patch would be glued and hammered in. Done right it's hard to see the patch unless you're very close.
 

Gino

Premium Subscriber
Ha Ha.... it's the kinda patch one makes when you need to deceive the on-lookers from seeing your original mistake. Anyone that can perform this... is a true master. We've done it with bevels on the edges to make it fit and seat better.

If this doesn't make sense.... when it's intentionally done... it's called inlay and you try to make your work noticeable.

Way to go signme.... show a few steps along the way and show these people what real craftsmanship is all about. No getting a real mechanic down.... they'll always make it it like new. :thumb:
 
Top