-
I want to thank all the members that have upgraded your accounts. I truly appreciate your support of the site monetarily. Supporting the site keeps this site up and running as a lot of work daily goes on behind the scenes. Click to Support Signs101 ...
You are using an out of date browser. It may not display this or other websites correctly.
You should upgrade or use an alternative browser.
You should upgrade or use an alternative browser.
BN20 .... printing white?
- Thread starter Legion455
- Start date
CS-SignSupply-TT
New Member
BN-20 printing WHITE issues
Allen, I went to YouTube and this is what I found. I hope it is helpful. http://www.youtube.com/results?sear...0.214.1582.4j4j3.11.0...0.0...1ac.rcaHZ1DMRS0
By the way, you may want to contact Roland Tech Support at 800-542-2307. Make sure you have your serial number.
Hey all,
I have a Bn-20 with the white ink installed,... and although I was expecting the printer to print "white",... mine is only printing about a 20% white.
Ran test prints,... everything looks good ,... but still, no "solid" white.
ne1 have any ideas?
thanks
ALlen
Allen, I went to YouTube and this is what I found. I hope it is helpful. http://www.youtube.com/results?sear...0.214.1582.4j4j3.11.0...0.0...1ac.rcaHZ1DMRS0
By the way, you may want to contact Roland Tech Support at 800-542-2307. Make sure you have your serial number.
myersvinyldesigns
New Member
I have a BN-20 and print on DURACAL CLEAR with white from Imprintables with no problems.
You may know all of this already, but it caused me grief, so I am just putting it here because.
You are using the spot color from the VersaWorks swatch library correct? In VersaWorks a White ink drop should appear next to where the A is that inidcates that cut line is visible.
Then you choose a clear media in the profiles area, and then can say WHITE -> CMYK or CMYK -> WHITE for either normal or reverse printing. If printing on the side that is facing out, lay white then color. If using a window cling, print CMYK, then white.
You should see the printer lay white, then move back and print over it with color. It should also increase the print time SUBSTANTIALLY.
I printed JUST white on clear and it looks GREAT.
I am happy to help if I can although I am just learning as well. Have had the machine for going on two months.
I'm trying to do some samples right now,.... how long do you wait for the white to 'dry' before putting on another coat? ... I'
m doing 30 minutes .... but at this rate... it'll take 2 hours to print a small 1" x 2" decal...

Does ne1 know if there's a quick way to "gas out" the ink, so I can keep printing wihtout the long wait times?
thanks
Allen
m doing 30 minutes .... but at this rate... it'll take 2 hours to print a small 1" x 2" decal...
Does ne1 know if there's a quick way to "gas out" the ink, so I can keep printing wihtout the long wait times?
thanks
Allen
Last edited:
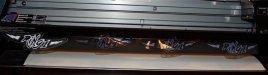
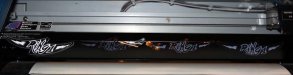
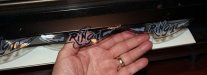
Ok, here are some samples that I've printed.
I do "High End" restorations of Pinball Machines., and these decals go over the lighted plastic inserts on the playfield. (incandescent or LED underneath)
These decals have "alot" of white lettering and graphics,... so they need to be as solid as possible.
There are 4 decals,. the one on the left was done with my old PC-12 that I had. the next one to the right has "one" layer of white underneath,.... the 2nd one to the right has "two" layers and the one on the far right has "three" layers of white....
Also, I set a 'dry time' on these to 30 minutes. ( for each white layer)
the decal w/ one layer of white looks to be about 20% opacity, with the next one 30% and the last one 40% - all unacceptable in my opinion.... which leads me to believe that something is wrong with my printer.
Also notice that the "black" on the decals printed with the PC-12 is NICE and black,.... while the other decals get more and more grey. (probably the black blending in with the white producing grey)
If anyone prints white, could you possible also do a test to see what the white looks like?
thanks
Allen
Attachments


Last edited by a moderator:
J Hill Designs
New Member
you should honestly use the edge for this purpose
scuba_steve2699
New Member
are you sure that you used white? it should have a flood coat behind the whole graphic. Can you post the file so we can see if there is anything that can be adjusted?
edge? sorry, but I'm not understanding what you mean.
Allen
Allen
you should honestly use the edge for this purpose
J Hill Designs
New Member
gerber edge - a thermal print machine like the pc-12 but newer tech
are you sure that you used white? it should have a flood coat behind the whole graphic. Can you post the file so we can see if there is anything that can be adjusted?
Here's the eps file, done in Illustrator.
http://www.treasure-cove.net/Roland/RingDecal.zip
and yes, I think I did the flood coat correctly.
gerber edge - a thermal print machine like the pc-12 but newer tech
ohhhhhhhhhhhhhh
J Hill Designs
New Member
do you need to maybe agitate the white cartridge to get the solids intermixed? might just be diluted due to settling of the white solids...worth a try
do you need to maybe agitate the white cartridge to get the solids intermixed? might just be diluted due to settling of the white solids...worth a try
Yes, I'm trying that as we speak! (er post!)
Mike at Imager's Supply (where I bought the printer) said Roland told him to tell me to try this very thing.
I shook the heck out of the cartridge,... then did two powerful cleanings,... now I'm re-printing the decal.
thanks for the hints!
J Hill Designs
New Member
also, you should set your black to rich black (I use 30/30/30/100) - I noticed in your file it was 75/68/67/90