• I want to thank all the members that have upgraded your accounts. I truly appreciate your support of the site monetarily. Supporting the site keeps this site up and running as a lot of work daily goes on behind the scenes. Click to Support Signs101 ...

Clean Cut issue

pelelive

New Member
Hi , i have an issue , i am unable to have a clean cut.

I tried the following ways but im still unable to get a clean cut (perf cutting).

1 - Put the blade in tool position number 1 but the result was that it was eating the cutting strip to fast.

2 - Try with different blades (clean cut blades, 30 degrees , 45 degrees with the blade holder red and and blue tip)

3 - Tried all the line cut types (dotted , straight lines and others)

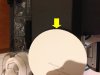
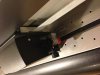
Here are somes pictures so you can see.

Thanks
 

Attachments

  • cleancut1.jpg
    cleancut1.jpg
    36.1 KB · Views: 155
  • cleancut2.jpg
    cleancut2.jpg
    28.8 KB · Views: 121
  • cleancut3.jpg
    cleancut3.jpg
    47.5 KB · Views: 129
Last edited:

Mosh

New Member
What are you cutting? Are you seriously cutting all the way through the backing paper??????
That is not meant to cut all the way through the paper backing. That is what it looks like you are trying.
Good way to waste your cutting strip.
 

Bigcat_hunter

New Member
It does look as if you are cutting all the way through he media. You are only supposed to cut the vinyl, not the paper backing.
 

pelelive

New Member
Hi! Thank you for your reply.

The vinyl I use is oracal 3640 and oracal lam 200G from oracal too.

Yes I cut completly through the vinyl, tried every possible blade, blade depth and force from 20 to 48.


I have no difficulty to pop out the stickers.
 

pelelive

New Member
Note that I am trying to make pop out stickers using the FC8000-75 in the tool position made for that type of work.
 

Mosh

New Member
I don't think so...not made to cut all the way through....sorry to burst your bubble.
That plotter is only made to cut the vinyl and lam, not the backing too. Die cutting would be the method for that.
 

bob

It's better to have two hands than one glove.
As everyone else has noted, cutting through the backing is somewhat less than a Good Idea. It's one of those things that just because you can do it is no sign you should do it. Not only does it lay waste to your cutting strip but it eats blades.Paper is incredibly abrasive and the life of a blade intended for cutting vinyl is measured in inches and seconds, damn few inches and seconda, when using it to cut paper.

But...if you absolutely must do this then at least lay out your job such that you leave a little margin between the contour cut of the vinyl and the perforation cut of the backing. That way, even if the edge of the backing paper is a little rugged when it's torn off the edge of the vinyl will still be smooth. Even if it takes two passes.
 

mopar691

New Member
start with a 60 deg blade first off.

Adjust your perf setting to leave the required tab according to the specific job.

You still need to contour the decal first, then perf outside of that contour line, it takes 2 separate color contour lines and correctly setting up the correct commands in your rip to switch profiles and pause to allow you to change the tool.
 

James Burke

Being a grandpa is more fun than working
Whew....I thought this was going to be a knock against the wonderful company that produces my plotter blades. Here's a good word for Ross and his crew!

Fred...please re-word this thread title so it isn't so imposing.


Jim
 

401Graphics

New Member
Graphtecs can cut through the backing. They have two blade positions. If you didnt know that then you must have been using a roland lol jk.
I've tried it with my fc8000 once but it was a PITA to set the perf cut settings perfectly so i just decided not to bother with it since I wouldnt have used it much, and im sure it dulls the blade quick.
 

mopar691

New Member
I run a few thousand small decals a month for a few accounts, Setting it up is a pain in the arse but once you get it it does work great. I am sure I have perf cut 4" x 6" decals out of more than 50 full 54" rolls and have yet to replace a blade.

It is a pain to set up and be prepared to throw away lots of material in the process but once everything is correct and dialed in it does work great.

I would think what ever rip your using would factor in how this is done also.
 

bob

It's better to have two hands than one glove.
thank you for your reply.

how come the contour cut before the die cut will be make cleaner edges?

Because you do the contour and the perforation on two different paths. Observe...
 

Attachments

  • Untitled-1.jpg
    Untitled-1.jpg
    71.5 KB · Views: 142

401Graphics

New Member
I run a few thousand small decals a month for a few accounts, Setting it up is a pain in the arse but once you get it it does work great. I am sure I have perf cut 4" x 6" decals out of more than 50 full 54" rolls and have yet to replace a blade.

It is a pain to set up and be prepared to throw away lots of material in the process but once everything is correct and dialed in it does work great.

I would think what ever rip your using would factor in how this is done also.
I'm using flexi. I think I went by a set up video that was on the signwarehouse website, but now that video page is dead.
Do you know where there is a set up tutorial, or could you post how to set it up?
 

pelelive

New Member
Because you do the contour and the perforation on two different paths. Observe...

I know that the contour will have a clean edge.

I want to know (if possible) how to get a clean edge on the PERF cut.

The contour cut (halfcut) before the perfcut will not solve the issue, the edges of the perf cut are still not clean.
 

401Graphics

New Member
I know that the contour will have a clean edge.

I want to know (if possible) how to get a clean edge on the PERF cut.

The contour cut (halfcut) before the perfcut will not solve the issue, the edges of the perf cut are still not clean.
its paper. I dont think it will be a perfect clean edge.
 

mopar691

New Member
You need a 60 deg blade, nothing else really comes close. I will post some more instructions and my setup on here when I get to shop on monday
 
Top