• I want to thank all the members that have upgraded your accounts. I truly appreciate your support of the site monetarily. Supporting the site keeps this site up and running as a lot of work daily goes on behind the scenes. Click to Support Signs101 ...

HELP PLEASE! Mimaki JV33-130 Issues

bawraps

New Member
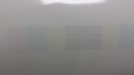
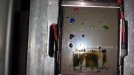
Yes I know, I have some older technology but I have to work with what I've got. I am having issues with my print quality. I get really bad banding in my prints and some issue with the black being dragged outside the lines of the print (See pictures). Yesterday we replaced the cap head assembly and the test prints actually got worse! Most of the issue is in the black part of the test print. Lines are out of place or missing all together. The magenta, yellow, and cyan have one or two lines missing but nothing like the black. There also seems to be A LOT of excess ink on the wiper and such when we are done as well as some streaks at the beginning and ends of prints.

I've contacted our local supplier/tech and all they can tell me is "let's schedule a technician repair." Well I don't really have $1600 just to get the guy in my shop, not to mention the parts, etc. SO! I was wondering if you all can help me with some suggestions.

Here's what I've already done:
  • Run a bunch of nozzle cleanings, some long, some short.
  • Custody washes
  • Pump tube washes
  • Cleaned the cap rubber
  • Cleaned the head area
  • Cleaned and switched wipers
  • Fill Up/Discharge/Wash/Initial Fill Up
  • Replaced Cap Head

The banding was bad before, but now it's even worse and the test print is even worse as well. Any suggestions would be GREATLY appreciated.
 

Attachments

  • 20150116_125827.jpg
    20150116_125827.jpg
    28.8 KB · Views: 497
Last edited:

Ponto

New Member
What do your test prints look like ? --- seems you have a bad case of nozzle deflections going on there --- any visual clues on the print head when you have a gander under there?? any debris on or around the printhead?..JP
 

shifil_mimak

New Member
try to manage with the print head height to the media,,this may happen if the head height is kept more than the usual,,,, normally it is suggested to be a 5milli MAXIMUM gap between the head bottom & the media,,,
also u can try the MAPS option well for about -10 (minus 10) value of speed,,,but only if ur machine is having the latest version of firmware,,,all the best...
 

bawraps

New Member
What do your test prints look like ? --- seems you have a bad case of nozzle deflections going on there --- any visual clues on the print head when you have a gander under there?? any debris on or around the printhead?..JP

Here's my disaster of a test print.
attachment.php


I am currently running a really long nozzle wash so I cant take a pic of the print head right now. But I can later if you still want it. There isn't debris around the print head. I've cleaned the crap out of it many times in the past week or so.

Thanks!
 

Attachments

  • 20150105_141312.jpg
    20150105_141312.jpg
    50.5 KB · Views: 331
  • 20150119_114648.jpg
    20150119_114648.jpg
    13 KB · Views: 944

bawraps

New Member
try to manage with the print head height to the media,,this may happen if the head height is kept more than the usual,,,, normally it is suggested to be a 5milli MAXIMUM gap between the head bottom & the media,,,
also u can try the MAPS option well for about -10 (minus 10) value of speed,,,but only if ur machine is having the latest version of firmware,,,all the best...


I will try to figure out how to do all that. I'll have to find the directions in the manual. I don't believe I have the latest version of firmware. Thanks for the suggestions!
 

Solventinkjet

DIY Printer Fixing Guide
It looks like your wiper is not cleaning off the head very well. You should not have any ink on the bottom of the head ever if the maintenance station is working properly. Make sure the wiper is moving back and forth properly. Also make sure the wiper is clean and not bloated. If the top of the wiper is not flat, it will cause issues like you are having.
 

bawraps

New Member
.... not a good testprint ---- is that fairly recent or an ongoing issue?JP

Oh I know. We've been having a bit of a banding issue for a fairly good amount of time. Never this bad though and the issue with the black being outside where it is supposed to be is more recent. It was not even remotely this bad until I replaced the cap head last Thursday. Now there all kinds of lines where they aren't supposed to be. No amount of cleaning helps. I think I may just have to bite the bullet and have a tech come out. And be dead in the water until I can do so.
 

bawraps

New Member
It looks like your wiper is not cleaning off the head very well. You should not have any ink on the bottom of the head ever if the maintenance station is working properly. Make sure the wiper is moving back and forth properly. Also make sure the wiper is clean and not bloated. If the top of the wiper is not flat, it will cause issues like you are having.

How do I ensure that it's working properly? It's been cleaned multiple times a day during this process of trying to fix it and it's also been replaced. The one that is in it right now is brand new. There's definitely ink being left on the head I can see the droplets when I watch it print. What can I do to make sure the maintenance station is working properly?

Thanks for all your help!
 

shifil_mimak

New Member
okay,, u can do one thing,,instead of giving a looooong nozzle wash,,,you can go for left maintanence option,,,thn the cariage assembly will move to the left end of the platern,,, there u can find more enough space to clean the base of the head,,use flat cotton stick diped in cleaning solvent,,then try to wipe the base of the head in vertical manner (NOT in horizontal),,,thn give a nozle wash for about 20 minits & try the print ONLY AFTER ADJUSTING THE PROPER HEAD HEIGHT.,,,,gud luck,,,,thnx
 

DougWestwood

New Member
How do I ensure that it's working properly? It's been cleaned multiple times a day during this process of trying to fix it and it's also been replaced. The one that is in it right now is brand new. There's definitely ink being left on the head I can see the droplets when I watch it print. What can I do to make sure the maintenance station is working properly?

Thanks for all your help!


Hey There,

Looks to me that the missing nozzles are causing the white stripes.
Also, with the black ink outside the image, looks like there may be a head height issue.

The droplet problem makes me think of a humidity issue in your location.
We had that happening this summer, in hot weather, on our flatbeds.
Weather cooled, problem solved.

Further, have you had any indication of a static build-up?
Getting zapped when loading/unloading?

Please post results here for us.
Good Luck!
- Doug
Vancouver
 

bawraps

New Member
okay,, u can do one thing,,instead of giving a looooong nozzle wash,,,you can go for left maintanence option,,,thn the cariage assembly will move to the left end of the platern,,, there u can find more enough space to clean the base of the head,,use flat cotton stick diped in cleaning solvent,,then try to wipe the base of the head in vertical manner (NOT in horizontal),,,thn give a nozle wash for about 20 minits & try the print ONLY AFTER ADJUSTING THE PROPER HEAD HEIGHT.,,,,gud luck,,,,thnx

Hey There,

Looks to me that the missing nozzles are causing the white stripes.
Also, with the black ink outside the image, looks like there may be a head height issue.

The droplet problem makes me think of a humidity issue in your location.
We had that happening this summer, in hot weather, on our flatbeds.
Weather cooled, problem solved.

Further, have you had any indication of a static build-up?
Getting zapped when loading/unloading?

Please post results here for us.
Good Luck!
- Doug
Vancouver

Here is the print after cleaning the head, 20 min nozzle wash and adjusting the head height.

Doug - Yes I have noticed that I get shocked pretty much any time I touch the machine. Heat/humidity is not an issue here I don't think, we are in the middle of winter in Michigan. Cold and dry! :)

This is where I'm at after today's actions

1)90 min nozzle wash this morning
2) Manually cleaned head
2) Some intermittent soft cleanings, hard cleanings, normal cleanings
3) Adjusting head height (lowering)
4) Manually cleaned head
5) 20 min nozzle wash

I accidentally hit the "Fill Up" option somewhere in there too. I think right before I adjusted the head.
attachment.php
attachment.php
attachment.php


The test print and actual print has improved SOME, but not very much. The biggest change I saw was when I adjusted the head height before I manually cleaned the head and did the 20 min nozzle wash. The test print went from the black being jagged and all over the place back to at least having mostly straight lines and what not.

Any more suggestions on what to attempt tomorrow? I'm thinking of doing a "head soak." Starting a nozzle wash then powering down to let it soak for the night.
 

Attachments

  • 20150119_154826.jpg
    20150119_154826.jpg
    12.9 KB · Views: 856
  • 20150119_154848.jpg
    20150119_154848.jpg
    32 KB · Views: 914
  • 20150119_154900.jpg
    20150119_154900.jpg
    24.4 KB · Views: 879

heyskull

New Member
Hi

Looking at your sample prints, you have only two options.

1. Print everything at the highest setting/resolution you have (much slower but will make up for nozzle loss).

2. Fit a new head and head cables.

The head is a consumeable as it does a lot of work and will defintley need replaced at least every 4/5 years.
Also when replacing the head I would advise fitting a new complete maintenance station, then everything is new.

Sorry but when these heads get this bad it is either live with it or replace.
It takes only 2 or 3 nozzles out on any colour to ruin a print.

SC
 

SightLine

║▌║█║▌│║▌║▌█
Well the test draw is greatly improved for one. I'm almost thinking a couple more good nozzle soaks (20 minutes to an hour or more) might get the rest nearly all back. You can have a few nozzles out and still get very good printing, not many though. I'd look through the owners and service manuals (get the full documentations in the Mimaki Bible thread on here) and run some additional checks on making sure your feed compensation is set right.

Also another VERY important one to now run, especially since you have changed the head height is run a Drop Position Correction. The banding needs to be corrected with the feed compensation first though and you might need to run the DropPosCorrection once before working out the feed comp and again after. The feed compensation is what will take care of and adjust your banding although if you have too many nozzles out that can also cause banding. The feed compensation adjusts the speed at which the material moves through the machine while it is printing, too fast and you end up with unprinted gaps leaving lighter to white banding lines, too slow and the passes can overlap too much leaving darker banding lines. That needs to be right on and you can even adjust the feed comp on the fly while it is printing to minimize any minor day to day banding that you might get. We almost never even need to adjust ours though and that is going between very very thin heat transfer material to very thick 18oz pole banner pro the next. One thing that we do run a couple of times a month is a drop position correction which can take care of minor alignment issues when going between extreme differences in material thicknesses. We also never run the head in its high position, it is always in the thin position.

I think its on the right track and probably does not need a head myself. It just needs some proper care. If it has been more than a year or two I'd also say you might need to replace all of the dampers and if more than about 4 years it might be good to replace the pump as well.
 

ATTTR

New Member
Had the same issues about year ago on same machine. (I hate this machine). I went through everything that's been posted in this thread...
If you are in Michigan, are you dealing with the Advantage tech support? If so, yeah, will cost an arm and a leg.
When my test prints were looking like that, I ended up needing new printheads. 2 @ $1200 a pop. Even after all the tech service and advice on cleaning this and that and the other thing. Apparently I had had a major headstrike and the aluminum casing around the print head was bent beyond repair. Hopefully that's not your case.

Do you deal with Grimco as a vendor? They've been very helpful to me getting parts I needed for my machine at a lower cost than Advantage, and they also have several third party techs they use in Michigan. They might be able to help you. I did notice when Mimaki announced they would no longer be manufacturing replacements parts and all that jazz for our printers, Advantage tech prices went up... imagine that.

I've also had great success contacting Mimaki support directly. They were able to troubleshoot my plotter even after the tech had been out here several times and couldn't figure out what was wrong with it.
 

SightLine

║▌║█║▌│║▌║▌█
Mimaki has NOT discontinued any parts for our machines. I think you must have the much much older JV3 which yes, has had some parts discontinued (but not really since they still support the 250 and a couple of other models that use the exact same parts). Compared to the JV33, the older JV3 is much more of a bear to maintain, keep aligned, and deal with on a day to day basis. The JV3 machines are over a 10 year old design going back to 2002 or so. So yes - they are (more often than not) very worn with more often than not them being scrapped for parts rather than dumping thousands into a 10 year old machine. That being said the JV33/CJV generation machines are not exactly spring chickens anymore either and are also getting up there in age but they are still fairly current, very well supported and an order of magnitude easier to maintain and deal with. We started with a JV3 many years ago and ran that machine hard for many years and finally upgraded to a JV33 about 4-5 years ago. The difference in dealing with the 2 is dramatic.


Had the same issues about year ago on same machine. (I hate this machine). I went through everything that's been posted in this thread...
If you are in Michigan, are you dealing with the Advantage tech support? If so, yeah, will cost an arm and a leg.
When my test prints were looking like that, I ended up needing new printheads. 2 @ $1200 a pop. Even after all the tech service and advice on cleaning this and that and the other thing. Hopefully that's not your case.

Do you deal with Grimco as a vendor? They've been very helpful to me getting parts I needed for my machine at a lower cost than Advantage, and they also have several third party techs they use in Michigan. They might be able to help you. I did notice when Mimaki announced they would no longer be manufacturing replacements parts and all that jazz for our printers, Advantage tech prices went up... imagine that.

I've also had great success contacting Mimaki support directly. They were able to troubleshoot my plotter even after the tech had been out here several times and couldn't figure out what was wrong with it.
 

ATTTR

New Member
Ah yes, you are right, my apologies. Too early in the AM without coffee. I registered JV3 and my brain stopped processing after that. As with it being a bear to maintain, that's an understatement! It gives me nightmares.

On that note, in anyone's opinion (sorry to thread hi-jack for a moment) - if a machine is 10 years old, but not used everyday, would you assume it's in better condition than the same aged model that's used every day? The parts and technology are still aging at the same rate, though not wearing out as quickly. This is an ongoing debate in my office. Mimaki said constant use only counts for about 25% of machines becoming unusable after that many years.

Mimaki has NOT discontinued any parts for our machines. I think you must have the much much older JV3 which yes, has had some parts discontinued (but not really since they still support the 250 and a couple of other models that use the exact same parts). Compared to the JV33, the older JV3 is much more of a bear to maintain, keep aligned, and deal with on a day to day basis. The JV3 machines are over a 10 year old design going back to 2002 or so. So yes - they are (more often than not) very worn with more often than not them being scrapped for parts rather than dumping thousands into a 10 year old machine. That being said the JV33/CJV generation machines are not exactly spring chickens anymore either and are also getting up there in age but they are still fairly current, very well supported and an order of magnitude easier to maintain and deal with. We started with a JV3 many years ago and ran that machine hard for many years and finally upgraded to a JV33 about 4-5 years ago. The difference in dealing with the 2 is dramatic.
 

bawraps

New Member
Well the test draw is greatly improved for one. I'm almost thinking a couple more good nozzle soaks (20 minutes to an hour or more) might get the rest nearly all back. You can have a few nozzles out and still get very good printing, not many though. I'd look through the owners and service manuals (get the full documentations in the Mimaki Bible thread on here) and run some additional checks on making sure your feed compensation is set right.

Also another VERY important one to now run, especially since you have changed the head height is run a Drop Position Correction. The banding needs to be corrected with the feed compensation first though and you might need to run the DropPosCorrection once before working out the feed comp and again after. The feed compensation is what will take care of and adjust your banding although if you have too many nozzles out that can also cause banding. The feed compensation adjusts the speed at which the material moves through the machine while it is printing, too fast and you end up with unprinted gaps leaving lighter to white banding lines, too slow and the passes can overlap too much leaving darker banding lines. That needs to be right on and you can even adjust the feed comp on the fly while it is printing to minimize any minor day to day banding that you might get. We almost never even need to adjust ours though and that is going between very very thin heat transfer material to very thick 18oz pole banner pro the next. One thing that we do run a couple of times a month is a drop position correction which can take care of minor alignment issues when going between extreme differences in material thicknesses. We also never run the head in its high position, it is always in the thin position.

I think its on the right track and probably does not need a head myself. It just needs some proper care. If it has been more than a year or two I'd also say you might need to replace all of the dampers and if more than about 4 years it might be good to replace the pump as well.


I really do hope you're right about the head, but we've done SO much cleaning without much improvement on the over all test print. Sure the last one I posted looks better than the first, but in all reality I just have it back to where I had it before I replaced the cap head. I have another concern as well. It seems like there is a lot of excess ink. It's on the wiper, bottom of the head, bottom of the carriage, sometimes ends up on the vinyl... I almost think that the wiper and capping station aren't working properly.

I may look into the dampers and pump as I am sure they are past due for replacement. I'm just about at my wits end with this d*** machine. I've hated it from day one. Haha
 

bawraps

New Member
Also, the JV33 Bible link takes me to an "Invalid" page. I'd really like to have it if someone could supply me with another link.

Thanks!
 

SightLine

║▌║█║▌│║▌║▌█
Look through the thread. Its been re-hosted a couple of times and there are different links to get it.

As far as excess ink staying on the bottom of the head yes there could be a problem there. Seeing a bunch on the wiper is expected, particularly when doing a lot of cleanings and whatnot. When it wipes the head you should be able to see the wiper move over into the path of the head and see the blue rubber wiper wiping the actual bottom of the head.

If you want to manually confirm it shut the printer off, manually move the wiper to the inward position in the path of the head and then manually push the head left to go over the wiper and look close with a flashlight and make sure it is wiping it. If the wiper actuator that move the wiper into the path of the head is not working then it would not wipe, you would need to just visually watch it when its is running to check that. When you first power it up it will do a light cleaning and wiping.
 
Top