• I want to thank all the members that have upgraded your accounts. I truly appreciate your support of the site monetarily. Supporting the site keeps this site up and running as a lot of work daily goes on behind the scenes. Click to Support Signs101 ...

Installing multi-piece display straight & aligned

gnubler

Active Member
Looking for some ideas and tips on installing an interior display similar to the one in this example pic, where individual panels need to line up along a grid. The panels would be around 12x12" in size with PVC spacers on the back for some projection. Applied with tape & adhesive, no drilling. Maybe map it out with masking tape? Set up a template/jig to distance one panel from another? Please share your ideas.

staff wall example 2.jpg
 

gnubler

Active Member
That crossed my mind. I need to watch some videos on usage, I've never used one.
How far from the wall do you need to be for it to work? My project would be in a hallway.
 

Texas_Signmaker

Very Active Signmaker
100% the laser. I did a similar wall and it's invaluable. Hallway should be fine.. you can move the laser and maintain height. You'll find a ton of uses for it and it impresses clients instead of them asking if it's straight.
 

Attachments

  • 20210609_123456.jpg
    20210609_123456.jpg
    2.4 MB · Views: 155
  • IMG20230717122149.jpg
    IMG20230717122149.jpg
    2.4 MB · Views: 139

2B

Active Member
A multi-directional laser level, we like green shows up better IMO
a GOOD tripod that has a leveling bubble, micro adjustments on the legs, and the height adjustment is also micro adjustments
 

gnubler

Active Member
Another addition to my ongoing shopping list. Should have purchased one a long time ago.
Does it work for even spacing in a grid, like my example?
 

2B

Active Member
Another addition to my ongoing shopping list. Should have purchased one a long time ago.
Does it work for even spacing in a grid, like my example?

Yes & No, a multi-directional will have an X & Y axis laser HOWEVER it is only one beam so you will have to move it.
it is easier to adjust the height of the tripod for the horizontal beam versus moving for the vertical beam

IMO, the example you posted, set one column in its entirety.
then use the tripod height adjustment for the ROWS and use a physical "spacer" for COLUMNS, installing in a horizontal manner
 

Moze

Precision Sign Services
I've done a ton of these. If you're doing a lot of repetitive, equally spaced pieces, a jig is your friend. Determine ahead of time what the spacing will be and find something that dimension. If there's 1" or 2" between each one, find a 3' or 4' box level that has a 1" thickness or 2" height.

A laser level is great and I'd use one too to make sure you're staying on track, but a jig is going to enable you to install faster and frankly a bit more accurately. On some laser levels, the lines aren't super crisp and it can be tricky to make sure you're dead on. A jig takes the guess work out. I have multiple box levels for that reason. They're different heights and thicknesses and all come in useful. Often, a customer will be open to suggestions. They may not have a definite dimension in mind but if you show them a 2" high level and suggest that for the spacing, they're usually on board. Typically though, approved drawings will already indicate the spacing. If I don't have a box level that is that specific dimension, I'll either find one or make a jig. Get your first piece dead on level then use the jig/box level to put the rest of the row up. Keep the laser on to confirm you're running true.


02.jpg


03.jpg


22.jpg


29.jpg


Screenshot_20230901-154533.png
 

JBurton

Signtologist
I f*cking hate hanging pictures, half the time on multiples the hanger is not in the same location and has to be moved.

I'd do a jig like moze says, especially if you're trying to hide you blocking by making it so much smaller that it can't be seen from the side, you'll have a hard time lining up a floating panel with a laser.
 

gnubler

Active Member
I f*cking hate hanging pictures, half the time on multiples the hanger is not in the same location and has to be moved.
Yeah, you should see what's on their wall now. Tacky pictures frames probably hung on picture hangers, all crooked and misaligned. Which is why I got the call for a total makeover.
I'm planning on sticking PVC blocks on the backs for projection and double face tape to install. If I have a physical jig between panels that will keep the spacing dead on balls.
 

gnubler

Active Member
Thanks for posting, Moze. That's exactly what I want to achieve.
This one's been in the works since last NOVEMBER. :rolleyes:
 

JBurton

Signtologist
If I have a physical jig between panels that will keep the spacing dead on balls.
Right, but only if your blocks are consistently placed, and your jig is built to match the blocks, not the pictures. Otherwise you'll need to make a deep jig or something.
 

gnubler

Active Member
Yes on a deep jig. Make it like an upside down T shape for the panel sides to butt up against.
 

GAC05

Quit buggin' me
I'd definitely listen to Mose. If I attempted the one with all the squares I'd probably make it to number 10 or 12 on the first row before breaking down and turning the laser on myself.
 

Humble PM

If I'm lucky, one day I'll be a Eudyptula minor
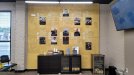
Measure floor to ceiling along points for the hang - sometimes the suspended ceiling drops by 5-10mm or the floor / skirting isn't straight. Assuming straight, put + laser in centre and mark with a very fine point spirit marker on tape. Mark height on far L&R of install, on tape as well, so if you need to move the laser, you have a set height further down the corridor.

If you can swing the depth of a bubble level as the spacing, then take a very fine point spirit marker (I like the write 4 all's) and draw the spacing between prints, and the size of a print on the level (use a t-square to make sure the line on the level is perpendicular all round).
If not, then cut spacers from 5mm pvc, and mark those up. Place centre print, then work out on the horizontal. Spacer below, work outwards. Spacer above, rinse and repeat.

If you're fixing subplates, then line them up the same way.

Laser is there for sanity check.

Clean off spirit marker maks from spirit level at end of job, with IPA or lighter fluid.

I've hung far too many exhibitions.
 

netsol

Active Member
I f*cking hate hanging pictures, half the time on multiples the hanger is not in the same location and has to be moved.

I'd do a jig like moze says, especially if you're trying to hide you blocking by making it so much smaller that it can't be seen from the side, you'll have a hard time lining up a floating panel with a laser.
As far as hanging pictures, "wall buddies" make it simple
A friend who owned a framing shop showed them to me
 

ikarasu

Active Member
A laser is nice to have for many projects, so I'd still recommend getting one - But you won't beat a jig - a T shape like you mentioned would work.

It's much much faster to just hold the jig and plop a new frame down vs moving your laser and measuring how far over each picture needs to go.

We usually make a T and a E. The E can be "held" up by the first plaque so both your hands are free to place the second plaque. Where as the T is more versatile and good for starting your second/ third / fourth line perfectly. it can be done with just a t, but depending on how big ) heavy the plaques are, and if using tape having the jig hold itself up while you're removing tape and grabbing the second jig is less if a headache.
 
Top