• I want to thank all the members that have upgraded your accounts. I truly appreciate your support of the site monetarily. Supporting the site keeps this site up and running as a lot of work daily goes on behind the scenes. Click to Support Signs101 ...

JV3 160 Print Issues

WrapperX

New Member
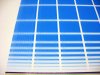
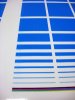
Ok, so attached are a couple of pictures of a morning routine we've started recently to correct an issue with our color Cyan.

For a short while, in the morning when we first fire up the printer and get it all set for its first print file of the day, I have noticed that the Cyan head fires irratically and gives a blue halo/haze around anything printed with that color. Also the ink ribbon prints in a staggered pattern: Looks like a zig zag or saw pattern with each pass in bi directional passes. \ on the left pass and a / on the right pass so the cyan ribbon kinda looks like:
/
\
/
\

Strangely though after about 5 or 6' of printing; the Cyan color corrects itself and is just fine for the rest of the day. But that first print and that first 5' is colored in a cyan haze.
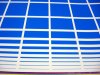
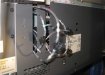
The other day it was the worst I had seen so we created a block of color 25" wide using 100% Cyan - No other colors. For the last couple of days I run this in the morning and it runs 25" wide by however long it takes to "fix" itself. Now I am aware that we need to run a line cleaning/nozzle cleaning using cleaning cartridges and we are awaiting those cartridges in the mail. However, if this is only cause by partially clogged nozzles and a cleaning cycle can fix this - then I will be surprised. Although my inclination is that there is something wrong with the head, I was thinking, if its the head, why does it correct itself after a matter of linear feet printed? Why wouldn't it be malfunctioning continously. Then we thought it might be the capping station creating some sort of film or surface clog and that it takes a couple of feet to "blast" that film off. But it also seems way to uniformed way of printing to be a random film or residue from sitting over night. We also thought it might be the carridge mother board but if it were the board why isn't it happening to the other colors??

I am posting to see if any one else has seen this issue and if they have any input on what you see.
Thanks
:banghead::frustrated::covereyes:

Bad Cyan 1 is the first/worst print and Bad Cyan 3 is when it corrected itself in about 7' of printing today.
 

Attachments

  • Bad Cyan1.jpg
    Bad Cyan1.jpg
    113.2 KB · Views: 183
  • Bad Cyan 2.jpg
    Bad Cyan 2.jpg
    86.5 KB · Views: 115
  • Bad Cyan 3.jpg
    Bad Cyan 3.jpg
    111 KB · Views: 121

smdgrfx

New Member
I'm having the same issue. Not as bad as yours, but it happens on 100% cyan and rich black. I print CMYK bands to get everything firing off and then it goes away. I use up about 4-5' of material. I have new dampers that I'm going to install and see if that helps the issue.
 

WrapperX

New Member
I'm having the same issue. Not as bad as yours, but it happens on 100% cyan and rich black. I print CMYK bands to get everything firing off and then it goes away. I use up about 4-5' of material. I have new dampers that I'm going to install and see if that helps the issue.

Please keep me posted on if this helps.
 

daveb

General Know-it-all
Just trying to think of all the possibilities... Is that head newer or older than the other ones? How long ago did you switch to Nazdar Inks? If it was within the last year I would suspect the ink, the pigment in the "non-OEM" inks are not ground as finely as the OEM inks increasing the possibility of causing head malfunctions and clogs. This will probably one up a whole can of worms.... but oh well. :rolleyes:
 

WrapperX

New Member
All the print heads are Factory installed original heads from purchase - 2.5 years ago. So I would not be surprised if the head was just going out.

We switched to Lyson in the Fall of 09 so 6-9 months ago. Again, I would not be surprised if it was the inks themselves, except we are only haveing this issue with the one head and not all four heads.

Honestly I'm inclined to just order a new head and get it installed, but, if we can avoid that cost by doing something else to solve the issue that would be ideal. However I am aware that a head relplacement is gonna be a necessary action eventually.
 

Neil

New Member
You can isolate whether it's the ink or damper by swapping the cyan line to another head and see if the problem goes to the new head.
And if the swapped color from the other head misfires through the cyan head then you know the problem is below the damper.

Could be the head going out.
Could be as simple as a worn wiper.
Might be the cap not sealing properly.
Maybe a dodgy pump.
Perhaps a blockage in the drain line.

Throwing a dart at that list I'd say...um... worn wiper.
 

WrapperX

New Member
I doubt its the wiper - I change that regularily and Iv'e changed the wiper at least twice since this problem has begun. The Capping station is only a few months old - we changed that out a while back when we were getting spotty test run results. Since then our test pattern has been just fine. Even in the morning ink routine the test has always sprayed clean. Its only when we run a print file do we get shotty results from the cyan.

To change the cyan to another line - won't I need to flush out the lines on both sides and then refill them with the new color?
 

Neil

New Member
No, just unplug the cyan damper from the cyan head and switch it onto say the black head. Plug the black damper into the cyan head.

(this is assuming the black channel is on a different head to the cyan).
Make sure you know how to pull off the dampers without breaking the nipples.

Then send a test pattern made of 100% black which will actually print using the cyan ink in the black head, and vice versa send a panel made of 100% cyan which will be printed with the black in the cyan head.

This will tell you if the problem is with the ink/damper/anything above the head - otherwise the problem lies in or under the head.
 

WrapperX

New Member
No, just unplug the cyan damper from the cyan head and switch it onto say the black head. Plug the black damper into the cyan head.

(this is assuming the black channel is on a different head to the cyan).
Make sure you know how to pull off the dampers without breaking the nipples.

Then send a test pattern made of 100% black which will actually print using the cyan ink in the black head, and vice versa send a panel made of 100% cyan which will be printed with the black in the cyan head.

This will tell you if the problem is with the ink/damper/anything above the head - otherwise the problem lies in or under the head.

I have no idea how to do that...and the dampers...what part of the carridge is that?
We haven't done a ton of maitenance on this machinge so the parts are fairly new to me. I know the heads, I know the capping station. I know the ink lines in the rear service panel directly behind the print/capping station. But alot of the parts under the carridge shell are foreign to me.
 

Neil

New Member
I have no idea how to do that...and the dampers...what part of the carridge is that?

Ok, best not to try pulling the dampers off till you've familiarized yourself with them and how to safely remove and replace them.
This is something you should know, so do a search here for info.

In a nutshell, this is how to replace a damper:

You need to use long nose pliers to grasp the rear top edge of the damper, while holding the front top with your other hand, pull it straight up. You'll see that it slides over a nipple on the printhead.
This can break if you twist the damper so be careful.

You can replace the damper with a new one by unscrewing the connecting nuts. Be careful to retain the O rings around the tube. Sometimes you get new O rings with new dampers.

Then you can use a syringe to pull the ink through into the damper till it's half full.
Wipe the ink off the O Ring at the bottom of the damper and plug it back in. Do a couple of cleans to prime it all up.

I'm not saying this is your problem though, could well be something else, but it's worth knowing how to change a damper.
 

WrapperX

New Member
Running a head wash now....I think I'll do flips and a cart wheel if this helps cause right now its only getting worse....I wonder if this is all because we switched to Lysons...
 

RippinPC

New Member
Have you replaced your capping station? I would ensure the bottom of the head is clean and the cap is clean to ensure good contact/seal. A small air leak would partially clog the head until if pushes enough out to clean itself.

If it wasn't that, I would follow the advice above about moving the ink line to another head to see if the problem moves or stays.

Good luck.
 

WrapperX

New Member
The capping station was recently replaced. Probably August of last year. The head and the capping station are cleaned on a weekly if not sooner basis so I know those are clean/free from gunk...
Head wash just finished so I'm gonna load a file and see what it does...
 

WrapperX

New Member
Cleaning did little to help the situation other then frusterate me even further...looks like I'm gonna be trying that line switching procedure...

This couldn't have happened 3 months ago when we weren't about to get really busy....
 

Letterbox Mike

New Member
Just had a very similar problem, different ink brand though. Clean the inside of the "doghouse" really well. We were getting alot of gummy ink buildup way back in there (farther back in it than you can really see or easily reach when doing normal cleanings). The wiper was dragging that gummy residue back out across the heads causing nozzle deflection and alot of misting. We were getting the problem randomly on all colors but predominantly cyan. Changing dampers didn't solve it for us, but cleaning the living daylights out of the wiper house did.

Dunno if that will work for you or not but it's worth a shot if you haven't already ruled that out...
 

WrapperX

New Member
The dog house meaning the holding station where the wiper sits when not in use?
I just cleaned in there not to long ago as well as changed out the sponge in there b/c the original was not longer working and it was leaking all down into that space below. What a mess. Ever since I changed out the sponge - that area is alot more neat. Doesn't seem to be alot of gunk build up...I'll check for good measure though. At this point I need to check and recheck all possiblities.
 

artbot

New Member
if the cyan is still not working...

after doing the damper switches if the issue stays at the cyan head. you then do a data ribbon swap. but first get back to me to assure me of what ink set you are running so i can correctly instruct you to which positions on the slider board are safely switchable. i'm assuming you are running double cmyk.

look closely at the spray patter with a magnifying glass. is it erratic misting of cyan? or does it have a geometric pattern? such as dots placed above and below other dots? or the spray area is actually elongated dots. if it has a geometric pattern it is a data problem. erratic printing can be caused by loose data cables and improper voltage and ink wicking onto the head. if the pattern is very abstract, it can be caused by static on your substrate, clogs, cold ink, bad ink, bad head (although bad heads usually give some kind of geometric bad patterns during failure).

i'm willing to bet that you aren't getting a good vacuum at that capping station location and over night it's not doing a good job during routine and sleep cleans. first you need to eliminate top end ink flow/starvation and data. but after that if there's no diagnosis. pull the panel off the back panel to access your pump lines. keep your printer off and rock your head carriage to put the capping station in it's most upright position against the heads. this will create a maximum seal. pull off the cyan pump line at the little stainless steel union. draw a vacuum on only the cyan line. with a syringe, very gently pull the amount of ink representative of the amount you are probably printing in order to get it to print clean. probably about 2 tablespoons of ink. start up your printer. if your printer prints significantly different than it usually would during start up, you have a bad capping station alignment at the cyan head. also, if you see tiny bubbles coming into your syringe that is a sign of a leak. look for these tiny bubbles by rocking the head carriage back to it's normal resting position.

later on add exterior pump diagnosis lines. it will make this kind of stuff very easy. attached is a photo of the pump replumb.
 

Attachments

  • pump_replumb.jpg
    pump_replumb.jpg
    73.4 KB · Views: 124
Top