• I want to thank all the members that have upgraded your accounts. I truly appreciate your support of the site monetarily. Supporting the site keeps this site up and running as a lot of work daily goes on behind the scenes. Click to Support Signs101 ...

JV3-160sp Cyan Overspray

stevenjowens

New Member
I'm seeing a lot of cyan overspray on our jv3-160sp. It only shows up on large amounts of print, when I print the test pattern or a small (couple inches) block of color it doesn't show up. It seems to sweep up

This just started recently; it's possible there was a head strike, though the cyan block of the test print doesn't look that bad (the black test pattern is pretty bad, planning to replace that head very soon).

I've just read through most of the threads on overspray with the jv3-160sp and I now have a list of things to check and things to try. I'll post them next. A lot of them, btw, were from this thread:

http://www.signs101.com/forums/show...imaki-JV3-160SP&highlight=jv3-160sp+overspray
 

Attachments

  • overspray_closeup_2.jpg
    overspray_closeup_2.jpg
    40.9 KB · Views: 226
  • overspray_closeup_1.jpg
    overspray_closeup_1.jpg
    31.1 KB · Views: 175
  • overspray_test.jpg
    overspray_test.jpg
    51.7 KB · Views: 153

stevenjowens

New Member
Things to Try

1) Ink: we're using OEM ink, purchased fairly recently (within the past 3 or so months), SS2 set up with 8 cartridge CMYK. The cyan has been used in some previous prints with no problems, so if it's bad ink then we just reached the bad stuff recently.

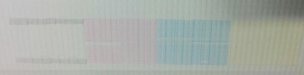
2) Test blocks: Print some test blocks in other colors. I need to do some more testing here, but so far it's only shown up on two different images with the same color as in the attached photo.

3) Static: I'll try the test Artbot suggested in a couple of threads; burnish half of the media and do a test print, see if the problem does or does not occur on the burnished portion. I don't think it's static, but it's an easy enough test.

4) Swap the data cables: I'll try plugging the cyan data cables into the magenta and vice versa, do a test print. See if the problem follows the data cables, in which case it's the cables or the slider board or something else data related.

5) Swap the ink dampers: Plug the cyan dampers into the magenta heads and vice versa. Do a couple cleans to pull fresh into into the heads, print a test pattern to be sure the old ink is cleared out, then do some test prints. See if the problem follows the ink, in which case it's bad ink, or possibly blockage or an air leak in the line causing ink starvation.

6) Bidirectional/Unidirectional: So far the problem has occurred on unidirectional printing and only in the direction of movement (i.e. going right to left) and upward.

7) Physical Leveling/Alignment: The heads look pretty level and even, although it's kind of hard to get in there between the carriage and the media to check. Are there any tricks or techniques to checking this?

8) How far above the media should the heads normally be? About half a centimeter?

9) Print Head Alignment/Calibration: I'll run through this tomorrow. I kept seeing references to this in threads, and also to a "service manual", but I couldn't find it in the Maintenance Manual or Operation Manual. Artbot just helpfully advised me that it refers to the Print Adjust function on page 5.3-5.8 of the Maintenance Manual PDF listed in this forum thread:

http://www.signs101.com/forums/show...collection-of-PDFs-amp-Tutorials-in-one-place

It also now becomes obvious to me that the "service mode" I've seen mentioned a few places is the "maintenance mode" in this manual.

10) Variable Dot: Check the RIP software (I'm using rasterlink 4) for NORMAL DOT or FIXED DOT, or "fast print" instead of "variable dot", use that and see if the overspray goes away. I've looked through the Rasterlink Pro menus and options, both in the main window and in the job editor, but I didn't see any options like those. Any idea where it is?

11) Linearization: What is linearization/re-linearization? I've seen that mentioned but I have no idea what it is, or where to find more information about it.
 

stevenjowens

New Member
Swapping the data cables seems pretty safe to try, just make sure I discharge any static before touching them, etc.

Swapping the dampers seems a bit riskier, I've read about drips of solvent ink frying data cables or the head electronics, etc. Are there any tips for doing this safely?

I guess I could drain the dampers and lines before swapping them, but that'd waste a ton of ink.
 

MikePro

New Member
I remember that thread! Boy was THAT a headache :)
I always harp on people about following-up threads with resolutions, as to help those searching for similiar issues BUT it looks like I never did in that case :(
overspray, for me, has been cured by printhead cleaning & flushing machine with fresh ink, printhead replacement, and/or encoder sensor cleaning.

static, is nonsense
that a tech will tell you instead of "i don't know" since he can't justify his $200/hr charge if he volunteered that information... I'm no rocket surgeon, but if static were somehow the case then the overspray would be occuring on ALL of the printheads.

aside from head replacement, which should be your last course of action, I'd suggest you try 3 things:

1) clean the heck out of the printer, specifically the Cyan head.
in order: Scrub the capping station, scrub the sides of the printhead (not the head itself, yet), run an overnight nozzle-wash (set nozzle-wash, then unplug printer from wall, negating automatic cleaning cycle that would drain the capping station), saturate a foam swap & wipe the bottom of the printhead ONCE in the direction the wiper usually does & repeat a few times with clean swabs, run a fillupink, & test your pattern/print again to see if improvement.
2) data swap & see if the issue follows to another printhead. if so, then you either have a bad ribbon cable or a dirty encoder strip and/or sensor. (my encoder sensor, the U-shaped unit that cups over the top of the encoder strip inside of the printhead carriage, once had magenta overspray on the lens. which caused inconsistent overspray because the machine wasn't reading it's place on the axis properly)
3) replacing dampers is always an easy thing to do & rule-out, cheap too. If your concern is dripping ink, then take steps to cover your butt. such as removing the ribbon cables first & placing paint masking tape over any parts that look like they may get dripped-in. ALWAYS be gentle & remove straight-up, as any wiggling/jerking may break the black plastic manifold-piece that inserts from the head into the damper.
 

stevenjowens

New Member
Thanks for the advice.

Attached is a better photo of the test pattern, this time on vinyl material. It shows up a lot better.

As you can see, the black head has some serious problems.

I've been cleaning it all of the heads and doing extended, but not overnight nozzle washes; start a nozzle wash, use the button to turn the machine off and let the nozzle wash last for several hours, until the maintenance cleaning cycle happens.

I'm a little gunshy about doing a really long nozzle wash, mainly just paranoia about the cleaning fluid somehow draining out or evaporating, and clogging all four heads.
 

Attachments

  • test_pattern_vinyl.jpg
    test_pattern_vinyl.jpg
    9.5 KB · Views: 172

stevenjowens

New Member
Just an update. The cyan overspray seems to have been greatly reduced. There's still a light haze, but nowhere near as bad.

We did a bunch of extended nozzle washes, and then finally did a 24 hour nozzle wash. That might have been what fixed it, but as it happened, one of the cyan ink cartridges ran out at the same time, so I replaced it (we use OEM ss2 inks).

The cyan overspray was greatly reduced.

Then it came back again. Now I've replaced the second cyan cartridge, and it seems gone again. This makes me suspect the ink was the issue all along.

The first cartridge was around 32% and the other was around 60%, then, quite suddenly it seemed, the first cartridge was at 1%, so I replaced it. The second cartridge seemed to have the same behavior, dropped slowly to low 30 percentages, then suddenly was at 1%. So maybe the overspray was caused by ink starvation, caused by the cartridge misreporting its capacity?


Incidentally, the test print after the 24 hour wash was a little scary (see attached), but I did a 99 minute wash and then the test print was fine (the black nozzle is still problematic, planning to replace that as soon as we can afford to).

This makes me wonder if the capping stations aren't sealing properly and the cleaning fluid started to evaporate.
 

Attachments

  • IMG_20151105_170650.jpg
    IMG_20151105_170650.jpg
    22.4 KB · Views: 177
Top