• I want to thank all the members that have upgraded your accounts. I truly appreciate your support of the site monetarily. Supporting the site keeps this site up and running as a lot of work daily goes on behind the scenes. Click to Support Signs101 ...

Laminator Troubles

kirsmith

New Member
Hi there,
I am fairly new to this whole game. I got a job making decals for a pressure washing company, basically had 3 hours of training on all the machines and have been left to my own devices for the past 8 months. No one else who works here has had much experience with the machines either so it's been trial and error when something goes wrong.
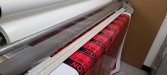
The laminator here is a GBC Professional 1064WF, its old as heck, I think, and probably little to no maintenance done to it.
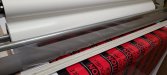
It is wrinkling EVERYTHING, one side will start to get loose, I turn the tension down, nothing, I turn the tension up, nothing. I cut the laminate and re-feed it and it fixes it for about 3 feet before it wrinkles again. I waste so much vinyl and laminate.
Does anyone have any suggestions?
I've gone through past posts searching for answers but no solutions have worked for me thus far
 

Attachments

  • 271958179_4941050656002445_8762594921115224816_n.jpg
    271958179_4941050656002445_8762594921115224816_n.jpg
    73.7 KB · Views: 288
  • 271850523_4905023836283354_7779242564006617500_n.jpg
    271850523_4905023836283354_7779242564006617500_n.jpg
    62.8 KB · Views: 206
  • 272166350_264818099076462_791919300480563045_n.jpg
    272166350_264818099076462_791919300480563045_n.jpg
    67.8 KB · Views: 190
  • 271810543_1917448025106162_6381746192582053271_n.jpg
    271810543_1917448025106162_6381746192582053271_n.jpg
    65 KB · Views: 205

kirsmith

New Member
The laminate is put on straight when I put on a new roll. I'm not sure what webbing means o_O 
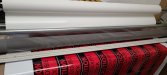
But there are two spoke like things the hold the top roll that gathers the backing up, I hammered those in quite far to the rolls and it seems to have relieved the problem temporarily.
 

hybriddesign

owner Hybrid Design
you might just cut pieces off laminate off and do each piece individually versus having the laminate come off of the roll like how you have it now. It’s a lot easier start that way and not that much slower
 

Joe House

Sign Equipment Technician
Something is unbalanced. If you're sure you're loading it straight, and you start out with even tension on the laminate all the way across, then something else is crooked. Is this attached to a take-up? If so is that straight? If everything is truly straight, unload everything and slowly bring the rollers together. I'd watch the right end and when they just touch, can you still see a gap at the left end? I'm not familiar with GBC laminators, but they look "similar" to a Royal Sovereign - at least what I can see in the pictures. Also, are you sure that the laminate goes over that metal roller above the rubber roller? Generally you try to get as much contact on the rubber roller as possible and that doesn't look right to me - but as I said, I'm not familiar with GBC's.

Good Luck
 

bigwow

New Member
Can you take a few more photos a little further away? Trying to see how the film is loaded: 'webbing' is the path the film / backer takes.

Initial thoughts are the tension is higher on one side of the feed roll, the film isn't webbed correctly, or as SignMeUp said - the laminate isn't loaded straight.
 
Last edited:

kirsmith

New Member
You have that webbed wrong. Your backing paper and laminate film should pass under the silver bar and that is where it separates from the film.
Okay! Trying this now. This is how I was taught, the girl before me was taught, and I just imagine they were doing it wrong from the get go.
 

kirsmith

New Member
Well I'll be, I think that's what the problem was. There is only tension knobs on one side of the machine. I added pictures after I put the laminate through how suggested. It still looks loose but I havent put any vinyl through it yet
259995063_353386773039585_845614833712294296_n.jpg
272006917_661401908319673_8026684046491036538_n.jpg
271756540_978293326106878_8534141796767790485_n.jpg
272002198_1094602551391155_7811180695880037803_n.jpg
 

brdesign

New Member
Another possible cause is that the top roller may not be parallel to the bottom causing uneven pressure from side to side. You have to remove the side covers to access the adjustment screws.
 

karst41

New Member
Your rollers do not have even pressure on both sides. (Alignment probably not the best term)

Take these steps, because this is the simple method. Not factory method, it is the down and dirty method.

1. with water base pen or china marker. Make a mark on Dead center of the top roller.
You can turn on the laminator and circle the top roller. do this lightly to avoid damaging the roller.

2. Cut a 10' run of media,54" will do for a 64" model. No this is not a waste of media.
You need to make a 10' line dead nuts down the middle. Take you time, accuracy is your friend.
Save this piece It will be part of your monthly Maintenance.

Go to You tube and search for a video on aligning or adjusting the rollers on your specific model.
Typically you will adjust one side, but you threw the laminator off when you moved it into your shop.

Load your media and starting with a modest pressure one third (3 on most Royals and Seals)
Starting with a speed of 2 your media will start drifting off center slowly tighten the side that has the problem.
You will likely need to adjust the other side to help walk it in. (back and forth in tiny adjustments. Or until
the line on your roller and media stay in place. There may be a touch of oscillitation with crowned rollers
swaying back and forth.

Royal sovereigns with crowned rollers can be a nightmare. You need 3 pull scales for the RBH series as in measures
in 5 places center out...... But once close the above method is the way to go.
 
Top