phototec
New Member
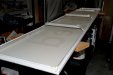
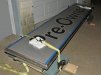
Lighted sign project, customer wants me to change the face of the sign, but I have never done this kind before, and need some help from the experienced members here.
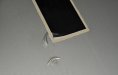
I have attached some photos of what I will be working with, the metal fixture appears to have a metal frame on the front and the graphics looks like it's applied vinyl over the face which is not a rigid plexi or acrylic, but rather feels like it is a thin skin stretched tight, kind of like on a drum. I have no idea what the material is or where to get it. Outer dimension is 23-1/2" x 118".
Questions:
Anyone know what kind of sign this is and if the vinyl can be removed from the translucent face material?
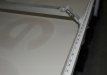
How is this this translucent material attached to the face frame, and what is this translucent material (feels very thin and stretched tightly)?
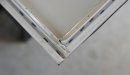
How is the translucent material attached to the front of the chrome frame?
Should I just get new translucent material for the front and apply new cut translucent vinyl, similar to the existing sign face?
The outside chrome frame looks pretty beat up, could that be wrapped with vinyl to make it look better?
Like I said, this is the first time I have seen a frame like this and don't know anything about it. Any help will be much appreciated.
Thanks

I have attached some photos of what I will be working with, the metal fixture appears to have a metal frame on the front and the graphics looks like it's applied vinyl over the face which is not a rigid plexi or acrylic, but rather feels like it is a thin skin stretched tight, kind of like on a drum. I have no idea what the material is or where to get it. Outer dimension is 23-1/2" x 118".
Questions:
Anyone know what kind of sign this is and if the vinyl can be removed from the translucent face material?
How is this this translucent material attached to the face frame, and what is this translucent material (feels very thin and stretched tightly)?
How is the translucent material attached to the front of the chrome frame?
Should I just get new translucent material for the front and apply new cut translucent vinyl, similar to the existing sign face?
The outside chrome frame looks pretty beat up, could that be wrapped with vinyl to make it look better?
Like I said, this is the first time I have seen a frame like this and don't know anything about it. Any help will be much appreciated.
Thanks
Attachments
-
 Overall Sign.jpg277.2 KB · Views: 379
 -
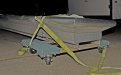 Top with hinge.jpg261.7 KB · Views: 247
 -
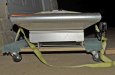 End View.jpg282.9 KB · Views: 263
 -
 End Detail & Close up.jpg335.8 KB · Views: 284
 -
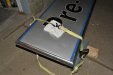 End Detail.jpg299.6 KB · Views: 265
 -
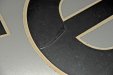 Face Close-up Looks like Black Vinyl Text.jpg256.5 KB · Views: 235
 -
 Face Close-up Looks like Silver Vinyl.jpg194.9 KB · Views: 230