• I want to thank all the members that have upgraded your accounts. I truly appreciate your support of the site monetarily. Supporting the site keeps this site up and running as a lot of work daily goes on behind the scenes. Click to Support Signs101 ...

Mimaki jv33 banding like someone is taking a miniature rake through it

struthmuffin

New Member
Hoping someone can help here.. we have tried everything we can think of..
I have done an alignment
tried adjusting temperatures (may not have found the right one?)
bi directional, unidirectional same result
checked media compensation.
fast head spead, slow head speed same result
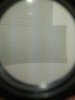
test draw is good, (one nozzle missing on one of the magenta heads, all others perfect)
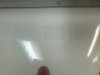
we have one media that works fine, but its like the ink spreads and evens out beautifully, the rest we have varying results like this.
and using onyx 10.

Please if anyone has any suggestions I would really appreciate it.
 

Attachments

  • IMG_20130710_141654.jpg
    IMG_20130710_141654.jpg
    83.5 KB · Views: 245

struthmuffin

New Member
OK, we've never had any really good direction or examples of what to look for when trying temp.. I will try more adjusting with temps and see what I can do.

thanks!
 

MixMaker

New Member
What size is your file? If you're in the GB's then your RIP may cause this as well. Think of it as data points stepping on themselves. The RIP tries to make a smooth curve, if there's too many data points it's still trying to make a smooth curve between the two points that are on top of themselves. You may possibly be "confusing" the RIP. If that makes any sense at all, haha.
 

SightLine

║▌║█║▌│║▌║▌█
Agreed.... the only real banding I see is the dark lines. Your feed comp is way off causing that. The thin white lines is the ink not drying right. I'd almost blame the media or temps that are way way off. Try 35, 35, 50 for your temps as a baseline to start and work from there. Of course a current Dot Position Correction would be good to do as well. What is the media and inks you are running?
 

MikePro

New Member
+1 ink limit and temperature settings, methinks.

is your printer in a controlled environment? media stored in same room/conditions as printer?
 

Masseria

New Member
+1 Ink Load.

Also, looking between passes below the big printed area, it doesnt look like banding issue for me.

Actually looks like if printhead was scratched and nozzles are firing wrong..(not in straight line).
 

LaserMan

New Member
I'm having similar issues. My test draw is perfect. No missing or deflecting nozzles.

I've run the media comp(s) and were the top bar and bottom bar meet, it's seemless (no gaps or overlaps). However, there are 2 streaks in the middle of each bar???

I've also run the drop position and adjusted accordingly.

My temp is at 32 35 38. I've changed it around to it's lower and higher. No changes in the print quality.

Thoughts?

(EDIT) I had the printer on Bi-Directional printing. I changed it to Uni. No real change. However, now at the beginning of the print, it's "fuzzy". Strange.
 

Attachments

  • IMG_20130822_093756.jpg
    IMG_20130822_093756.jpg
    39.8 KB · Views: 153
  • IMG_20130822_093746.jpg
    IMG_20130822_093746.jpg
    37.5 KB · Views: 142

LaserMan

New Member
Attached are pics of my test draw and media comps.

You can see in the media comp, that the two bars aren't touching, but in each bar, there are some dotted lines that do overlap.

Thoughts?
 

Attachments

  • IMG_20130822_095337.jpg
    IMG_20130822_095337.jpg
    19.5 KB · Views: 153
  • IMG_20130822_095635.jpg
    IMG_20130822_095635.jpg
    33.5 KB · Views: 149

LaserMan

New Member
Still getting the banding. The banding is only on reds (moreso dark reds/garnet) and purples.

Test draw is still perfect. Just confused on what to do and adjust?

I've changed my media comps from -20 to +20 and everywhere inbetween those.
 

4R Graphics

New Member
Laser I believe it is a media comp issue.
The pic of your media comp looks ok to the naked eye in the pic BUT what you need to do is get a microscope and look at it where you can actually see the dots.

I think if you do this you will see that there is either a larger gap or an overlap.

Now with the microscope you want to adjust it so that the 2 sets DO NOT touch but have the same gap as all the rows of dots have if you get that try a print see ifts not better.

Also sometimes you have to go farther than +20 or -20 make a really big change like +60 and see which way it goes if it went the right way great dial it in with smaller jumps wrong way then make a big -60 jump and then go from there. If you do the microscope media comp adjustment most times you dont have to do any on the fly print media comps unless enviroment changes.

I got a little pocket telescope thing from harbor freight $10 I think it is a 25X zoom only thing is you have to remember that it flips the image so everything is upside down not important for this adjustment but very important on alignments.
 

AnimalG82

New Member
I am having this exact same problem as well. I've used 3 materials and they all do it. I have messed with the media comp and temps and still have not resolved the issue. I wish I knew of someone in my area that knew more this, I'm not good with media comp/temp stuff.
 

MikeD

New Member
canned profiles usually leave a lot to be desired, but they are a good starting point. Ask your materials/software/rip vendor/manufacturer to supply a profile or give advice in regard to temps and ink limits
Good luck!
 

AnimalG82

New Member
@Mike I'm actually using a custom profile made by a tech. Perhaps I will go back to the default one it was based on the fiddle with that. @sign, I haven't tried that, I will do one and take a look.
 
Top