-
I want to thank all the members that have upgraded your accounts. I truly appreciate your support of the site monetarily. Supporting the site keeps this site up and running as a lot of work daily goes on behind the scenes. Click to Support Signs101 ...
You are using an out of date browser. It may not display this or other websites correctly.
You should upgrade or use an alternative browser.
You should upgrade or use an alternative browser.
need tips for single person banner install onto a concrete wall.
- Thread starter 0igo
- Start date
The Hobbyist
New Member
the banners are 4x10ft about 18 ft off the ground.
There is more than one?
.
signbrad
New Member
You can also run a cable for the top of the banner.
I'm surprised only one person has mentioned running a cable.
This is by far the easiest and quickest way to install banners to masonry walls. In fact, I recommend it for installing banners anywhere. Even between posts.
Here are the advantages on masonry:
You drill four holes per one banner, instead of a series of holes, one for for every grommet.
You can hang different size banners on a cable if it's long enough for the longest banner.
Changing out banners is easier.
There are many ways to accomplish the cable system. A heavy-duty method is to use 1/8 or 3/16-inch aircraft cable or wire rope. You can buy it galvanized for long life. Put a galvanized or stainless turnbuckle at one or both ends and stretch it between two anchors in the wall. Use carabiners or screw-type links at each grommet to attach the top of the banner to the cable. The upper corners can be pulled tight with bungees or rope tied to the top wall anchors. Or, instead of tying off the top corners to the wall anchors, a cable clamp could possibly be used to clamp the corner carabiners to the wire itself, though I've never done this. Bottom corners can be tied off to two wall anchors with bungees, ropes or rope ratchets.
If you are stretching a banner across a street, I would use 1/4-inch wire rope rather than 1/8 or 3/16-inch.
Cable clamp:
About carabiners:
Sometimes the spring-loaded kind can unhook itself in windy conditions. The threaded type are more positive. They are available in both galvanized and stainless.
Wall anchors:
A simple anchor I have used is a heavy screw eye threaded into a lag screw shield. If the eye is too lightweight, it can pull open from the tension of stretching, unless you use a welded screw eye. I would not use anything smaller than 1/4-inch shank. Again, galvanized or stainless is best for a cable that is going to stay up for a while.
Tapcons:
I like self-tapping masonry screws. But they are not perfect. Some bricks are too hard, making it difficult to thread the screw in all the way. And some bricks are too soft, resulting in a stripped hole.
I find the Tapcon brand, in particular, to be disappointing. The same product in the Hilti brand is better in three ways: First, you can use a standard-size masonry bit instead of a special diameter Tapcon bit. Second, Hiltis are stronger per diameter size than Tapcons, though that is not a real issue with banners. Third, the galvanized Hilti version has a heavier coating than a galvanized Tapcon. I won't even use a blue-painted Tapcon because I don't like the way they rust so quickly (I've even seen them start to rust in the box). If the fastener is hidden, say inside a cabinet sign, rust may be a moot point, but an exposed fastener through the face of a sign, or serving as a banner anchor in plain view should be rust-resistant. It's the mark of a professional, in my opinion.
Turnbuckles:
Pictured is my favorite version. I prefer galvanized steel or stainless, rather than the kind that have aluminum components.
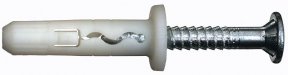
Hit fastener:
You may have a situation where a banner is to be put up and left indefinitely, and you feel you must drill a hole for a fastener at every grommet. A nylon hit-fastener is better than a Tapcon. After the hole is drilled, the hit fastener requires only a hammer to install. So you don't need to change from a drill bit to a driver bit for each fastener. Yes, I have use the quick-change bits with a Tapcon-type screw, where the driver slides over the drill bit for driving, but I still prefer the quickness of using a hammer to install a fastener. Hilti sells a drive-in fastener that has a nylon shank and a zinc-plated metal pin that has threads—you drive it in with a hammer but it can be backed out at any time with a Phillips bit.
I know I sound like a Hilti salesman, and yes, their stuff costs a little more. But the greatest part of the cost of an installation job is rarely the materials. It is almost always the labor. I've always believed that spending extra pennies on hardware could save dollars in time spent. Unless, of course, your labor is cheap or you work cheap yourself.

Web ratchet:
Never tried these for banners on walls. This is a picture of a ratcheting anchor used to secure 2-inch web tie-downs on truck loads. These could be used for stretching banners that have the 1-inch flat webbing sewn into the hems. I have never used these anchors for this, but it might be a quick install with only four attachment points.
Cheapie stuff:
One other item is a lightweight version of a ratcheting stretcher. I don't have a picture but it's made for stretching clothes lines. I have built clothes lines with these and they work great. I have always meant to use them on a wall with a clothes line stretched between them for a banner install, but I never did. They work for hanging queen-size sheets and blankets in the wind. Why not a banner on a wall? Clothes line wire stretches with time, of course, but the ratchet allows it to be tightened periodically with a half-inch wrench.
Plastic ties could be used at the grommets. Short term, of course.
Or, instead of plastic ties, these plastic hooks that I saw at a greenhouse supply:
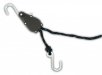
Rope Ratchets:
Rope ratchets are very handy.
I don't see why they could not be used for temporary banner installs.
They are made to be tie-downs. I had several versions of them on my truck for different jobs. I used a version with 1/8-inch rope for tarp tie-downs. The 1/4-inch rope version I used to tie off ladders and scaffolding, and for load tie-downs on trucks.
The version that takes a 3/8-inch rope I used for more than just tie-downs. When I painted wall jobs by myself, I threaded longer ropes through them and hooked them onto the top rungs of my ladders to raise my aluminum pick. Raising two or three feet at a time at each end, I could quickly get it to working height without a helper. After installing ladder jacks under the pick, I then released the tension on the ratchets but left them in place for lowering the pick later.
These ratchets are not really made for lifting. They can fail under a load. So this is not a safe way to lift anything, and could easily result in an OSHA bust. In fact, a pick-and-ladder setup itself is an OSHA violation in Kansas City. I assume elsewhere as well. I abandoned pick-and-ladders when I acquired a set of pump jacks, those foot-operated gizmos that can climb a 4x4 post. They were amazing. My helper loved them. He thought they were fun. Then I quit using them, too, after I bought a bucket truck.
Now my favorite piece of equipment is my Lay-z-Boy.
Brad in Kansas City
Attachments


visual800
Active Member
I just installed a 6' x 20' banner by myself on block wall.
i figure out where banner is gonna be and get up there and drill hole and put 1 anchor in corner
i then go all the way to other end and drill hole and temp tap the corner up to reduce weight
then go back and pull and drill along top
i dont measure if im putting on black or brick since they have groutlines to go by
all i need is ladder, drill and anchors.