• I want to thank all the members that have upgraded your accounts. I truly appreciate your support of the site monetarily. Supporting the site keeps this site up and running as a lot of work daily goes on behind the scenes. Click to Support Signs101 ...

Never Any Answers For This X3 Question

RedlineMan

New Member
Howdy;

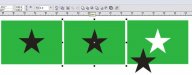
I've had some frustration with this on many occasions, but no one has ever come up with an anwer. I often make complex objects by cutting the shape of one object out of another. In other words, using a foreground object as a tool to remove it's shape from the object behind it. This should leave a visible hole in the shape of the foreground object in the background object when it is selected with the pick tool (see pic #1).

Under certain circumstances where one object has been cut out of another, the area that I have cut out is not visibly removed when selected with the pick tool, but when selected with the shape tool, you can clearly see the vectors of the cut, i.e. the cut has taken place in the vector sense, but the color (green) has not been removed in the visual sense (see pic #2).

This is not a problem in terms of getting the vinyl cut there, because the vectors are in place. However, it can be confusing when laying out a design when elements are not removed visually. Also, it is a problem when you want to add certain things like outlines, create drop shadows, etc, within that "openning" in the background object.

Obviously, there are certain attributes of some of these objects or certain circumstances that do not allow the material to be visibly removed. Does anyone have any idea of what those attributes or circumstances might be, and how to correct this problem??
 

Attachments

  • Example1.jpg
    Example1.jpg
    25.5 KB · Views: 90
  • Example2.jpg
    Example2.jpg
    28.9 KB · Views: 73

vid

New Member
yeaaaaaaah ---

It's been a while since I've played with Corel.

But there's an issue with a node or line direction that is confusing Corel.

Your top object my have an unconnected node.

There's also a way in Corel to define the direction that the shape is drawn. There may be conflicts between the direction that the two objects where drawn that's causing that issue.

Sorry, but that's my best guess. It's a head scratcher for sure.

Good Luck!
 

rcook99

New Member
Not sure if I understand your question totally but what if you made the square with the star as shown in the pic, then grab both objects and use the back minus front button that will nock out the front object.
 

S'N'S

New Member
Not sure if I understand your question totally but what if you made the square with the star as shown in the pic, then grab both objects and use the back minus front button that will nock out the front object.

Exactly the way I do it........select both objects then go Arrange > Shaping > Back minus front. Your using the trim function which will cut out the shape but leaves it in place.
 

rcook99

New Member
Originally Posted by SNS Exactly the way I do it........select both objects then go Arrange > Shaping > Back minus front. Your using the trim function which will cut out the shape but leaves it in place.

Not sure what version you are using but there is a shorter way to do it with out going through all of your steps by just grabbng both images and look at your toolbar across the top and you will see a number of squares in a row and each one perfroms a different fuction. (Weld,Trim,Simplify,Front minus back, Back minus front, combine) it is a nice shortcut in place of using the 3 steps your using. Give it a try you will save a few steps with them.
 

GAC05

Quit buggin' me
In your example you have a closed path(star) completely inside a second closed path(rectangle) There is no need to trim or weld these, you should use "combine" (ctr+l) to make them a single compound path.

wayne k
guam usa
 

S'N'S

New Member
Not sure what version you are using but there is a shorter way to do it with out going through all of your steps by just grabbng both images and look at your toolbar across the top and you will see a number of squares in a row and each one perfroms a different fuction. (Weld,Trim,Simplify,Front minus back, Back minus front, combine) it is a nice shortcut in place of using the 3 steps your using. Give it a try you will save a few steps with them.

Thanks, I'm using Corel X3 but I had to get that toolbar back (for some reason it wasn't there, is now), just reset the factory settings.
I don't use corel much and still learning it myself. Cheers
 

mamos

New Member
Using the shape tool (F10) select the offending object and click on the 'Reverse Curve Direction' button in the tool bar. (it looks like two curved arrows, one pointing up and the other down)

Now combine the objects or back minus front which ever you normally do

This should work.

In X3 you need to break apart the combined objects before you can reverse the curve direction. In X4 you can reverse the subcurve direction in situe.

mamos
 

RedlineMan

New Member
Using the shape tool (F10) select the offending object and click on the 'Reverse Curve Direction' button in the tool bar. (it looks like two curved arrows, one pointing up and the other down)

Now combine the objects or back minus front which ever you normally do

This should work.

In X3 you need to break apart the combined objects before you can reverse the curve direction. In X4 you can reverse the subcurve direction in situe.

mamos
Ha!

Others hinted at this here, and I've had others hint at this in previous posts here, but no one ever just came out and explained it. Thanks... it worked! :thumb:
 

rcook99

New Member
Redline, Did you try any of the other suggestions to see if it works for you? just curious as all three ways seem to do the same thing, just different steps to get there.


I tried the other way using the F10 key but was unable to get the reverse button to open up and be usable.
 

Joe Diaz

New Member
I know exactly what you’re talking about. It happens to me all the time. Usually when doing complex shapes. Not sure why.

Here is anouther way to fix the problem: Make a larger shape outside of the glitchy trimmed or combined shape in question. Trim, not combine that shape into the larger one you just created. Delete the first glichy shape leaving behind the new one you created. Break apart the new shape you just created. Delete the outermost shape from the broken apart shape. And Combine what’s left. That should fix the problem.

I've never tried the reverse curve direction command before. Next time I run into this problem. I'll give it a try. It sounds like it's alot quicker then the one I've been using. You learn something new every day.
 

mamos

New Member
I used to try loads of different solutions before I came across the reverse curve solution.

It is the easiest once you get the hang of it

Also, instead of breaking apart a complex object containing many subpaths just to work on one wayward subpath, you can use the 'extract subpath' button two to right fron reverse curve button.

Select any node on the subpath you want to extract then press the extract subpath button and it just breaks that path away.

I tends to end up at the bottom of the stack so you have to search for it

mamos
 

RedlineMan

New Member
Redline, Did you try any of the other suggestions to see if it works for you? just curious as all three ways seem to do the same thing, just different steps to get there.

I tried the other way using the F10 key but was unable to get the reverse button to open up and be usable.
Hey;

I just went back and fooled with it a bit. I did not have any of the items that I was originally having trouble with, as I had already gone ahead and finished my work on them. However, I did create some new ones and was able to replicate the problem.

First, simply drawing a geometric shape does not avail you of the "reverse curve" function. The object must be converted to curves and then the reverse function is available. At first I drew a square and then a star on top of it. Both the Trim and Front Minus Back functions worked. However, when I reversed the curve of the star, neither worked. This is interesting, since I had been trying the trimming with a star I had drawn previously, and it would not work. I had modified the star to some degree, but I would have tought it should have still been "in the direction" that it was originally drawn.

Why the software seems to draw things in different directions - or reverses their directions as you manipulate them - at different times I do not know. However, at least I now have another thing to check for to alleviate the problem. So far so good!
 

rcook99

New Member
Glad to see you have it all figured out, its amazing the little quarks that some of the programs have.

Have a great day.
 

mamos

New Member
Another thing to keep in the back of your mind for when things don't happen quite how they should is the reduce nodes button.

You have to select all nodes on a path but clicking the button next the the reduce node(or CTRL+A or drag a marquee around the shape) then click reduce nodes.

Keep an eye on the task bar at the bottom of the screen and it will show you how many node are on the path before and after you have reduced them.

You can also use the slider next to the reduced node button to smooth out your path even more but keep an eye on the shape as you are doing it as it can have a dramatic effect on the shape.

And remember CTRL+Z is your best friend

mamos
 

K Chez

New Member
Ahh, the dreaded "winding rule"....

Had grief with this for a while, but got it figured out through the Corel User forum.
 

CES020

New Member
Couldn't you use the Smartfill tool to create the new object with just a click or so? Then delete the original objects? Maybe not a better way, but perhaps another way, just the same. I use Smartfill in cases like this all the time. I love that tool.
 

RedlineMan

New Member
Heyu;

Thanks to all who have chimed in. I hope we all got something from it. This has all been very instructive for me. There's still a ton to learn about the software, but I've also picked up a fair amount in this process.

I have always been a bigtime node assassin. I spend a TON of time reducing the number of nodes, as I feel it clearly offers a better outcome. I work in fairly large formats (car graphics), and you can really see when someone simply creates a design and cuts it. You end up with a lot of spurious nodes and lumpy vectors. I think removing nodes and smoothing vectors makes the difference between a graphic and an artwork.

I have found that simply reducing the number of nodes has solved some of the Trim problems I have had. It CERTAINLY also helps when you try and turn an outline into an object. Many times if you do not reduce, the program locks up. Reduce, and it works just fine. On ocassions where reduction still does not do the trick for Trimming, Changing the Node Path Direction usually fixs it.

:clapping:
 
Top