Yes I’m in Florida. Yes I do have the manual. I did switch the cap top idk what else to try.You are not pulling ink through the M/Y head. That is the first issue that must be solved. There are several adjustment to be made to insure the capping is correct. Do you have a service manual?
Those are the fuses. Measure them with a resistance meter on it's most sensitive scale. They should read zero. If either of them reads open, that indicates either a damaged or incorrectly inserted ribbon, a shorted transistor on the main board or a bad print head.
Where are you located in Florida?
-
I want to thank all the members that have upgraded your accounts. I truly appreciate your support of the site monetarily. Supporting the site keeps this site up and running as a lot of work daily goes on behind the scenes. Click to Support Signs101 ...
You are using an out of date browser. It may not display this or other websites correctly.
You should upgrade or use an alternative browser.
You should upgrade or use an alternative browser.
Roland sp 300-v
- Thread starter j0el1212
- Start date
Jim Hancock
Old School Technician
What town?
Debary in between Sanford and Orange city.What town?
So here’s the latest. I put the Blk and blue dampers in the magenta and yellow print head and the magenta and yellow dampers in the Blk and blue print head nothing came out in the test print of the magenta and yellow but the black and blue came out perfect. So is it safe to say it isn’t the fuse it can’t be the cap top or the print head or ribbons. Even tho the Magenta and yellow dampers are new I have a feeling that’s the only thing that makes senses. Any other ideas?
Should I just buy knew dampers again and where can I find reliable one?
Should I just buy knew dampers again and where can I find reliable one?
Jim Hancock
Old School Technician
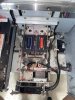
Please post a pic of the caps after you did the above. When you do this damper swap, you must do at the very least a medium cleaning to flush the previous ink colors out of the head. You will see a change in the color of the inside of the caps, where the K/C left cap is looking M/Y and the M/Y right cap is now K/C. It is very important to post the cap pic for a true assessment if the damper swap was done correctly and the caps are doing their job. This pic will determine the next step.
Please post a pic of the caps after you did the above. When you do this damper swap, you must do at the very least a medium cleaning to flush the previous ink colors out of the head. You will see a change in the color of the inside of the caps, where the K/C left cap is looking M/Y and the M/Y right cap is now K/C. It is very important to post the cap pic for a true assessment if the damper swap was done correctly and the caps are doing their job. This pic will determine the next step.
Attachments
Jim Hancock
Old School Technician
OK, you are not pulling ink through the M/Y head yet. If you were, you would see the color change I described. Also, the M/Y cap looks dry, while the K/C cap is wet. So this is the first thing you must fix. Any other steps are a waste of time until you know you have ink going through the head. Let me gather up the necessary procedures and tests to move forward. I will reply in detail in the morning.
Jim Hancock
Old School Technician
These are the steps that need to be taken next:
1. "Intialize the limit". After doing this step, go into service mode and do a test print. Ignore the test print results, but instead check the cap to head alignment. Do this so you can see where the machine parks the head through the normal operation. If the alignment is off, note which way and how much. To adjust this, move the print carriage out of the way and do steps 7-10 in the "Initialize the limit" document. Run the "Intialize the limit", restart in service mode , do a test print and observe the cap/head alignment. Once the alignment is perfect, do the cap height adjustment.
2. Do a power clean, observing the clear line coming from the M/Y cap, watching for ink coming through that line. If you are still not getting ink through that line, disconnect it at the Y fitting, put a syringe on the line and pull gently. If you are pulling air or ink with air bubbles, then I suggest you replace the cap with an Roland OEM cap. Using aftermarket caps are like rolling the dice, with a good chance of getting a poorly manufactured one.
Please post the results and I will advise the next step.
Attachments
Finally got a the Roland OEM cap top and install it same results. Now I’m doing the limit initialize. Wish me luck.These are the steps that need to be taken next:
1. "Intialize the limit". After doing this step, go into service mode and do a test print. Ignore the test print results, but instead check the cap to head alignment. Do this so you can see where the machine parks the head through the normal operation. If the alignment is off, note which way and how much. To adjust this, move the print carriage out of the way and do steps 7-10 in the "Initialize the limit" document. Run the "Intialize the limit", restart in service mode , do a test print and observe the cap/head alignment. Once the alignment is perfect, do the cap height adjustment.
2. Do a power clean, observing the clear line coming from the M/Y cap, watching for ink coming through that line. If you are still not getting ink through that line, disconnect it at the Y fitting, put a syringe on the line and pull gently. If you are pulling air or ink with air bubbles, then I suggest you replace the cap with an Roland OEM cap. Using aftermarket caps are like rolling the dice, with a good chance of getting a poorly manufactured one.
Please post the results and I will advise the next step.
Last edited:

Jim Hancock
Old School Technician
On the road today. Please call me. 561-441-6658.