• I want to thank all the members that have upgraded your accounts. I truly appreciate your support of the site monetarily. Supporting the site keeps this site up and running as a lot of work daily goes on behind the scenes. Click to Support Signs101 ...

Screws in Enamel Paint Can Lids

stickybeak

New Member
hey everyone!
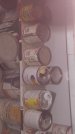
this is probably a really silly question, but i feel like i'm doing something wrong and maybe someone here can set me straight. i have seen several sign painters putting screws into their cans of enamel so that it never skins over as it has less oxygen getting into the can, i thought this seemed like a great idea and after reading a few threads in different parts of the internet thought i'd try it.

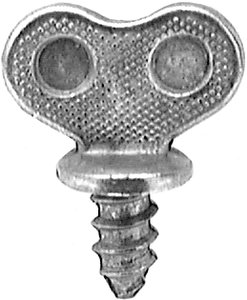
first i got some sheet metal self tapping screws to try and after putting one in the lid of a fresh can of paint, and taking it out only once, the next time i put it in, it was loose in its hole and wasn't making a seal at all, so then i read somewhere that someone used hex head roofing screws with the little plastic washer on them so i got some to try and after putting it in and taking it out maybe three times, it is ALSO loose and not making a seal! i feel like a complete ninny and i'm guessing i've overlooked a step or have done something wrong for this little trick to fail so completely for me...

is it because the tin that the lid of the can is made of is so thin it's bowing and the hole for the screw is stretching(? not even sure that's a thing that can happen?) anyway, hoping i haven't completely buggered up a fresh quart of enamel with this! should have tried it on one of my little half pint cans in retrospect, ah well... live and learn! any info, pictures, or ideas would be highly appreciated!

all the best, george
 

Gino

Premium Subscriber
All of those ways of screws or covering it with wax paper and whatnot are dumb stories. They are all cover ups for being a slob. Just clean the rim completely and put the lid back on properly. Don't add ANYTHING to your paint like thinners, additives, Japan drier, penetrol or anything else. Use those things while paletting only.

What makes paint dry ?? Basically air . So, when air gets inside the can, as when you close the can up......it can start the drying agents into motion. You need to make the air pocket smaller inside the can. Either put the remaining paint into a smaller can or put a over over it, inside. Then the air can't start the process..... or at least not much.
 

Kottwitz-Graphics

New Member
I never used that screw trick. Go to Amazon and buy a pack of Paint Stretcher Spouts. They will fit on pints, quarts, and gallon cans, and keeps the paint from collecting in the rim. They are reusable, and a pack of 50 has lasted me over 2 years, with lots left.

As far as air inside the can, I've heard of a product called bloxegene, which sprays out carbon dioxide, and you spray it in the can to remove the air, so no paint skin. I've never tried it, and in sure you can try the canned air from Wal-Mart, but I start the lid, take a deep breath, and exhale into the can as I'm closing it. It works for me...
 

tbullo

Superunknown
I have been doing the screw in the lid of my lettering enamels for over 15 years. I rarely get a skin and use all the paint. I use a 1/2'' long self tapping screw with a washer tacked on the top. When i'm done with a can of paint the screw goes into the new can. The picture shows a few of my cans. Some of them still have the shipping clips on them.
 

Attachments

  • 0830170824.jpg
    0830170824.jpg
    487.1 KB · Views: 772

gixxer2004

New Member
My dad has been hand lettering for 50 plus years and has used pan head screws in the top of his cans for the last 25 yrs. He also throws in a few 1/2" round metal pieces that he got for free at a local steel shop....similar to the ball bearings in the bottom of an aerosol can. He never had problems with the screws being loose, I think they will tighten up over time as paint dries around the screw. He tends to waste less paint because he squirts a small amount into 1 oz dixie cups.
 

Attachments

  • screw.jpg
    screw.jpg
    141.8 KB · Views: 751

Johnny Best

Active Member
I have taken a nail and punched holes around the rim of paint cans to let the paint drain back in when I first open up a new can of paint, but those get filled in pretty quick.
But have never screwed the lids down or blew into the cans afterwards to remove air.
It was a sort of ritual to remove the lids and take my pocketknife and cut the skin away from the edge. Lift out the hardened layer, scrape off any liquid excess and discard dried skin into the trash. Pour out what I need and proceed to work.
I will admit that it is a thing of beauty to see the cut away edges of layers in the can as it get used up.
Always on varnish cans I will pour into another can with a cheesecloth strainer across the top to get out any particles that get into it from cutting the layers off.
Will have to try the screw thing but I am not really worried about the skin on top and then I would have to find a tool to back the screws out to get to the paint. And another thing, that skin has save paint from spilling everywhere when the can gets knocked over.
FYI the upside down thing works great on that healthy peanut butter than has the oil on top.
 

d fleming

New Member
+1 for punching a nail hole in rim. I also put just enough clean spirits on top to cover paint in can then seal. No skin.
 

studio 440

New Member
I agree with johnny have been doing this for years poke holes in the drip rail clean out rim with rag reseal, last for years. And it is not the air that dries paint but the evaporation of the solvent weather it is thinner or water based thus combining the molecules of pigment and varnish or acrylic polymer and pigment.But sadly the removal of lead in the enamels shortens the durability and workability of those paints
 
Last edited:

stickybeak

New Member
thanks all for your replies and photos! i understand that it's the drying of the solvents and hardeners that makes the paint skin up on top, and i've heard people tell (and experienced it myself with older cans of paint at trade school) that once you get to the bottom the hardener has all been thrown away with the skins and the paint left takes a long time to dry if at all...

i also know about cleaning the rim and had heard of people punching holes in the rim to let the excess drain out, on the cans i have that i am opening fully they're all kept very clean as i just use a butter knife to put what i need into a dixie cup, i just figured the screw in the lid trick was a good option so that my larger quart cans weren't going to skin as badly if i wasn't using them as regularly and this way i use all the paint to the bottom instead of losing "hamburgers" of paint along the way haha!

at the moment the screw seems so loose in there that i definitely don't want to store it upside down, even shaking it seems risky at the moment... i might go back to the hardware store and see if i can find some screws with a coarser thread, or less pitch on the thread maybe... luckily one of my housemates is a hobby machinist so i could probably run the issue by him and he might have an idea too!

keep the replies coming though, i'd love to see and hear how more of you keep your cans! i'll try and post some pictures of the screws i've tried and the issue i'm having. cheers!
 

S'N'S

New Member
My old man used to his paint tins upside down so that "if" it did skin you can still use the paint as the usable paint is on top when can is righted and opened.
 
Last edited:

signbrad

New Member
this is probably a really silly question

No, it isn't a silly question. Those who ridicule others for their questions are rarely effective as teachers, because ridicule stifles curiosity and learning. Never stop asking questions.
"The people who don't ask questions remain clueless throughout their lives." —Neil deGrasse Tyson.
..........................

There are a number of good suggestions that have been given here. I believe they have all been used with varying degrees of success.

SHAKE FIRST
The first step in having your paint last a long time is thorough mixing at the beginning. When paint sits on a shelf for a long time, whether in the supplier's warehouse or at your shop, the components want to separate. An initial shaking gives you a good dispersal of all the components from the start. If your supplier cannot shake the paint on a machine, buying a paint shaker is a good investment for a sign shop. A machine will always mix your paint better than you can by stirring. And shaking by hand is not effective. These machines can be bought inexpensively through "freight salvage" type stores. The cheap ones are not good enough for a paint store to use, but they work for a sign shop. You can also use the shaker to clean empty cans for re-use, and to mix components together in quantity for a job, such as when adding thinner or catalyst, prior to painting. A machine can also make short work of shaking aerosol cans.
Matthews recommends shaking their base colors before loading them to the mixing station. This is especially important with the metallic toners, which always have a lot of solids in the bottom of the can when you get them from the supplier. The mixing station does not do a good job of mixing them if they aren't shaken first.

THE SCREW METHOD
I used the screw method for a while years ago. I don't recall whether it actually prevented skins. But it was a non-messy way to pour out paint into paper cups when out on a job lettering a race car or a boat transom. I used thumb screws rather than sheet metal screws. Thumb screws are sort of like wing nuts, but they are screws instead, with a head almost as big as a dime that you turn by hand. The screw method was never practical for pouring out larger quantities of color, of course.

ANTI SKINNING AGENTS
I used to use a product called Paint Sav to prevent skinning, though I haven't seen it for a long time. You just dribble a small amount on top of the paint before you replace the lid. It prevented the paint from forming a skin and the manufacturer claimed it had no harmful effect on durability or drying. There are other, similar products.
Using CO² gas sounds like it should work. It is heavier than air and should theoretically displace oxygen in the top of the can. Skinning is from oxidation and polymerization of the surface of the paint where it meets the air. So, displacing the oxygen, whether by liquid or gas, sounds reasonable.

DON'T BUY TOO MUCH PAINT
I think it's important to buy paint in no larger quantities (or cans) than you can use in a reasonable amount of time. If you only use smaller quantities, buy half pints, for example, rather than quarts. Or, if you use most of a gallon, but not all of it, pour it off into a smaller can, as Gino suggested, filling the small can as much as possible. I saved small jars just for this purpose. One Shot used to be available in quarter pint cans, but I haven't seen them for years.
I've even heard of sign painters who bought empty paint tubes, such as artists use, and filled them with lettering colors.
When you want a small quantity of paint, dipping it out of the can with a palette knife, instead of pouring, will keep the can lip clean. Taking paint out of a can this way is quick and easy, though if you've never seen it done it's hard to describe. You pull the knife straight up out of the paint and quickly scrape the blade in a downward motion onto the edge of a paper cup held over the can. It's a rapid up and down, up and down. I can quickly fill a 3-ounce cup this way in just a few seconds.

NO MORE THAN SEVEN SKINS
When a skin forms and you remove it, you are removing binder. Remove too much binder and the paint will not endure. How much is too much? I once read somewhere many years ago that the magic number is seven. You can remove up to seven skins from lettering color without seriously damaging the paint. I also saw a comment once by Kent Smith, author of Gold Leaf Techniques, mentioning this same number. Unfortunately, I have not been able to find where I read either reference.

Brad in Kansas City
 

JR's

New Member
I used this method for my traveling kit.
It worked good, but it was for small amounts of paint.
That I would dispense into a non-wax Dixie cup.
 

Attachments

  • Empty Aluminum Paint Tubes.jpg
    Empty Aluminum Paint Tubes.jpg
    34.2 KB · Views: 628

Billct2

Active Member
Oh, for the days when this was the big subject for debate! Back when I tried all the tricks. When I tried screws I used eye screws so I had a little handle to tighten. Seemed to slow it down but not completely. I have a feeling the lids are thinner like you said which could interfere. Me, I eventually just got used to dealing with the skins.
 
Top