• I want to thank all the members that have upgraded your accounts. I truly appreciate your support of the site monetarily. Supporting the site keeps this site up and running as a lot of work daily goes on behind the scenes. Click to Support Signs101 ...

Seiko W64-S head replacement cartridge ?

HERMAN

HERMAN
Hi Folks,
I am thinking of changing my black print head, and the manual book page 3-19 need "Print head replacement cartridge" to be installed in the black ink cartridge slot.
Can someone tell me if there is a way to bypass this step caused we don't have such replacement print head cartridge.
Or any way not to follow the lcd wizard ?
Appreciate for your advise.

Cheers,
 

RustyNZ

New Member
Hi Folks,
I am thinking of changing my black print head, and the manual book page 3-19 need "Print head replacement cartridge" to be installed in the black ink cartridge slot.
Can someone tell me if there is a way to bypass this step caused we don't have such replacement print head cartridge.
Or any way not to follow the lcd wizard ?
Appreciate for your advise.

Cheers,

Hi,

Yes you can change it without those cartridges (I've done two myself).

I'm still new to working on these printers (and the whole industry in general) but I have done two and this is what I follow. Read through first because there is a part you might get stuck (sucking ink under the caps).

Don't tell the machine to go in to PH replace mode instead tell it to go to Cap Clean, once the head has moved over to the left side of machine turn off the printer ***be aware your heads are not capped, do not leave it like this for too long or your heads could block up with dry ink***, replace the print head, turn on the printer, suck some ink through the line from under the caps (disconnect from cap pump and hook up a syringe to pull through ink, you might not be able to do this without the right connector so maybe look at this part before you do anything, I personally carry a hose with one of those connectors in my toolkit), input the print head serial and voltages in CP Manager, test the printer and do your mechanical and electronic adjustments.

Note that this will NOT reset the printhead so in CP Manager or on print head status printouts it will show that your printhead is still the original one with that manufacture date and the usage will just keep counting up so you might want to screenshot that stuff first if you ever need to work out how much it's done.

Something else that is handy to know is that the rear screw on the print head is quite tricky to unscrew/screw because it is in a tricky spot. I recommend you have a small ratchet and some sockets handy with an extension because it is much easier to undo it using these than a screwdriver (they are hex type screws so you can use a socket on them). If you don't have that then it's going to be hard and I think you need a phillips #2 100mm plastic handled screwdriver (one with a fairly small handle or it gets in the way).
 

HERMAN

HERMAN
Thanks Justin,
My situation was firstly the ink on the black printhead to the cartridge didn't flow, when I opened the connector from the black printhead, the ink was sucked in to the cartridge line.
And now thinking of changing to 4 colors configuration will move the Lc head to replace the black.
Your explanation was quite clear for me, and just want to make sure the following:
1. I have opened the prime pump and takeout a bigger line that go to the cap, is this from here we will suck the ink with syringe ? ( I will find the correct connector).
2. When You input the printhead detail in CP Manager, was the printer still on cap cleaning State?
3. When you finish installing the head, how to bring the ink flow back from the cartridge to the printhead line?

Do you need to recharge the ink before we do the test print or not necessary?

Thanks again to you.

Cheers,
 

RustyNZ

New Member
Thanks Justin,
My situation was firstly the ink on the black printhead to the cartridge didn't flow, when I opened the connector from the black printhead, the ink was sucked in to the cartridge line.
And now thinking of changing to 4 colors configuration will move the Lc head to replace the black.
Your explanation was quite clear for me, and just want to make sure the following:
1. I have opened the prime pump and takeout a bigger line that go to the cap, is this from here we will suck the ink with syringe ? ( I will find the correct connector).
2. When You input the printhead detail in CP Manager, was the printer still on cap cleaning State?
3. When you finish installing the head, how to bring the ink flow back from the cartridge to the printhead line?

Do you need to recharge the ink before we do the test print or not necessary?

Thanks again to you.

Cheers,
Hi,

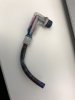
I've taken a photo of the connector (and hopefully attached it) that I use and has a tube attached for my syringe. I think this is the exact same connector you will see in your machine and will have to unscrew the plastic hex nut from the tube then connect your connector like mine and hook a syringe up. This process is essentially doing an ink charge just on the one line you have connected it to.

1. I think that is right, compare with my connector. Basically it's the tube that comes down out of the cap and connects to the pump connector.

2. The printer will not be on cap cleaning state once you turn it back on, the head will automatically move back to the home position and printer should just boot up in to 'ready' state.

3. As above, the process of using the syringe to pull the ink through is essentially a charge, ink will come through the lines, in to the head then down to the cap station. Once the line is full and if ink has hit your syringe (excusing any ink that might have been in there at the very start) you will know it is charged.

Just to advise again, I am still new to this, I believe all this to be true and correct and this is the process which I was trained to replace the heads by a very knowledgeable qualified tech. As I said before, I have replaced 2 heads using this procedure, one was at least 2 months ago and all is well, the other about a month ago and also all is well.

Happy to help :)
 

Attachments

  • file-9.jpeg
    file-9.jpeg
    178.7 KB · Views: 223

HERMAN

HERMAN
Thanks Justin,
I don't have such connector, where do you get that from ? or where can I buy it from ?
Cheers,
 

RustyNZ

New Member
Thanks Justin,
I don't have such connector, where do you get that from ? or where can I buy it from ?
Cheers,
Hi, not too sure where to get one sorry. I believe mine was likely off an old pump (if it connects directly to the pump). I am pretty sure this is just one of the connectors in there that you are going to remove. Sorry, I don't have one of those machines I have the H series instead which is a bit different. Maybe a local hardware or electronics store could have something that will screw in to that hex nut.
 

InkDifferent

New Member
Hi,

Yes you can change it without those cartridges (I've done two myself).

I'm still new to working on these printers (and the whole industry in general) but I have done two and this is what I follow. Read through first because there is a part you might get stuck (sucking ink under the caps).

Don't tell the machine to go in to PH replace mode instead tell it to go to Cap Clean, once the head has moved over to the left side of machine turn off the printer ***be aware your heads are not capped, do not leave it like this for too long or your heads could block up with dry ink***, replace the print head, turn on the printer, suck some ink through the line from under the caps (disconnect from cap pump and hook up a syringe to pull through ink, you might not be able to do this without the right connector so maybe look at this part before you do anything, I personally carry a hose with one of those connectors in my toolkit), input the print head serial and voltages in CP Manager, test the printer and do your mechanical and electronic adjustments.

Note that this will NOT reset the printhead so in CP Manager or on print head status printouts it will show that your printhead is still the original one with that manufacture date and the usage will just keep counting up so you might want to screenshot that stuff first if you ever need to work out how much it's done.

Something else that is handy to know is that the rear screw on the print head is quite tricky to unscrew/screw because it is in a tricky spot. I recommend you have a small ratchet and some sockets handy with an extension because it is much easier to undo it using these than a screwdriver (they are hex type screws so you can use a socket on them). If you don't have that then it's going to be hard and I think you need a phillips #2 100mm plastic handled screwdriver (one with a fairly small handle or it gets in the way).


Hello my friend, Im about to change the print heads on my printer as well. What do you mean by mechanical and electronic adjustments??
 

RustyNZ

New Member
Hello my friend, Im about to change the print heads on my printer as well. What do you mean by mechanical and electronic adjustments??

I haven't done one for a while now but you need to do some adjustments like nozzle position, head position, head L/R adjustments. It's normal to have to do these adjustments (or similar) when replacing a print head. The procedure is outlined in the Service Manual, you could try asking on here if someone has one.
 
Top