-
I want to thank all the members that have upgraded your accounts. I truly appreciate your support of the site monetarily. Supporting the site keeps this site up and running as a lot of work daily goes on behind the scenes. Click to Support Signs101 ...
You are using an out of date browser. It may not display this or other websites correctly.
You should upgrade or use an alternative browser.
You should upgrade or use an alternative browser.
Simple carved sign
- Thread starter SignManiac
- Start date


Pat Whatley
New Member
Nice and clean. I really like the attachment to the posts.
SignManiac
New Member
Thanks Pat. I slot the side supports so the face is locked in and back screwed with counter sunk heads. Makes for a nice clean / strong support as well as another dimensional design element.
iSign
New Member
Bob, it might be simple in it's elegant visual impression, but certainly not it it's execution. The attachment method is very impressive as others have noted, as are the top finials.
I'd be interested in a bit more detail on the slot & back screw approach. I'm guessing a "tab" of PVC that is slightly below center of the sign, cut with a hook almost, to fit into a slot on those mounting bracket pieces & lock down into being centered to it?
Besides wanting to be inspired by any good ideas I can wrap my head around, I just struggled with a similar sign, so I wanted to find an improved method now.
Mine was a simple 2 sided non dimensional panel that I agreed to a 48 hour rush completion, because the largest golf tournament in Maui was starting this past weekend & this new restaurant was right in the middle of that territory, struggling to get signage approval in time. I designed & printed the layouts, routed the PVC panel & the posts the first day, primed & painted the posts that night, laminated, applied & assembled it the next day... but I only used PVC to save me paint time over the MDO option I usually would have used. I routed 1" deep, 1/2' wide grooves into 4x4 posts & had corresponding tabs in my panel. The realization I encountered half way through was that I am relying on the ground to hold this thing together. Because it was owner installed, I screwed temporary bracing boards across the whole deal to ensure that they didn't snap off a tab, or lose the parallel alignment of the posts. The slot & groove joint was very tight & assembled with a rubber mallet, but the freshly purchased 4x4's were still drying too...
Without too much more trouble, I could have used a solution like yours had I thought of it, or learned it here... maybe next time.
Deaton Design
New Member
Its beautiful Bob. Simple but elegant and very prominent.
SignManiac
New Member
Curious... do you route the pvc with a paint mask, then paint the letters and remove the mask or paint the letters without a mask?
Does that make sense?
Yes, paint pvc first, lay paint mask then route. slop on paint and remove mask carefully. Far faster that way. Just be really sure that your paint bonds well to the PVC so the mask doesn't lift paint or your screwed!
Perfect Bob. Very nice job. What paint do you find bonds the best to the pvc?
I had a Sherwin Williams outside sales guy in here yestereday telling me they now have an "adhesive" primer that sticks to PVC and even Melamine. He promised me a quart to try out in the shop. Wondering if you've ever heard of this?
I had a Sherwin Williams outside sales guy in here yestereday telling me they now have an "adhesive" primer that sticks to PVC and even Melamine. He promised me a quart to try out in the shop. Wondering if you've ever heard of this?
SignManiac
New Member
Bob, it might be simple in it's elegant visual impression, but certainly not it it's execution. The attachment method is very impressive as others have noted, as are the top finials.
I'd be interested in a bit more detail on the slot & back screw approach. I'm guessing a "tab" of PVC that is slightly below center of the sign, cut with a hook almost, to fit into a slot on those mounting bracket pieces & lock down into being centered to it?
Besides wanting to be inspired by any good ideas I can wrap my head around, I just struggled with a similar sign, so I wanted to find an improved method now.
Mine was a simple 2 sided non dimensional panel that I agreed to a 48 hour rush completion, because the largest golf tournament in Maui was starting this past weekend & this new restaurant was right in the middle of that territory, struggling to get signage approval in time. I designed & printed the layouts, routed the PVC panel & the posts the first day, primed & painted the posts that night, laminated, applied & assembled it the next day... but I only used PVC to save me paint time over the MDO option I usually would have used. I routed 1" deep, 1/2' wide grooves into 4x4 posts & had corresponding tabs in my panel. The realization I encountered half way through was that I am relying on the ground to hold this thing together. Because it was owner installed, I screwed temporary bracing boards across the whole deal to ensure that they didn't snap off a tab, or lose the parallel alignment of the posts. The slot & groove joint was very tight & assembled with a rubber mallet, but the freshly purchased 4x4's were still drying too...
Without too much more trouble, I could have used a solution like yours had I thought of it, or learned it here... maybe next time.
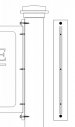
Doug here's my system. The side bracket that attaches to the posts has a 3/4" wide in this case, by lets say 24" high hog out recess of 3/8" deep that the sign face plugs into. I then counter sink my screws on the back side through the middle and into the edge of the sign portion. The you simply attach the sign holder brackets to the side of you post. I used lag bolts with painted plastic caps to cover the heads.
Attachments
Last edited:
SignManiac
New Member
I have no idea what brand of PVC my supplier is selling me. I'm sure it's the Chinese brand. I get mine from N. Glantz and have had no problems over the years. I sand all the parts and prime, then finish with three coats generally.Bob, what particular brand of PVC do you like to use?
How do you make "simple" look so darn good?
And to answer Johns question on the paint, I haven't tried SW paint yet. I've always used Behrs premium exterior semi gloss latex with good success. I imaging every manufactures better brands will do just fine. Behrs doe's offer their paints with the primer already in the paint which would save a step. It cost more but I think time is worth more than the added expense of the paint.
SignManiac
New Member
Yes sprayed with HVLP turbine setup.
iSign
New Member
Doug here's my system. The side bracket that attaches to the posts has a 3/4" wide in this case, by lets say 24" high hog out recess of 3/8" deep that the sign face plugs into. I then counter sink my screws on the back side through the middle and into the edge of the sign portion. The you simply attach the sign holder brackets to the side of you post. I used lag bolts with painted plastic caps to cover the heads.
thanks..
so, I'm now picturing a possibly 1" thick side bracket, so there remains 5/8" thickness of PVC material between the sign panel & the posts (on each side)
I had thought the side brackets had a slot all the way through at first, so that's where I got confused on what screwed to what...
...but each bracket is screwed to the panel, through that 5/8" remaining material (in my hypothetical 1' thick scenario) and countersunk to clear the screw head from obstructing with mounting the bracket to the posts. Got it!
Here's my little rush project:
(I will steal your idea for sure, next time..
along with the 3 panel sandwich,
& the nice round-over edge treatments)
http://islandsign.com/vc1.jpg
http://islandsign.com/vc2.jpg
http://islandsign.com/vc3.jpg
http://islandsign.com/vc4.jpg
http://islandsign.com/vc5.jpg
http://islandsign.com/vc6.jpg