• I want to thank all the members that have upgraded your accounts. I truly appreciate your support of the site monetarily. Supporting the site keeps this site up and running as a lot of work daily goes on behind the scenes. Click to Support Signs101 ...

Versacamm SP-300 head replacement, few questions.

frmdstryr

New Member
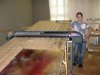
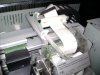
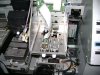
I recently bought a used SP-300, from a guy that had a racing shop and didn't use it in about a year. Right before selling it he got it serviced by a local shop but the company that serviced it went out of business (moved) so they never completely finished. So I got it with two things left to do: 1) replace one head and 2) connect the ink pump.

I have a service manual so I just replaced the head myself, not too bad (although i still have a few checks and adjustments to do). The ink lines are currently dry as they needed to be for shipping, and we have brand new ink cartridges waiting to be installed. I have to perform the Head Replace from the Ink Control menu which leads to my question, do I have to use cleaning solution first or can I simply put in ink.

I took a few pictures along the way... you can look at them here, http://picasaweb.google.com/FrmDstryr/Versacamm?authkey=Gv1sRgCJ70p-anyLzStAE#5474893346749784722 if you'd like.


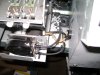
Another quick question regarding the ink pump. The original pump was replaced with the newer version and the connections aren't exactly the same. The service manual merely said connect the lines back up (it doesn't cover the new pump) so thats what I have done. Can anyone verify that this is the correct setup?

attachment.php

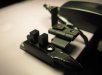
All I did was put a t-fitting on the two hoses coming from the ink head caps. The other hose goes into the ink drain container and I'm not sure if I'm missing any hoses or not...

Any help is appreciated, I'm really new to solvent printers.
 

Attachments

  • DSC00744.JPG
    DSC00744.JPG
    87 KB · Views: 1,508
Last edited by a moderator:

artbot

New Member
the cleaning solution is for brand new heads. the heads are tested out by the manufacturer with a waterbased ink. the cleaning solution (mostly ethylene glycol) is both compatible with water and solvents. so it can purge out the water based ink with out coagulating. if the prints heads have previously had solvent ink, or solvent cleaning solution in them, then you can go straight ink. also, you don't have to run the solution through the lines. it can be gently pushed through the head at the head adapter with a syringe and rubber tube. if the head is already installed, this can be a bit more tricky because you risk leaking solvent solution all over the print head pcb. also, look at the print lines. do they look wet inside or with dried plaque-like ink on the walls. if they are dried out, definitely cleaning solution copiously through them. that said. you can just make your own solution with 80% butyl cellosolve and about 20% acetone from sherwin williams for basic line purging work. it's nice to be able to just "waste" the stuff for $20 instead of nursing a similar amount of fluid that cost you $200.
 

frmdstryr

New Member
the cleaning solution is for brand new heads. the heads are tested out by the manufacturer with a waterbased ink. the cleaning solution (mostly ethylene glycol) is both compatible with water and solvents. so it can purge out the water based ink with out coagulating. if the prints heads have previously had solvent ink, or solvent cleaning solution in them, then you can go straight ink. also, you don't have to run the solution through the lines. it can be gently pushed through the head at the head adapter with a syringe and rubber tube. if the head is already installed, this can be a bit more tricky because you risk leaking solvent solution all over the print head pcb. also, look at the print lines. do they look wet inside or with dried plaque-like ink on the walls. if they are dried out, definitely cleaning solution copiously through them. that said. you can just make your own solution with 80% butyl cellosolve and about 20% acetone from sherwin williams for basic line purging work. it's nice to be able to just "waste" the stuff for $20 instead of nursing a similar amount of fluid that cost you $200.

Thanks for you're reply, this is exactly what I needed. The lines look like they've been flushed out really well, as they're clear (slightly faded to the color of the ink) but there isn't any build up from dried ink. They don't look wet either however. The new head that I just installed had small amounts of clear fluid on the bottom (i suppose cleaning solution), the other head (which was apparently still good so I left it in) looked dry but also didn't have any ink deposits whatsoever on it. It sounds to me like I can go ahead and install the ink. Here's a few pictures of the lines and the heads (new one installed and the one that was removed).

Ink lines
attachment.php

The little spots on the lines below are the only place I can see that have any ink deposits, they're very small.
attachment.php

Heres the two heads, the top is the new one, bottom is the one that's removed...

attachment.php


Is there any way of easily telling whether or not a head is actually bad? (other than running ink through i suppose)
 

Attachments

  • 1.jpg
    1.jpg
    77 KB · Views: 531
  • 2.jpg
    2.jpg
    123 KB · Views: 641
  • 3.jpg
    3.jpg
    71.5 KB · Views: 473
Last edited by a moderator:

artbot

New Member
those lines look very clean. no problem there.

maybe i didn't quite read correctly. if you have a brand new head (out of the box). definitely run (manually or all the way through the printer) some solvent cleaning solution. there's no way to guarantee that you don't have aqueous cleaning solution in that head (basically a combination of soap and water). some solvent inks don't mind a little water, some freak out and coagulate. so, don't put ink through it first if it's a new head.

as far as seeing if a head works you have to plug it in and do some printing (you can just put an old damper with the top plugged and a pin hole in the membrane at the top. but to see if it is electrically fine you can just plug it in and let it dangle to see if it doesn't boot properly (keep your mechanically dead heads around for doing diagnostics in this way, to prove if you have a head problem or a data/board problem.) all said, you don't need to align the head. just do a test pattern.
 

frmdstryr

New Member
Well it's good I didn't put ink in yet. I think i'm just going to use cartridges, don't want to risk spilling anything. Should I get empty cartridges and fill them with the sherwin williams solution you explained earlier or should I just buy cartridges of cleaning solution? What would you recommend? Thanks.
 

artbot

New Member
i've got cheap $8 plastic roland empties for my mimaki. if you think you might have waterbased solution in your head, you can mock up a syringe with a damper at the end also. the butyl cellosolve is just a carrier/purging/cleaning mechanism. you can go wrong by doing the solution first in the lines and then the ink. in fact it is the most fail safe method considering you have a brand new head which aren't cheap. in the future you can just go straight ink.

still keep a bottle of factory solution too. but use it for cleaning parts etc. it has the perfect balance of cellosolve and benzene for dried ink etc. but for really going through the solution, i like to use the home brew.
 
I am a Roland Tech....Put the Roland cartridges in and hit the Fill or Power Clean and .... you do NOT need to worry about the minimal fluids in the heads.
 

frmdstryr

New Member
Great, i'll just put in the ink then. Thanks Pacific Coast Sign & artbot.

Is there a specific humidity/temp range that the SP-300 should be kept in? Didn't check the user manual yet...
 

frmdstryr

New Member
Well the ink fed through fine, however there seems to be some worse issues, it won't test print, instead it is getting scan motor error 0040 (overcurrent/large load) and it's making some pretty horrible noises... Luckily these don't seem to be head related (as it fed 200+ ml into the drain cup, ouch....).

Problem 1:
Let me try to describe what happens and when. Upon turning it on, it goes through the cleaning process fine (more ink goes to waste :( ...). The menu says setup sheet, so I put in the vinyl and close the lever. The cutting carriage moves to the leftmost (from the front) pinch roller, then back to the right one sensing the positions, then the cutting carriage speeds up extremely fast and slams into the print head carriage (literally) causing the entire printer to wobble. It acts like nothing wrong has happened and displays the width of the material. If I do a test cut, it will cut without any problems (I haven't tried cutting anything other than a test cut). I assume that this is not normal, and something isn't setup right (but what???). The only confusing part is, that if I lifted the material lever and reset it in, the second time it would go back to the position next to the print head slowly and settle in place without any issues.


Problem 2:
If i try to send a print job or test print (pressing the button), after warming up the heaters, you can hear some loud clicking (almost like a gear slipping a few times, and I haven't located the source) and immediately it will display the error above, Scan Motor Error Code: 0040, Last: 0040 please turn off... So I turned it off and tried 2 more times with the same result. There is no material jams or anything, the print head doesn't even move away from the cap position (caps do come off though). I hope it's nothing internal...

I should post a video so you can really see/hear what's happening.

Please help!! Thanks.
 

Fatboy

New Member
send us a video clip.Are you sure the clicliing noice is not just the pump pulling the ink threw?
 

artbot

New Member
gaga gooey! you are not having fun. damn! yes do send that video it will be worth a ton of info. the scan motor isn't "zeroing" out before it takes off so it doesn't know where to stop. and then when it does it the second time it then knows where "0" is. the clicking noise is probably the pump motors. if you are used to how loud they are, they do sound very nasty. i've considered putting some sound insulation around them even because they irritate me. :I

if you just can't fix that scan motor error right away, you can in just a few minutes bypass the scan/measure function and make it only do it when you want. i attached a pic of mine.

i hate my printer measuring every freaking time i touch the lever.
 

Attachments

  • IR_switch.jpg
    IR_switch.jpg
    61.3 KB · Views: 192

frmdstryr

New Member
Yeah it's not the pump, that clicks pretty loud while pumping too (why haha) but there's another thing clicking somewhere.

I'll get a video up today.
 

frmdstryr

New Member
So this morning I tried it again, it's giving me the Service Call 0101, limit position error. If i hold left right and up, and press on to go to the limit initialization menu, i can move to cap position but when I try to set the blade position it gives me an Unrecoverable sensor error.... I have no idea what to do for this one.

This isn't fun.... I'm moving backwards!
 

artbot

New Member
i'd just start the day with a reinstall of the firmware. your machine has to get a fresh set of instructions before you do anything. maybe it thinks it's a sp540 or something and all the distances are off?

and fatboy! i've been messing with printers for about 12 years or so. look at this monstrosity. an encad 505 installed on giant ramps (covered with a zillion match box car wheels) to gravity feed heavy sheets of 5x10 aluminum. this thing was printing white way before even the big flatbeds.
 

Attachments

  • 505.jpg
    505.jpg
    36.7 KB · Views: 178

frmdstryr

New Member
That is awesome!! Haha.

Is there a way I can reset the firmware? I updated from 6.3 to 6.9 last night (it said it installed correctly), now it says, SP-??? on the menu, and I can't reinstall the firmware because the installer complains that it doesnt support it.

attachment.php

I don't think i'll be able to get it to do anything useful if it doesn't know what it is. Frustrating, guess i'll have to call Roland...
 

Attachments

  • 5.jpg
    5.jpg
    100.7 KB · Views: 192
  • 4.jpg
    4.jpg
    100.7 KB · Views: 676
Last edited by a moderator:

artbot

New Member
firmware is not my thing. this is getting really primitive. sounds like you'd have to do a "from scratch" install, the way the printer would be before any firmware existed...and not an upgrade, because it's now getting stupid on you. before you do that, do something easy (this won't help, but do it). power down from the front, the switch off from the back, then press the front power button four time slowly. this clears all the stray charges from the machine. sp's seems to have static charge build up and doing this procedure can actually repair printers that are malfunctioning. maybe even pull the battery. then go about the fascinating search for a full raw firmware install.
 

frmdstryr

New Member
Unrelated, but what's the proper way to dispose of the ink? The manual just says follow applicable laws yada yada...
 
Top