-
I want to thank all the members that have upgraded your accounts. I truly appreciate your support of the site monetarily. Supporting the site keeps this site up and running as a lot of work daily goes on behind the scenes. Click to Support Signs101 ...
You are using an out of date browser. It may not display this or other websites correctly.
You should upgrade or use an alternative browser.
You should upgrade or use an alternative browser.
VJ1604 E071 error code
- Thread starter heyskull
- Start date
never received the email mate, excatly what did you do to correct this problem? I've also tried cleaning the pinch rollers and I've examined the belt which appears to be in perfect condition.
We are getting really desperate now as we can't print any jobs, if anyone can help we'd really appreciate it.
There is a smear on the encoder disk, can i clean the disk? if so what should i use, lint free wipes and cleaning casette fluid?
We are getting really desperate now as we can't print any jobs, if anyone can help we'd really appreciate it.
There is a smear on the encoder disk, can i clean the disk? if so what should i use, lint free wipes and cleaning casette fluid?
CheapVehicleWrap
New Member
You shouldn't need anything as strong as cleaning solution. Up there someone suggested alcohol.
You shouldn't need anything as strong as cleaning solution. Up there someone suggested alcohol.
can I touch the "data" part of the disc, wouldn't that damage it? I heard they should never be touched, same as the encoder strip that runs across the carriage.
I think I have repaired it!!!!
I have had it to bits and there is no adjustment anywhere!!!!
It is all to do with the motor position.
The belt was not in the centre of the large plastic pulley and it was touching the side.
This was causing excess stress on the motor.
What I have done is shimmed the left hand side of the motor with a razor blade (thinnest shim I could find) and this has moved the belt over into the centre of the plastic pulley.
The belt is now almost touching the metal on the motor pulley now!
Now the machine moves back and forward without thudding and has stopped it bringing the E071 error code up.
What i think has happened over time is the tension of the belt has distorted the backing plate between the motor and the main spindle.
Really this should be strengthened so that it can't do this. Obvious this is a design fault!!!!!
Can you explain what you mean by "shimmed the left hand side of the motor with a razor blade"??
You shouldn't need anything as strong as cleaning solution. Up there someone suggested alcohol.
I don't have any alcohol to hand, could i just use water?

heyskull
New Member
Randya or Compilla
You are our tech gurus!!!!
What else can this thud be?
I am thinking it is maybe the clear encoding wheel.
But I have no clue as to how that is an issue and would cause it.
If I didn't know better I would say it's a bearing but I can feel no restriction when the machine is off.
It is now thudding and changing the wave pattern every 25-30mm previously it was doing it every 80mm!
I have a 30' print to go through the machine on Wednesday and don't want it to stop half way through!!!
Help and suggestions are greatly welcome..
Sean
heyskull
New Member
P.S.
I would call out a tech but they are all useless in the UK and just play swap a part until the problem goes away.
We have had techs in here who scared me when working on a plotter and printer as the didn't know what to do.
In fact I know as much if not more than most of them in the UK.
Sean
I would call out a tech but they are all useless in the UK and just play swap a part until the problem goes away.
We have had techs in here who scared me when working on a plotter and printer as the didn't know what to do.
In fact I know as much if not more than most of them in the UK.
Sean
I have attached some pictures now!!
Picture 1 is the banding issue!!!
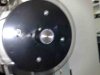
Picture 2 is looking down with no shims in the motor and the belt touching the encoder side
Picture 3 is with a shim in the left hand side of the motor The belt touches the inner part on the motor and sits almost in the middle of the big wheel.
Another thing to take into consideration over the last 2 weeks we have had the heating on in the print room.
We moved into these premises in the summer but our other premises had very very minimal heating. To say it is warm in there is an understatement.
Could the heat be causing a problem?
Sean
So mine here, looks like Picture 2 but it does not actually rub on the encoder.
the belt does not wander, but stays centered on the small pulley when running.
You could take and flip the encoder.
And clean the sensor.
Looks like you are missing counts, somewhere.
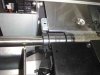
Please have a look at the attached photos. Does your printer have the white plastic spacer between the encoder pulley and the steel shaft? Is the coupling between the short shaft and main grit roller rigid or flexible type?
Attachments

guys, here is an image highlighting my problem, notice the wave pattern and the shadow text around SPICEBEAN, the shadow and wave pattern is caused by the slipping. This problem occurs around every 10 inches.
can anyone help?
Can anybody help with my issue?
There is a smear on the encoder disk, can i clean the disk? if so what should i use, lint free wipes and cleaning casette fluid?
The machine uses the tick marks on the encoder to determine how much to advance and what posistion it is at.
You can clean the encoder with denatured alcohol and an a non-shedding clean room wipe.
If the disk is damaged, it should be replaced
henryp
I don't have that white spacer between the encoder pulley and the steel shaft.
I do't know what you mean about the coupling but mine looks like picture 2.
SC
If inexplicable PF encoder errors occur on a VJ-16xx printer, there is a modification available to make the printer less sensitive to this problem.
The modification consists of the placing of an extra ring into the pulley.
By placing this ring, you avoid a situation where the pulley can get deformed when tightening the screws.
Tools necessary
Torque screwdriver
Pulley retainer (part number: DF-49456)
crosshead screwdriver
Procedure to install:
Loosen the two screws holding the pulley.
Install the pulley retainer ring. Make sure that the grooves in the ring slide into the correct place.
Push the ring as far as possible into the pulley.
Fasten the two screws alternating until you feel some resistance.
Set the torque screwdriver at 7.5kgf/cm.
Fix alternating the two screws to 7.5 ±1.5 kgf/cm.
Power ON the printer and load media.
Feed the media a couple of meters forward and backwards by the jog keys on the keyboard. This to verify there are no errors and the printer does not make any strange noises.
In case there are strange noises or errors occurring, reposition the pulley.
In case noises or errors keep occurring you need to install a new pulley and / or encoder disc.
The spacer ensures that the pulley remains straight and true when the screws are tightened, without the spacer, the pulley could veer towards one side or the other when the 2 screws are tightened with unequal force.
VERY IMPORTANT !!!
When tightening the screws, make sure that the encoder disc is always lightly touching the right hand side guide pin of the encoder sensor as it rotates. (This is the guide pin near the printer mechanism). In case the disc is positioned towards the left hand guide pin, you need to reposition the pulley.
Please note: This disc alignment should be checked and performed if required even on printers without the pulley retainer.
The coupling on picture 2 is a rigid type. If the 2 shafts are not aligned, you can have a tight spot when the grit roller rotates because the axis of rotation can vary. Imagine rolling a straight tube on a flat surface, then imagine rolling a bent one on the same surface, this is the same effect when straight or bent grit roller rotates on the bearings when feeding your media. Picture 3 is a flexible coupling, on this type, alignment of the shafts is not as critical because the joint is flexible and can compensate for a slight change in the axis of rotation.
Last edited:
heyskull
New Member
henryp
My disc is closer to the left hand of the encoder (outer) in some case touching!
It isn't touching the two parts of the right hand guide pin. It is touching the left hand one furthest from the printer mechanism!
I know this is the problem but I can't move the sensor out!
How do adjust this?
Do I adjust it at the coupling?
SC